Interact with Cisco ACI network through Python (Requests)
Introduction
In this blog post, we will address how we can use Python to work with Cisco ACI. It’ll focus on the very basics, trusting it gives you enough meat to tackle the more complex tasks on your own (e.g. create EPGs, contracts etc…)
Note about equipment
For all the examples, I will use my own APIC in my lab. However, if you want to follow along with this blog post, checkout the Cisco sandbox environment delivered by Cisco Devnet. To get a list of all sandboxes, check out this link. For this tutorial, you could use the always on ACI sandbox as well (see here).
Code to login to the APIC Controller
Cisco ACI uses a controller, called the APIC. The APIC exposes a REST API which is documented here. I encourage you to go through the information on that page as it gives you essentially all the knowledge you need to work programmatically with ACI. The REST API itself can be found here
First things first, we’ll need to login to the APIC and retrieve a token. According to the API guide, the REST API looks as follows.
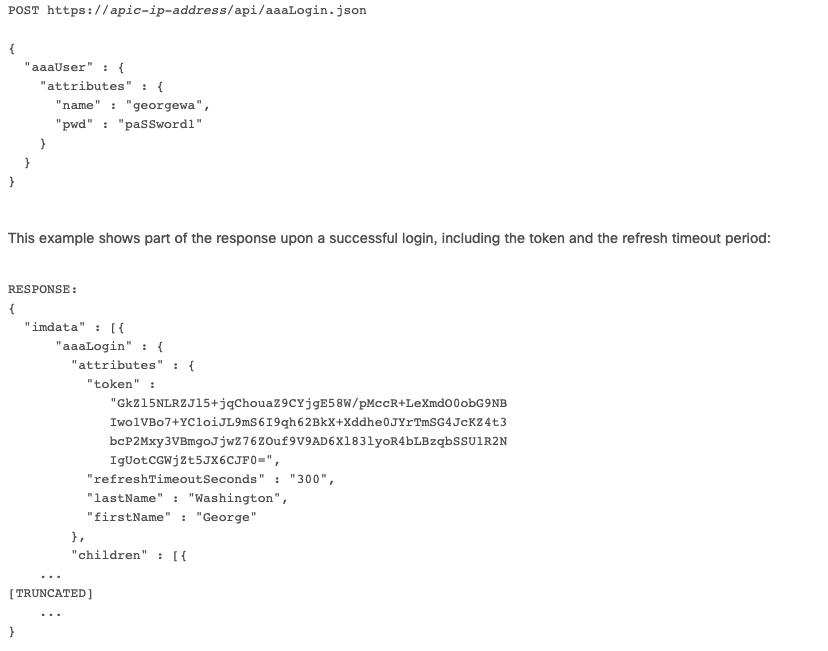
So we need to use the POST method to send JSON body the the following URL. https://<APICclusterIP>/api/aaaLogin.json
import requests
import json

def get_token():
   url = "https://10.48.109.10/api/aaaLogin.json"

   payload = {
      "aaaUser": {
         "attributes": {
            "name":"admin",
            "pwd":"---"
         }
      }
   }

   headers = {
      "Content-Type" : "application/json"
   }

   requests.packages.urllib3.disable_warnings()
   response = requests.post(url,data=json.dumps(payload), headers=headers, verify=False).json()

   token = response['imdata'][0]['aaaLogin']['attributes']['token']
   return token

def main():
   token = get_token()
   print("The token is: " + token)

if __name__ == "__main__":
   main()
In the script, you’ll that we prepare the ‘payload’ json body according to the REST API. We’ll insert the username and password in the appropriate place. Nothing more to it.
Then we send the HTTP request itself. We pass the payload via the json.dumps format, we pass the headers and we disable SSL verification (for demo purposes only).
APIC will then send back a JSON response (again as documented in the above screenshot). We can parse the JSON response in Python as it essentially is a dict object. In order to parse the object, you need to look at the response and you’ll note the token is in the attribites section ([‘imdata’][0][‘aaaLogin’][‘attributes’]).
Note: I’m creating a header. Strictly speaking this is not required with ACI as the .json extension in the REST URL indicates that we expect JSON format. ACI also supports XML.
When we execute the above script, it will print the token that is returned in the JSON body of the response.
(venv) WAUTERW-M-65P7:aci_rest_examples wauterw$ python3 aci_login.py
6jUCAAAAAAAAAAAAAAAAABCOfgYX5j0IXhy0ZKPV7x05BEhyd00p5yVn9s59oAR5ZTlSjCZ9wlTY9VSEJbT2pJJPc02hfPsGh/2C1dmQHe9QmNuS9Qq5avaBcfoS12PUWi1rD4lnJ3ul0w4kfbNex/C2cg1g99v5BlSUa47PFbwsf78ig7Vdv8o0l2ZuxRFp3AF5uaN+1BtOxE9fGlw8JA==
This token will now be used for the subsequent REST calls.
Retrieve all ACI tenants
Let’s see what are the configured tenants on our APIC. Now that we have the script to perform a login, we can re-use this in our code. The code is pretty straightforward, in essence, we will query the /api/node/class/fvTenant.json endpoint and iterate over the response.
import requests
import json
from aci_login import get_token

def get_tenants():
   token = get_token()

   url = "https://10.48.109.10/api/node/class/fvTenant.json"

   headers = {
      "Cookie" : f"APIC-Cookie={token}",
   }

   requests.packages.urllib3.disable_warnings()
   response = requests.get(url, headers=headers, verify=False)

   return response

if __name__ == "__main__":
   response = get_tenants().json()
   tenants = response['imdata']

   for tenant in tenants:
      print(f"Tenant name: {tenant['fvTenant']['attributes']['name']}")
When we execute this script, we will receive a list of tenants:
wauterw@WAUTERW-M-65P7 requests % python3 get_tenants.py
Tenant name: tn-bjorn
Tenant name: dvs-demo-dynamic
Tenant name: mgmt
Tenant name: common
Tenant name: infra
Tenant name: tn-qinq
Tenant name: tn-automation
Tenant name: Tenant_Wim
...
Create an ACI tenant
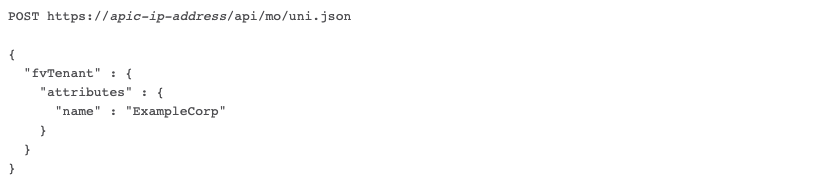
In many cases, your first action on Cisco ACI will be to create a Tenant. We’ll also use the REST API documentation to achieve this.
Again, this is pretty straightforward and is following the same ‘template’ as the login script above.
import requests
import json
from aci_login import get_token

tenant_name = "Tenant_Python"

def create_tenant():

   token = get_token()

   url = "https://10.48.109.10/api/mo/uni.json"

   payload = {
      "fvTenant": {
         "attributes": {
            "name": tenant_name
         }
      }
   }

   headers = {
      "Cookie" : f"APIC-Cookie={token}",
   }

   requests.packages.urllib3.disable_warnings()
   response = requests.post(url,data=json.dumps(payload), headers=headers, verify=False)

   if (response.status_code == 200):
      print("Successfully created tenant")
   else:
      print("Issue with creating tenant")

def get_tenant():
   return tenant_name


if __name__ == "__main__":
   create_tenant()
First, we will need to retrieve the token. Therefore we call the get_token() function. Note that we imported that function in the third line of the script. According to the documentation, we need to pass that token in a Cookie called APIC-Cookie. The rest of the script is pretty self explanatory I would think.
The result
Executing the script is as simple as running any other Python script.
(venv) WAUTERW-M-65P7:aci_rest_examples wauterw$ python3 aci_login.py
s1ICAAAAAAAAAAAAAAAAAIodgsFHXkastXMmKf7Hr8x/rLC1f/L+z3iXiFbqJXk6ufdu0w3oSXoTgLIVwK4Mqgl4TDHnoDYbmdEcC7GW1GZOZRn+PmrFUzuM8HK98Dc03AzfrsfVp
q0fThEgCfJjzCN2fkR0NUIg2SsLN5ZnPhqw9gWyTKyjT/wfFedZ+BdW1Bxz1kCU/SGqa/cRsPa99A==
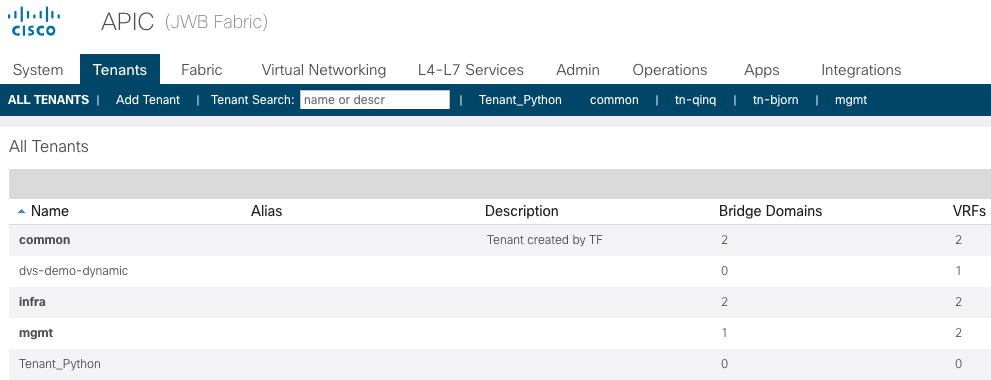
(venv) WAUTERW-M-65P7:aci_rest_examples wauterw$ python3 create_tenant.py
Successfully created tenantIn the below screenshot, you’ll notice a Tenant called ‘Tenant_Python’ got created.
Delete an ACI tenant
Let’s quickly checkout a Python script that takes care of the tenant deletion. Pretty much similar to the rest of the examples, but nevertheless, here is the full code.
import requests
import json
from aci_login import get_token

def delete_tenant():
   token = get_token()

   url = "https://10.48.109.10/api/mo/uni.json"


   payload = {
      "fvTenant": {
         "attributes": {
            "name": "Tenant_Python",
            "status": "deleted"
         }
      }
   }

   headers = {
      "Cookie" : f"APIC-Cookie={token}",
   }

   requests.packages.urllib3.disable_warnings()
   response = requests.post(url,data=json.dumps(payload), headers=headers, verify=False)

   if (response.status_code == 200):
      print("Successfully deleted tenant")
   else:
      print("Issue with deleting tenant")

if __name__ == "__main__":
   delete_tenant()
Let’s execute the script:
wauterw@WAUTERW-M-65P7 ACI_Python_Requests % python3 delete_tenant.py
Successfully deleted tenant
This example was fairly simple of course. The code can be found at Github. In case you are interested in a more complete and complex example, please have a look at this code. It builts entirely on the foundation of this post, but is focusing on creating a more complete setup (using contracts and filters etc.)