Create Cisco ACI network with Python (ACI toolkit)
Introduction
In this post, we have seen how to create some ACI objects using Python and Jinja2. While this was relatively straightforward, it’s not always as straigthforward as it seems.
Things can become quickly more complex. Examples include: - assign a BD to a VRF, the BD and VRF each part of the same tenant - creating some application profiles with X EPGs and create contracts between them ).
The painpoint of the approach we have been using so far is to construct the proper payload templates. These are not always one on one available in the documentation and it requires you to be familiar with the ACI object model. You can read everything about the ACI policy model here. You’ll soon notice that many of the ACI objects are interlinked with one another. As an example, a Bridge Domain links to a Tenant, but also to a VRF (often called Context as well). The fact that objects can be interlinked to one another makes it sometimes pretty hard to create the proper Jinja2 template. It’s not impossible, as ACI helps you quite a bit with providing an ‘API Inspector’. This tool can be found by logging into the APIC and go to ‘Help and Tools’ (upper right corner) and then select ‘Show API inspector’. The tool essentially logs all REST calls that are made through the UI. Hence, in order to find a particular REST API call, execute the function via the user interface. As an example: create a tenant using the user interface and look at the API inspector for an HTTP Post call. That will contain also the JSON body that was used. You can now use this REST call to use in your Python script.
As mentioned before, while this works, it certainly is not the easiest way. Luckily, Cisco is also providing a Python toolkit to make it easier to interact with Cisco ACI. The toolkit can be found on Github
Note about equipment
For all the examples, I will use my own APIC in my lab. However, if you want to follow along with this blog post, checkout the Cisco sandbox environment delivered by Cisco Devnet. To get a list of all sandboxes, check out this link. For this tutorial, you could use the always on ACI sandbox as well (see here).
Use a virtual environment
I would suggest you to work with a Python virtual environment. If you don’t know how to do that, please refer to this post, where some sections explain how to achieve this.
Once inside the virtual environment, continue with the rest of this tutorial.
Installing the ACI toolkit
(venv) WAUTERW-M-65P7:ACI_Python_ACITookit wauterw$ git clone https://github.com/datacenter/acitoolkit.git
Cloning into 'acitoolkit'...
remote: Enumerating objects: 276, done.
***Truncated***
Next step is to install the toolkit:
(venv) WAUTERW-M-65P7:ACI_Python_ACITookit wauterw$ cd acitoolkit/
(venv) WAUTERW-M-65P7:acitoolkit wauterw$ python3 setup.py install
/Library/Frameworks/Python.framework/Versions/3.8/lib/python3.8/distutils/dist.py:274: UserWarning: Unknown distri
bution option: 'tests_requires'
  warnings.warn(msg)
running install
running bdist_egg
***Truncated***
Finished processing dependencies for acitoolkit==0.4
Don’t forget to also install the pyyaml and pprint packages in your virtual environment. The installation of both these packages in covered in that same blog post.
Parsing YAML files
We will use a YAML file to pass the variables to our script. We have discussed that in this blog post. A big part of our code will be to deal with YAML files, so make sure you understand that blog post before you continue.
Python script
Read variables file
Refer to the first line in below script. The part after Read YAML configuration is explained quite well in the blogpost we referred to already (this one). Nothing different here.
Making use of Session object
Note that to work with the acitoolkit we need to use a Session. The Session object is described here but a Session object is essentially under the hood dealing with the ACI login process (and token).
Read ACI objects
In below snippet, we will document how we can use acitoolkit to read all the configured tenants from our APIC.
from acitoolkit.acitoolkit import *
url = "https://10.48.109.10/"
user = "admin"
pwd = "---"
session = Session(url, user, pwd)
session.login()
tenants = Tenant.get(session)
for tenant in tenants:
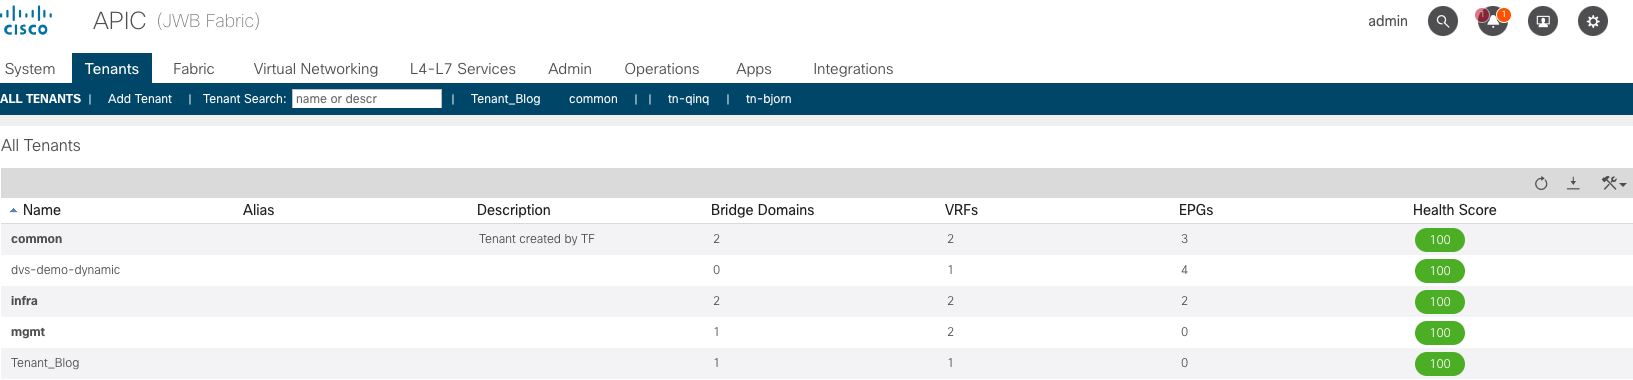
print(tenant.name)When we execute this script, you’ll see we indeed get back a list of all configured tenants.
wauterw@WAUTERW-M-65P7 aci_toolkit % python3 get_tenants_toolkit.py
tn-bjorn
dvs-demo-dynamic
mgmt
common
infra
tn-qinq
tn-automation
Tenant_Wim
Create ACI objects
In below snippet there is a section behind the comment # Create ACI objects. This part is effectively creating the ACI objects. We are first creating the tenant via the Tenant object. This object is describeded here. As you can see, we need to pass a String variable, which in our case will be the tenant name we retrieved from parsing the YAML variables file. Exactly the same process for the other objects, VRF and BD.
As a last step, we will call the push_to_apic function to effectively push the objects to the APIC. Note, that we simply use the entire Tenant tree. As an exercise to the reader, it’s helpfull to print the content of the two variables tenant.get_url() and tenant.get_json(). It will help you to understand how this push_to_apic function works.
from acitoolkit.acitoolkit import *
import yaml
from pprint import pprint

url = "https://10.48.109.10/"

user = "admin"
pwd = "---"

session = Session(url, user, pwd)
session.login()

# Read YAML configuration
yml_file = open("variables.yml").read()
yml_dict = yaml.load(yml_file, yaml.SafeLoader)

tenant_name = yml_dict['tenant']
vrf_name = yml_dict['vrf']
bd_name = yml_dict['bridge_domains'][0]['bd']

# Create ACI objects
tenant = Tenant(tenant_name)
vrf = Context(vrf_name, tenant)
bd = BridgeDomain(bd_name, tenant)

response = session.push_to_apic(tenant.get_url(), data=tenant.get_json())

print(response)
Note: the source code can be found here.
Login to your APIC and verify if the tenant, VRF and BD were created. Of course they were..haha. See below. Pay particul attention to the number 1 in the VRF and BD column.
Python script: a bit more complex examples
In the above snippet, we kept things easy. We just created a Tenant, a VRF and a BD. In what follows, we’ll take it a bit further and assign a subnet to the bridge domain and link the bridge domain to the VRF. Note that this is the example (first bullet) I referred to above when we talked about the fact that objects can be interlinked to one another.
For the stuff that follows, refer to the ACI object model or simply refer to the below picture.
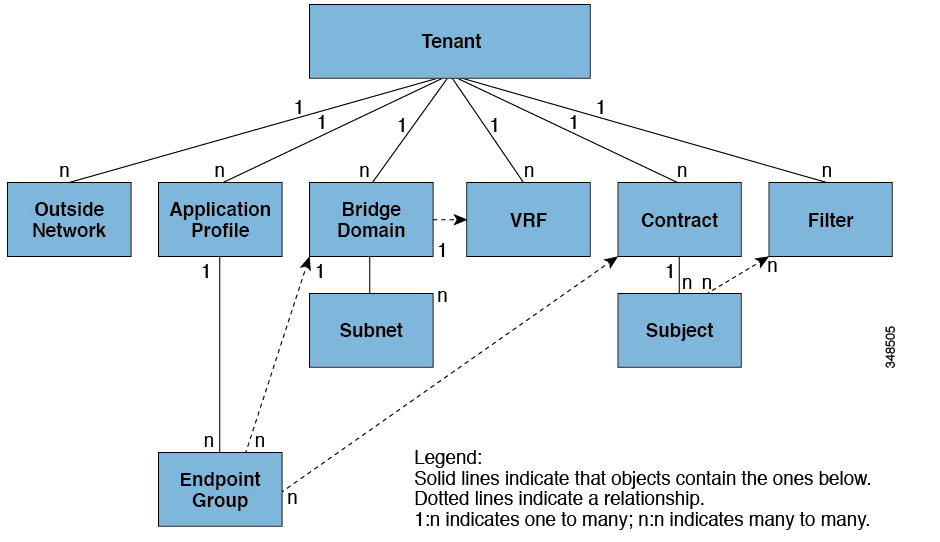
Looking at the ACI object model above, you’ll notice that BD and VRF are all relative to the Tenant object.
You will also see that a BD can have one or more subnets. Hence, in below snippet, we create a Subnet object and assign it to the BD object we created earlier.
Next, again as per the ACI object model, the BD object is linked to a VRF object. Hence, we are calling the add_context method. This will assign the BD to the VRD object.
Lastly, in this example, we will also assign an L3Out to the BD.
The snippet below only shows the relevant difference to the previous script we already explored.
# Create ACI objects
tenant = Tenant(tenant_name)
vrf = Context(vrf_name, tenant)
bd = BridgeDomain(bd_name, tenant)
subnet = Subnet('', bd)
subnet.addr = bd_subnet
bd.add_context(vrf)
l3out = OutsideL3(bd_l3out, tenant)
bd.add_l3out(l3out)
bd.add_subnet(subnet)
The rest of the script remains similar to what we saw earlier. The full source code can be found on here.
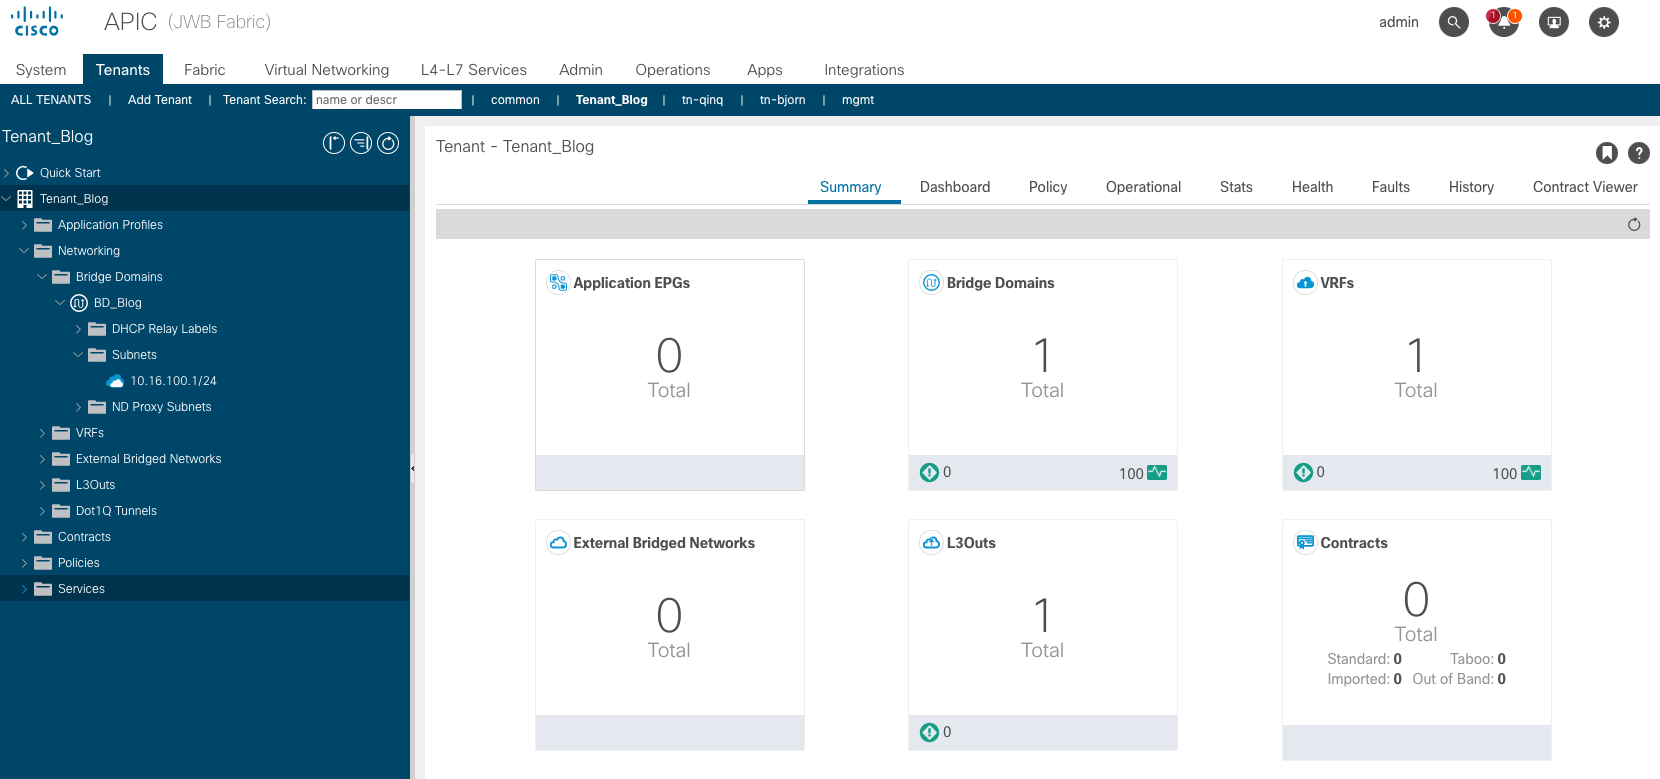
To check if everything worked out, verify on the APIC. In below screenshot, you will see that Tenant_Blog has been created with a BD called BD_Blog and under that BD, you’ll see a subnet 10.16.100.1/24.
The entire repo for this small project can be found at Github.
A more complete example can be found here.