Cisco Webex Teams - Chatbot with Python
Introduction
In this post, we created a chat bot using the wonderfull Botkit project. In the upcoming sections we will explore how to create a botkit using plain Python (without the use of a framework).
Download ngrok or localtunnel
Also here we need to install either ngrok or localtunnel. This will expose our Python chatbot to the outside world. Just as we did in this post, we will be using localtunnel.
Go ahead and install it as follows
~blog-hugo-netlify-code/WebexTeams_Chatbots/botkit-template ❯ npm install -g localtunnelNext, create a tunnel:
~blog-hugo-netlify-code/WebexT/python_deckofcards/deckofcards_bot master ❯ lt --port 5005
your url is: https://great-eel-95.loca.lt
Your Python app will be exposed on this URL.
Create a Webex Teams bot
Rather than repeating myself here, please check out the Create a webex teams bot section of this blogpost.
Add the bot to your Webex Teams space
Rather than repeating myself here, please check out the Add the bot to your Webex Teams space section of this blogpost.
Create a webhook
Next up, we need to create a webhook. Webhooks allow your app to be notified via HTTP when a specific event occurs in Webex Teams. So for instance, each time a message is received in Webex Teams, a webhook will be send to our Python application (exposed via ngrok or localtunnel) where it can be further processed.
To create a webhook, we will use Postman. We could have done it in Python as well though. First, configure your Postman client with the access_token (the one you wrote down while creating the bot in Webex).
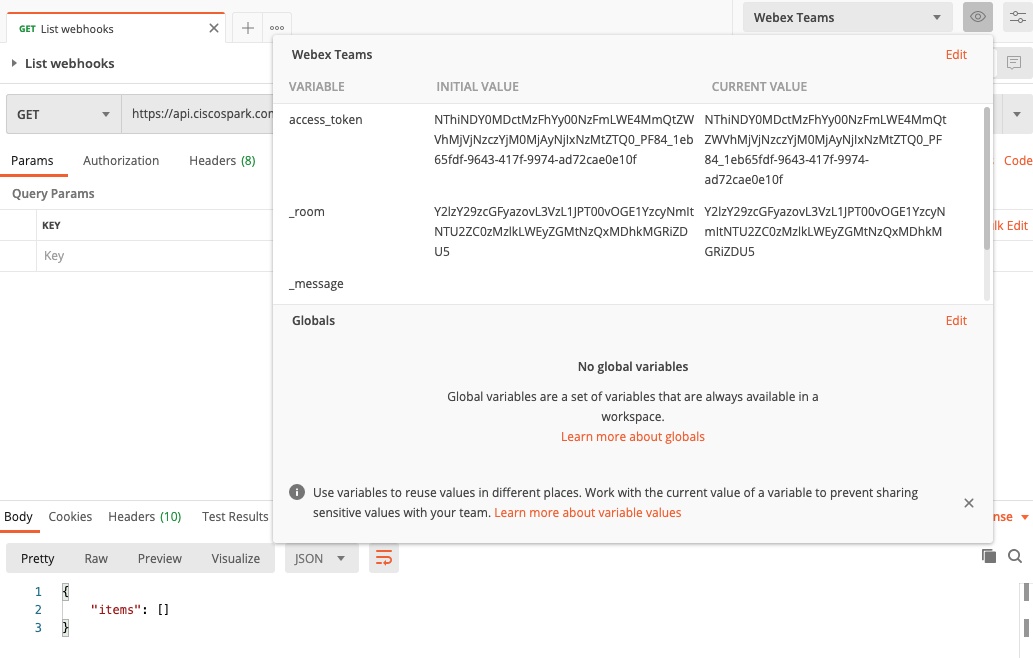
Next, let’s see if there are already webhooks available for this chatbot. You will see we get an empty list meaning there are no webhooks registered so far.

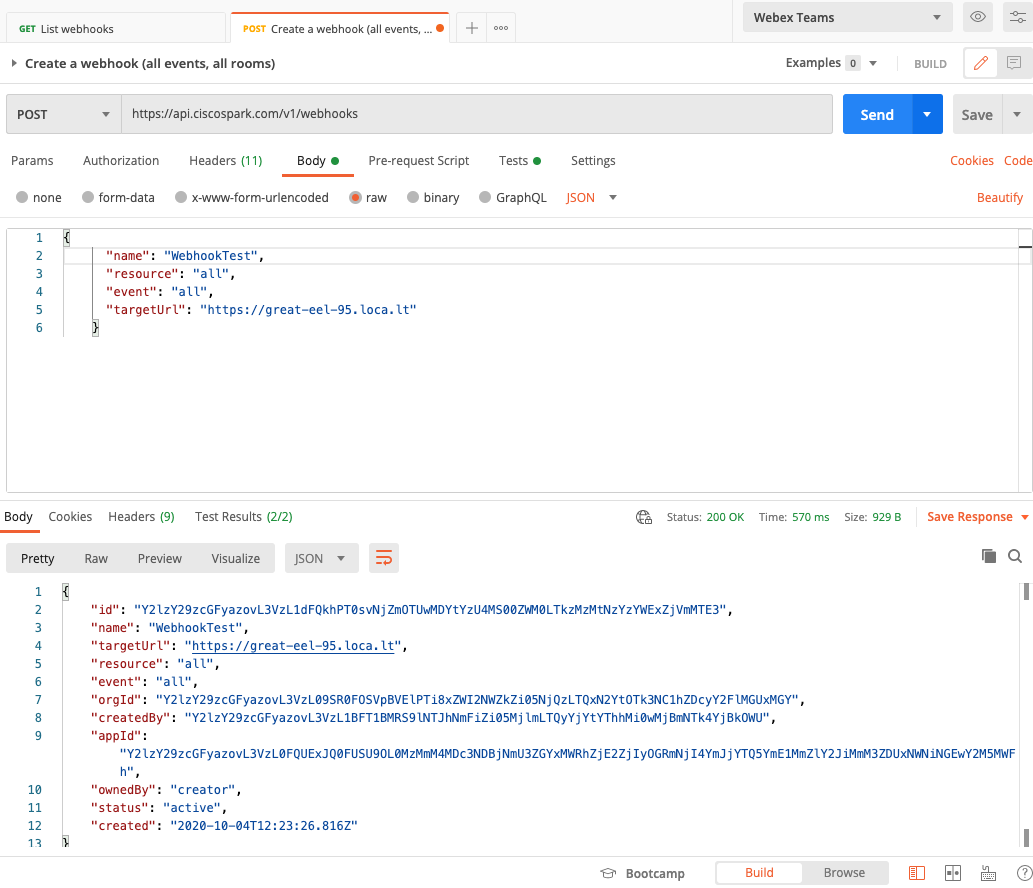
We will go ahead and create a Webhook now. Do this by sending a POST request to the https://api.ciscospark.com/v1/webhooks URL with the body indicated in the screenshot. Note that in the targetUrl we need to specify our localtunnel or ngrok endpoint.
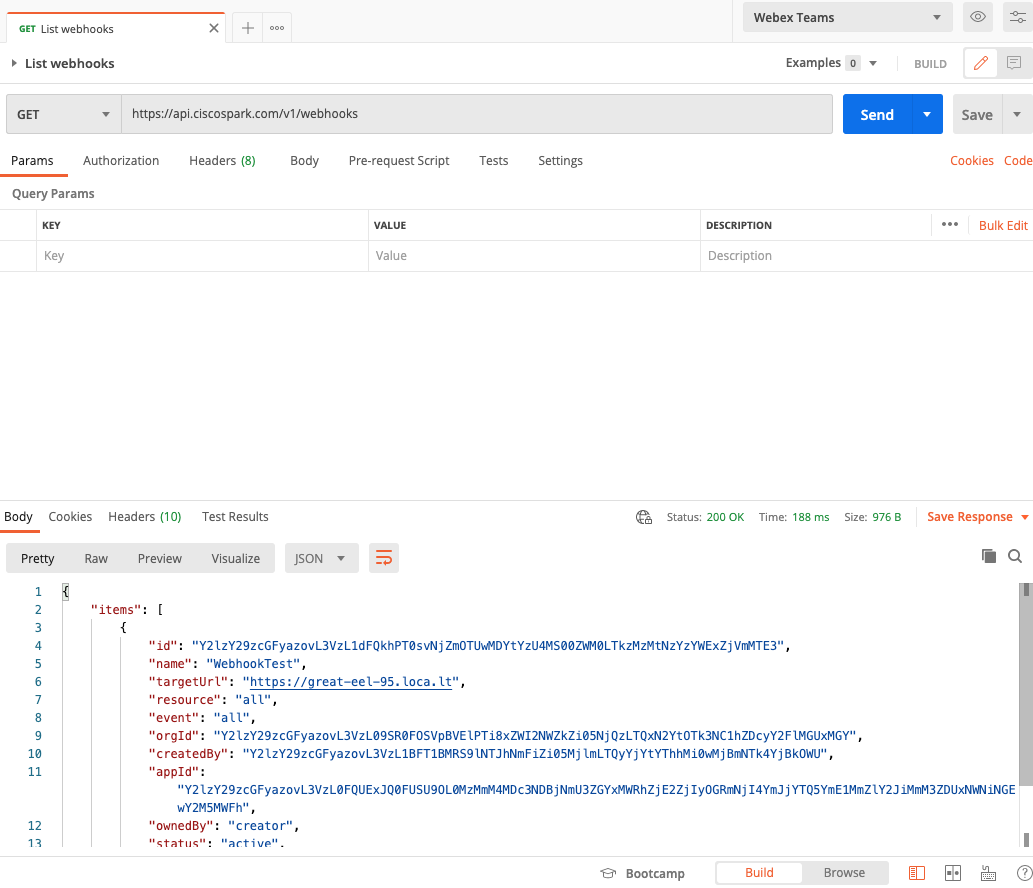
Let’s check again if our webhook was registered successfully.
Create a Flask application
Let’s now move on to the ‘meat’ of this blogpost, the Python script itself. Below you will find the Python script, but probably it’s easier if you first take a look at the content of an incoming webbook event.
{
    "actorId": "Y2lzY29zcGFyazovL3VzL1BFT1BMRS85Y2EzY2UwNi01YTgxLTRiMjktODk0Zi0xMTU1MDQ0OTIwZWY",
    "appId": "Y2lzY29zcGFyazovL3VzL0FQUExJQ0FUSU9OL0MzMmM4MDc3NDBjNmU3ZGYxMWRhZjE2ZjIyOGRmNjI4YmJjYTQ5YmE1MmZlY2JiMmM3ZDUxNWNiNGEwY2M5MWFh",
    "created": "2020-10-17T10:22:05.523Z",
    "createdBy": "Y2lzY29zcGFyazovL3VzL1BFT1BMRS9lNTJhNmFiZi05MjlmLTQyYjYtYThhMi0wMjBmNTk4YjBkOWU",
    "data": {
        "created": "2020-10-17T10:23:07.688Z",
        "id": "Y2lzY29zcGFyazovL3VzL01FU1NBR0UvYmZkZmIyODAtMTA2Mi0xMWViLThjOGEtZDdiNzM3YmYzMTc3",
        "personEmail": "wauterw@cisco.com",
        "personId": "Y2lzY29zcGFyazovL3VzL1BFT1BMRS85Y2EzY2UwNi01YTgxLTRiMjktODk0Zi0xMTU1MDQ0OTIwZWY",
        "roomId": "Y2lzY29zcGFyazovL3VzL1JPT00vODJiYzBhOGMtOGM3NS0zZGVlLThlMzgtZjhiNDY1MTg3MmQ3",
        "roomType": "direct"
    },
    "event": "created",
    "id": "Y2lzY29zcGFyazovL3VzL1dFQkhPT0svNDk3NGEyODgtZTE2OC00YTgwLWIyYjItMDFiNTAwMDgzYjUw",
    "name": "postmanbot",
    "orgId": "Y2lzY29zcGFyazovL3VzL09SR0FOSVpBVElPTi8xZWI2NWZkZi05NjQzLTQxN2YtOTk3NC1hZDcyY2FlMGUxMGY",
    "ownedBy": "creator",
    "resource": "messages",
    "status": "active",
    "targetUrl": "https://great-eel-95.loca.lt"
}
It’s pretty self-explanatory. Essentially there is a data field which contains the data from the person who sent a message into the Webex Teams chat room as well as an identifier to the ID of the message.
In the below code, chatbot.py, we do the following steps:
- We listen to GET and POST messages on the
/route. - When receiving a POST verb, we will retrieve the room_id as well as the message_id (both are available in the webhook JSON body as seen above)
- We only have the id of the message, but not the message itself. Therefore we have a separate class
Messengerwhich is responsible for a.o getting the message based on the ID we pass in. - We parse the incoming message to identify if we received the keyword we were looking for (in our case
cards) - Upon receiving a sentence that starts with
/cardswe will call the deckofcards api and finally we will send back to our Webex Teams space the ID of the deck of cards (as returned by the deckofcards API)
from flask import Flask, request, json
import requests
from messenger import Messenger

app = Flask(__name__)
port = 5005

msg = Messenger()
local_url = 'https://great-eel-95.loca.lt'

@app.route('/', methods=['GET', 'POST'])
def index():
    if request.method == 'GET':
        return f'Request received on local port {port}'
    elif request.method == 'POST':
        if 'application/json' in request.headers.get('Content-Type'):
            data = request.get_json()

            if msg.bot_id == data.get('data').get('personId'):
                return 'Message from self ignored'
            else:
                print(json.dumps(data,indent=4))
                msg.room_id = data.get('data').get('roomId')
                message_id = data.get('data').get('id')
                msg.get_message(message_id)
.
                if msg.message_text.startswith('/cards'):
                    reply = requests.get('https://deckofcardsapi.com/api/deck/new/shuffle/?deck_count=1').json()
                    msg.reply = reply['deck_id']
                    msg.post_message(msg.room_id, msg.reply)
                else:
                    msg.reply = f'Bot received message "{msg.message_text}"'
                    msg.post_message(msg.room_id, msg.reply)

                return data
        else:
            return ('Wrong data format', 400)

if __name__ == '__main__':
    app.run(host="0.0.0.0", port=port, debug=False)
and the Messenger class looks as below. It’s a simple class that has one constructor and two methods:
- constructor: upon creating a Messenger object, it will retrieve (and set) the bot ID. As it knows the api-key (generated in the Webex Teams bot creation page), it knows based on this api-key which bot is ‘talking’.
- get_message: retrieves the message based on the incoming message_id
- post_message: allows us to send a message back to the Webex Teams room
import json
import requests

api_key = '***'
base_url = 'https://api.ciscospark.com/v1/'

class Messenger():
    def __init__(self, base_url=base_url, api_key=api_key):
        self.base_url = base_url
        self.api_key = api_key
        self.headers = {
            "Authorization": f"Bearer {api_key}",
            "Content-Type": "application/json"
        }
        self.bot_id = requests.get(f'{self.base_url}/people/me', headers=self.headers).json().get('id')

    def get_message(self, message_id):
        """ Retrieve a specific message, specified by message_id """
        received_message_url = f'{self.base_url}/messages/{message_id}'
        self.message_text = requests.get(received_message_url, headers=self.headers).json().get('text')
        print(self.message_text)


    def post_message(self, room_id, message):
        """ Post message to a Webex Teams space, specified by room_id """
        data = {
            "roomId": room_id,
            "text": message,
            }
        post_message_url = f'{self.base_url}/messages'
        post_message = requests.post(post_message_url,headers=self.headers,data=json.dumps(data))
Running our code locally
Next step is to run the code. In our setup, it suffices to run the code locally as we are exposing our URL anyway to the external world through ngrok or localtunnel.
~blog-hugo-netlify-code/WebexT/p/deckofcards_bot master ❯ python3 chatbot.py
 * Serving Flask app "chatbot" (lazy loading)
 * Environment: production
   WARNING: This is a development server. Do not use it in a production deployment.
   Use a production WSGI server instead.
 * Debug mode: off
 * Running on http://0.0.0.0:5005/ (Press CTRL+C to quit)
Our bot is now up and running and ready to send and receive messages so let’s go ahead and test it.
Testing our bot
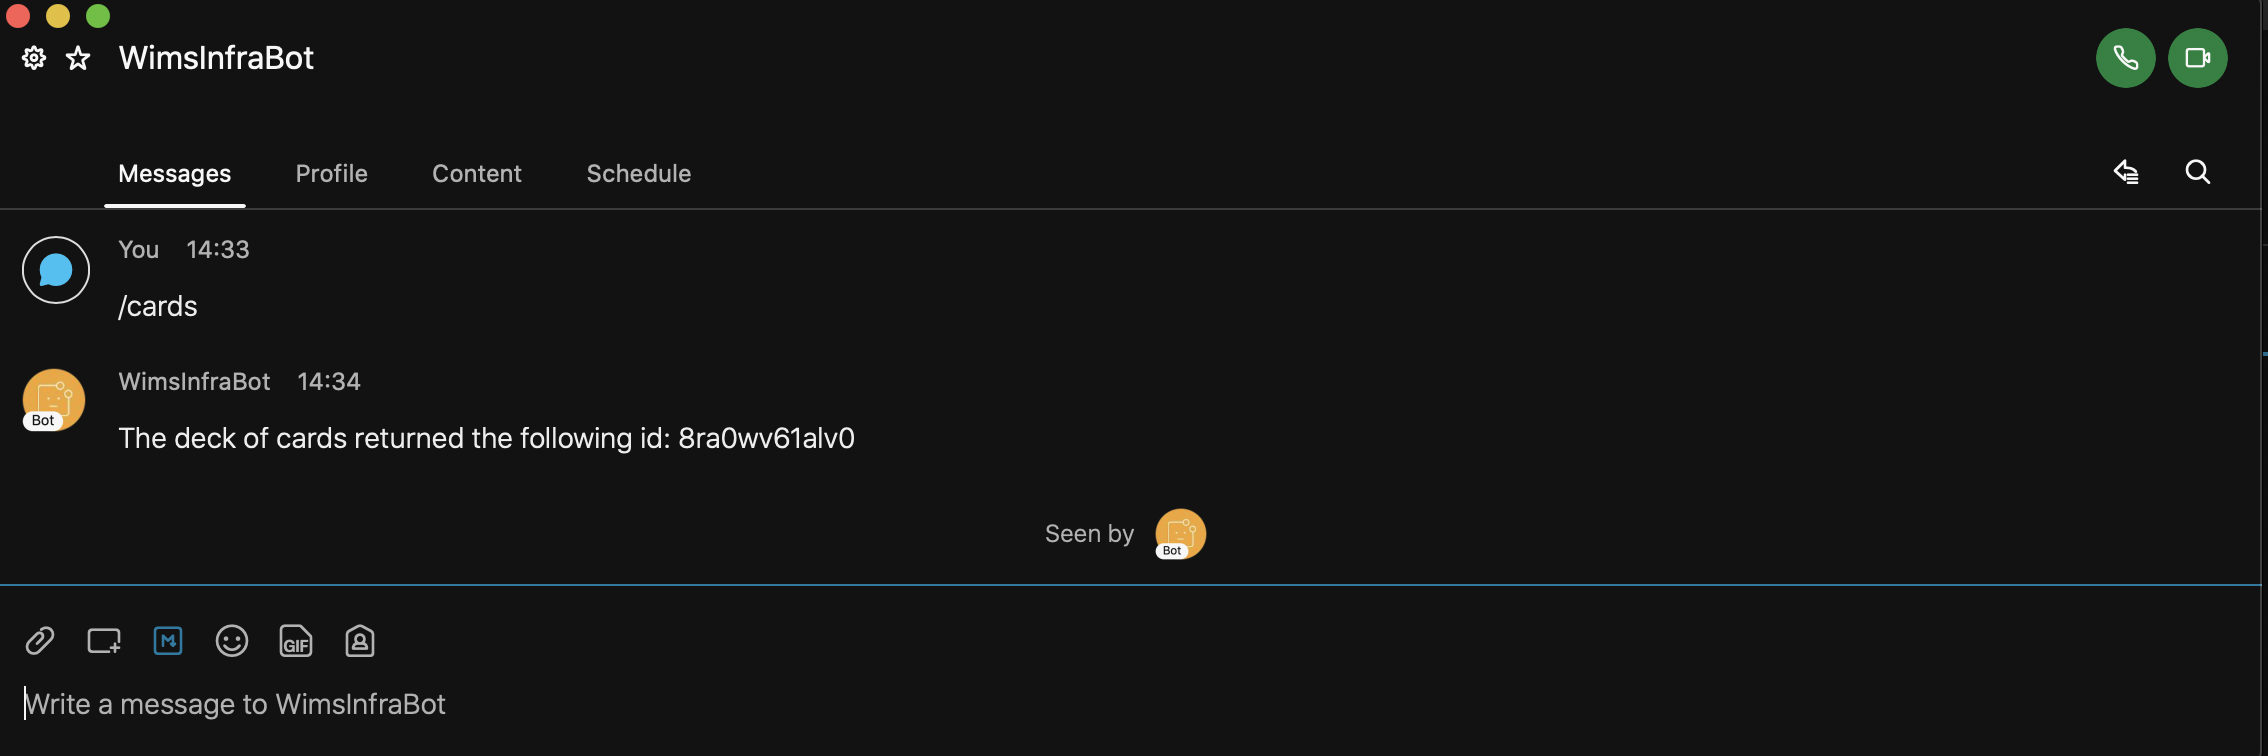
Testing is fairly simple. Just go to your Webex Teams client and send some messages.
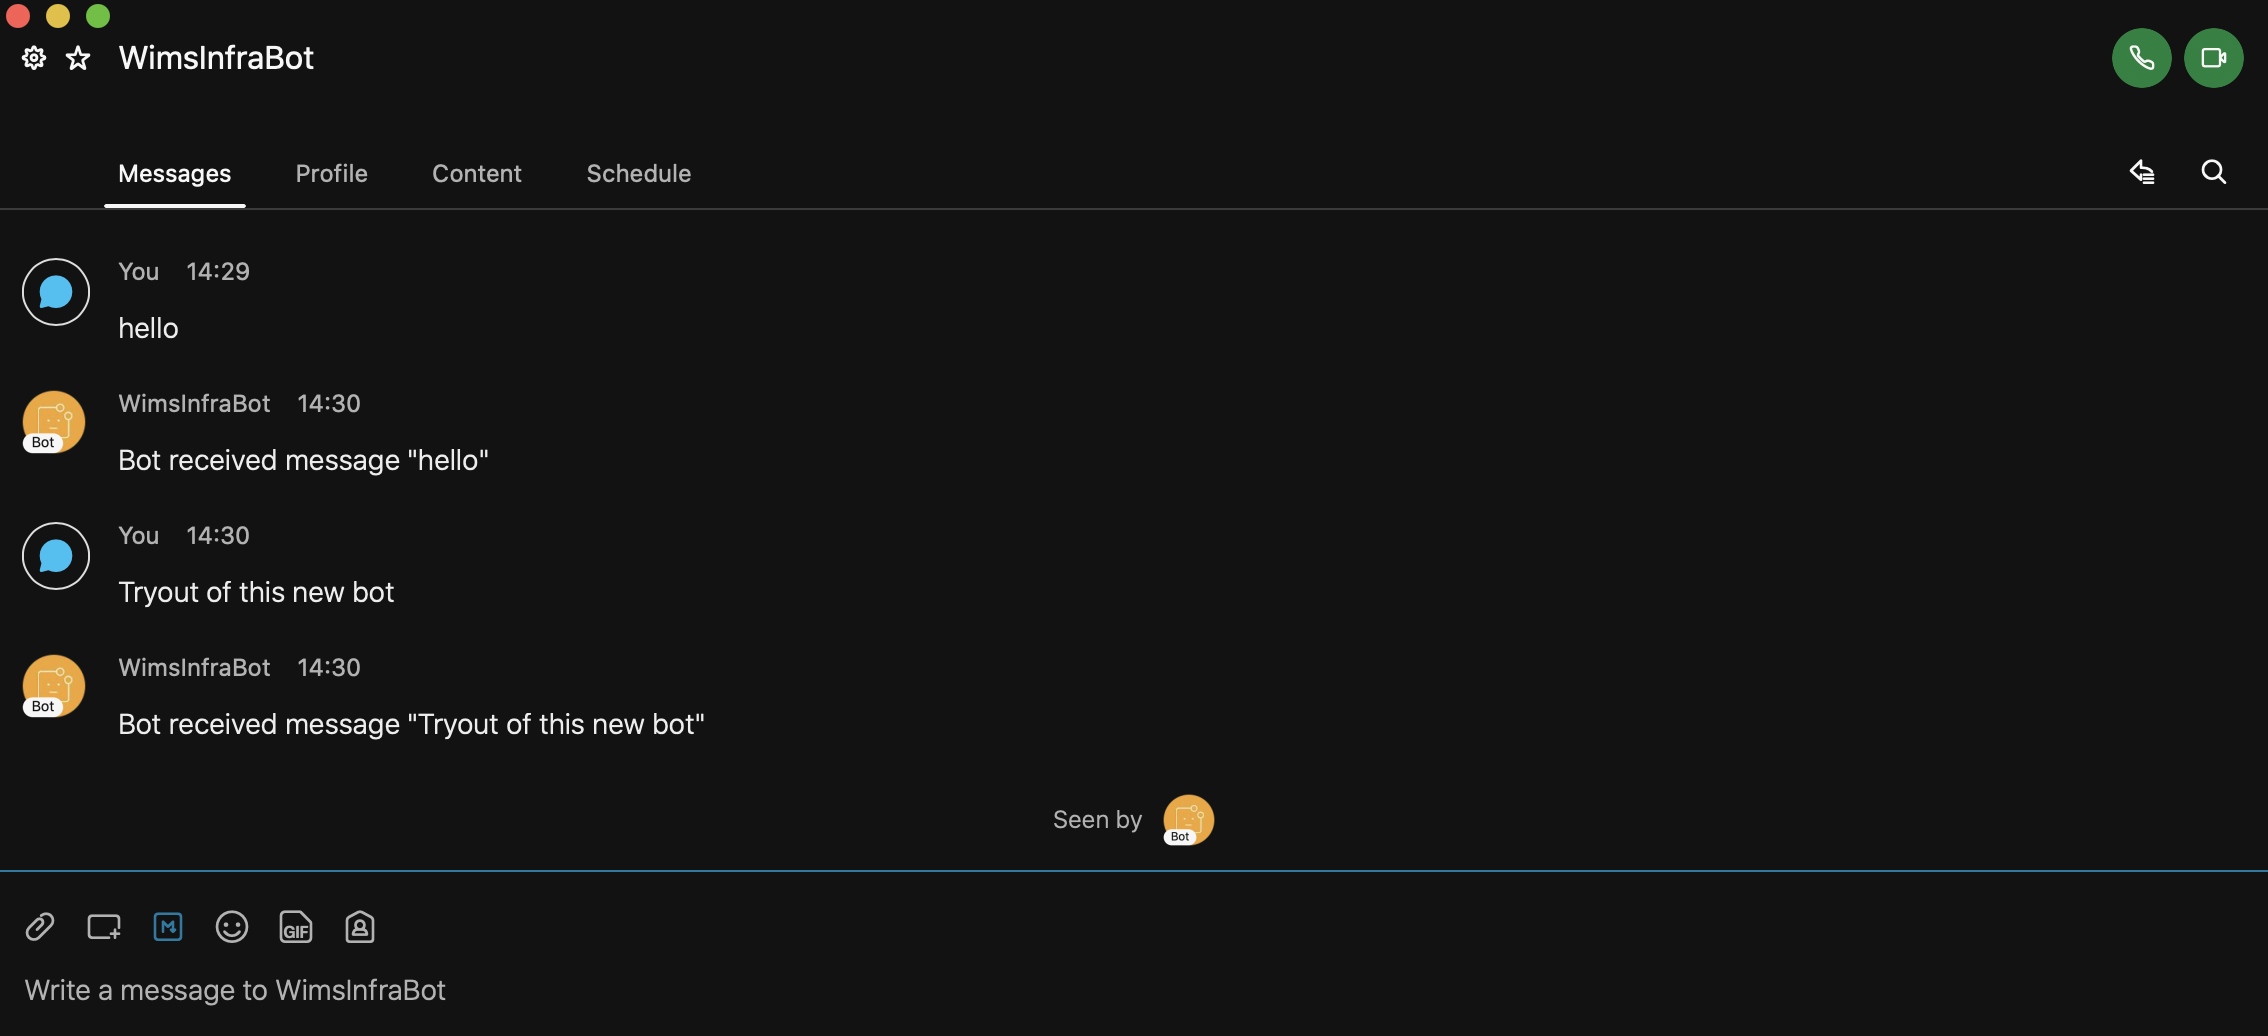
Obviously we are mostly interested on what happends when the /cards keyword is sent. As we expected we will receive back the id of a deck of cards.
So, this is the end…We have created a simple Python Flask based bot that allows us to send and receive messages to and from our Webex Teams client. If you want to try out some of this, please find the code here here.