NetPalm Introduction - Part 3
Introduction
This post is a follow up on part 1 and part 2.
In part 1, we focused on retrieving information from our devices using NetPalm. In part 2, we focused on changing/setting information in our devices.
In this post, we will explore some more advanced features of NetPalm. We will be covering:
- using Jinja2 templates to change configuration
- using service templates
Using Jinja2 templates
NetPalm allows you to change configuration on devices using Jinja2 templates in combination with NAPALM and Netmiko. If you are a regular reader of my blog, we have been changing configurations already using NAPALM and Netmiko individually:
NAPALM: we added a loopback interface to our device using a Jinja2 template (check this post )
Netmiko: we added a loopback interface to our device using a Jinja2 template and we also changed the description of an interface (check this post)
In this post, we will add some loopback interfaces to our device but using NetPalm (which under the hood will use NAPALM or Netmiko).
Let’s first create the Jinja2 template. Create a file called loopback.j2 and place this in the netpalm/backend/plugins/jinja2_templates folder. We will be using the following template:
{% for interface in interfaces %}
   interface {{interface.name}}
   description {{interface.description}}
   ip address {{interface.ipv4_addr}} {{interface.ipv4_mask}}
{% endfor %}
NetPalm provides an API to change the configuration through a Jinja2 template (see here for Netmiko and here for NAPALM.
The example is the following:
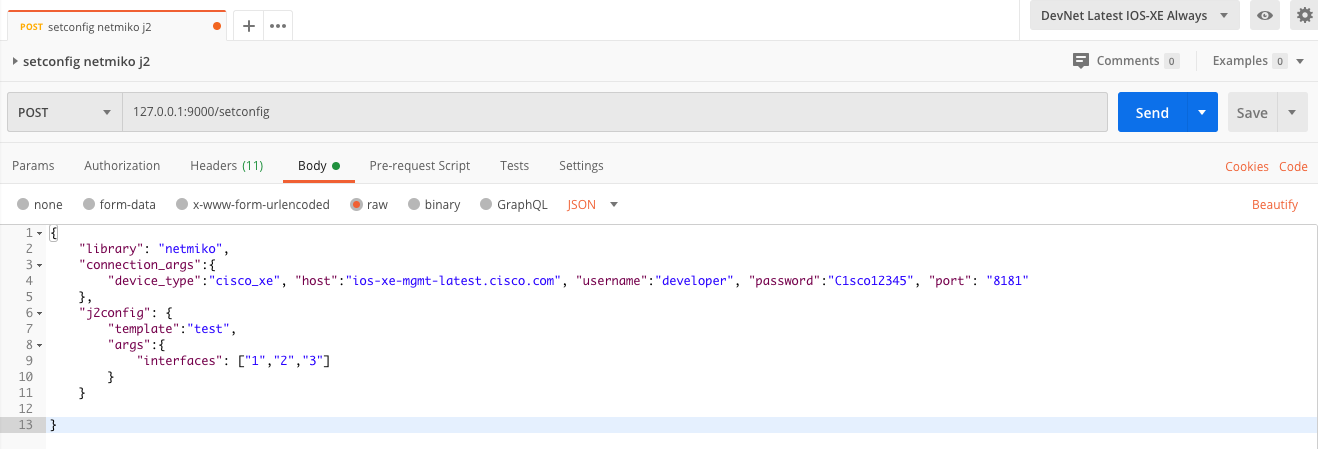
Essentially the template argument points to the template we have stored in the netpalm/backend/plugins/jinja2_templates folder, in our case this will be loopback (not loopback.j2). Next, in the args, we need to pass the variables for our Jinja2 template. In our case, we want to provide the following information.
{
  "interfaces": [
    {
      "name": "Loopback3001",
      "description": "Description for Loopback 3001",
      "ipv4_addr": "200.200.200.230",
      "ipv4_mask": "255.255.255.255"
    },
    {
      "name": "Loopback3002",
      "description": "Description for Loopback 3002",
      "ipv4_addr": "200.200.200.231",
      "ipv4_mask": "255.255.255.255"
    }
  ]
}
Below is an example of the complete REST API call:
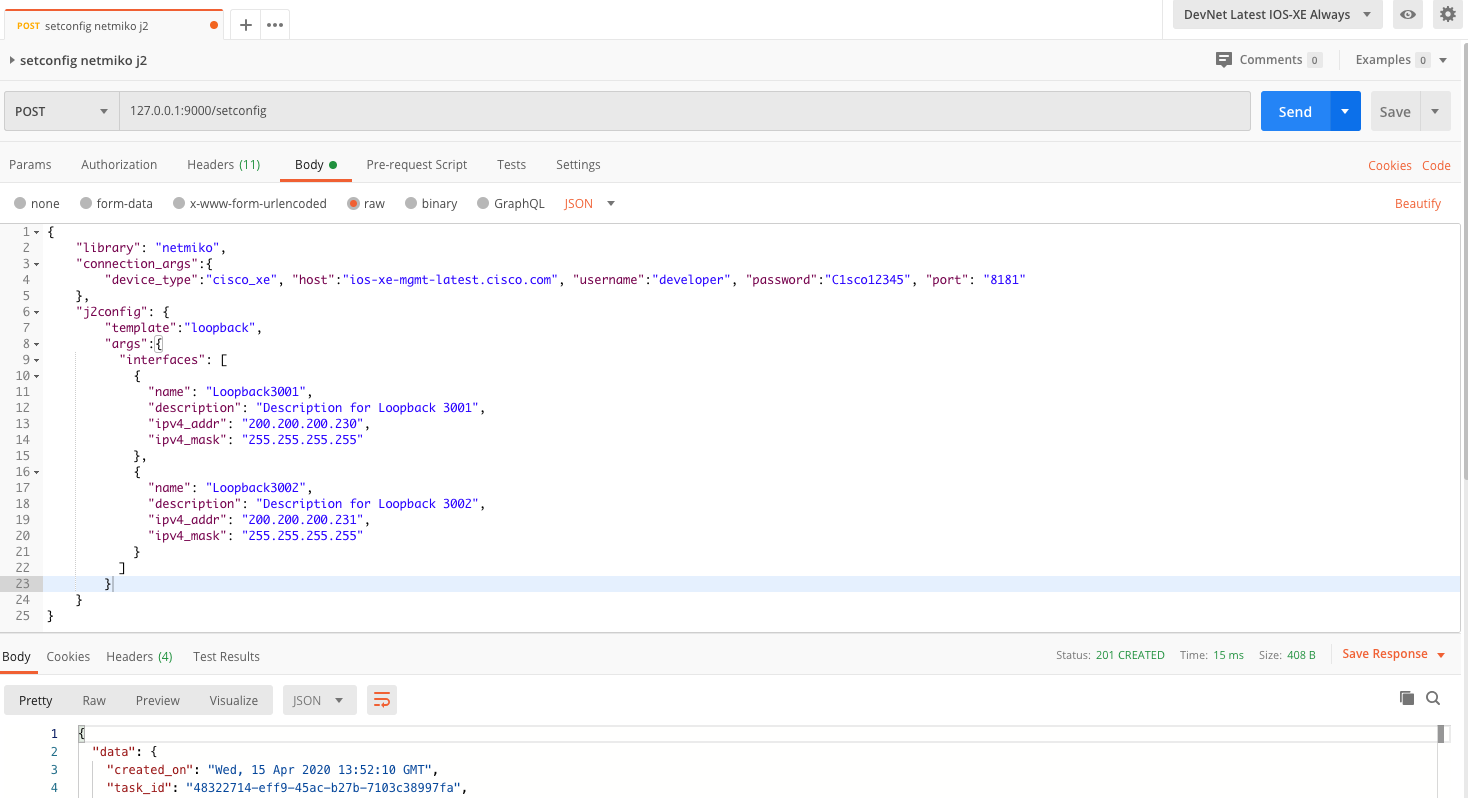
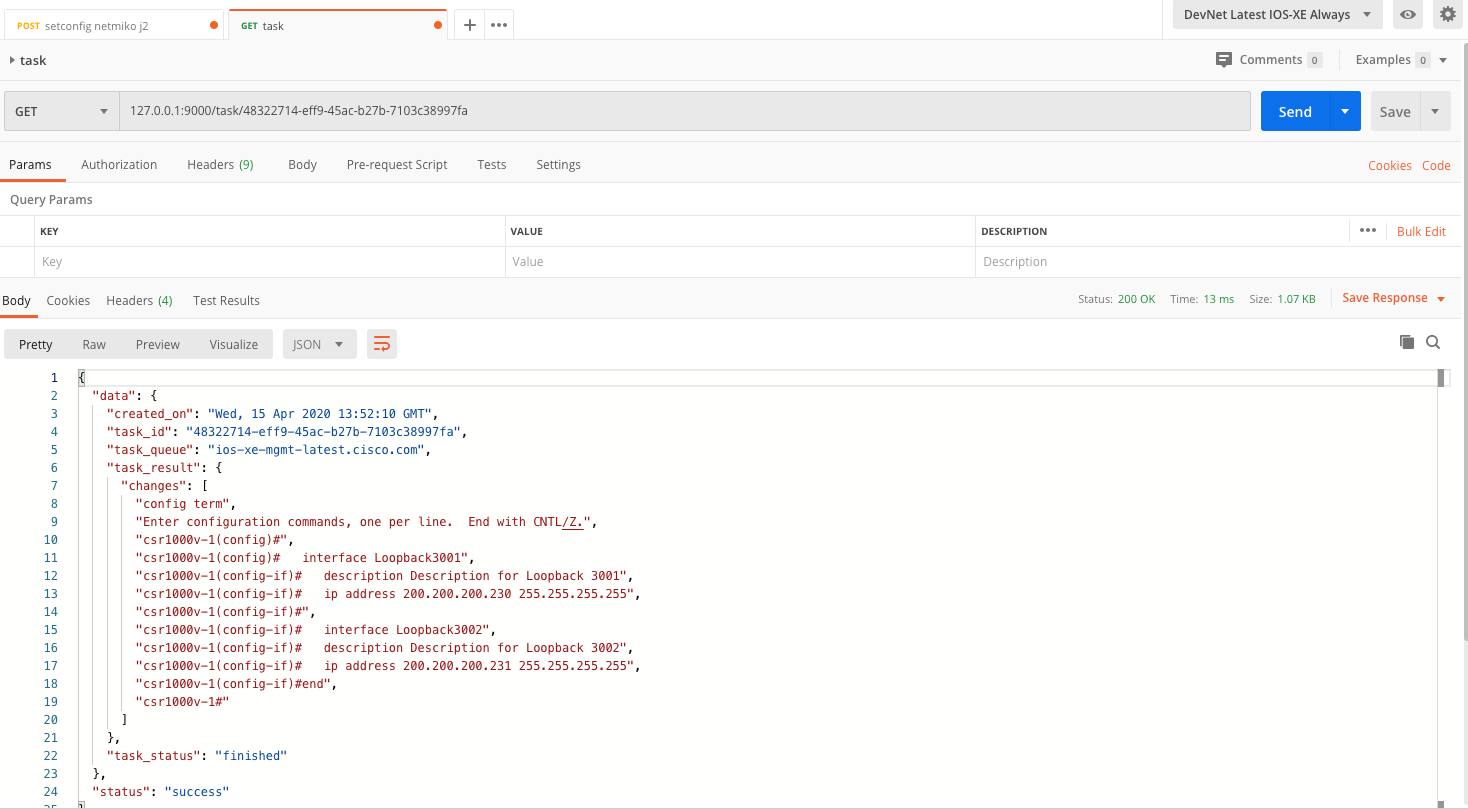
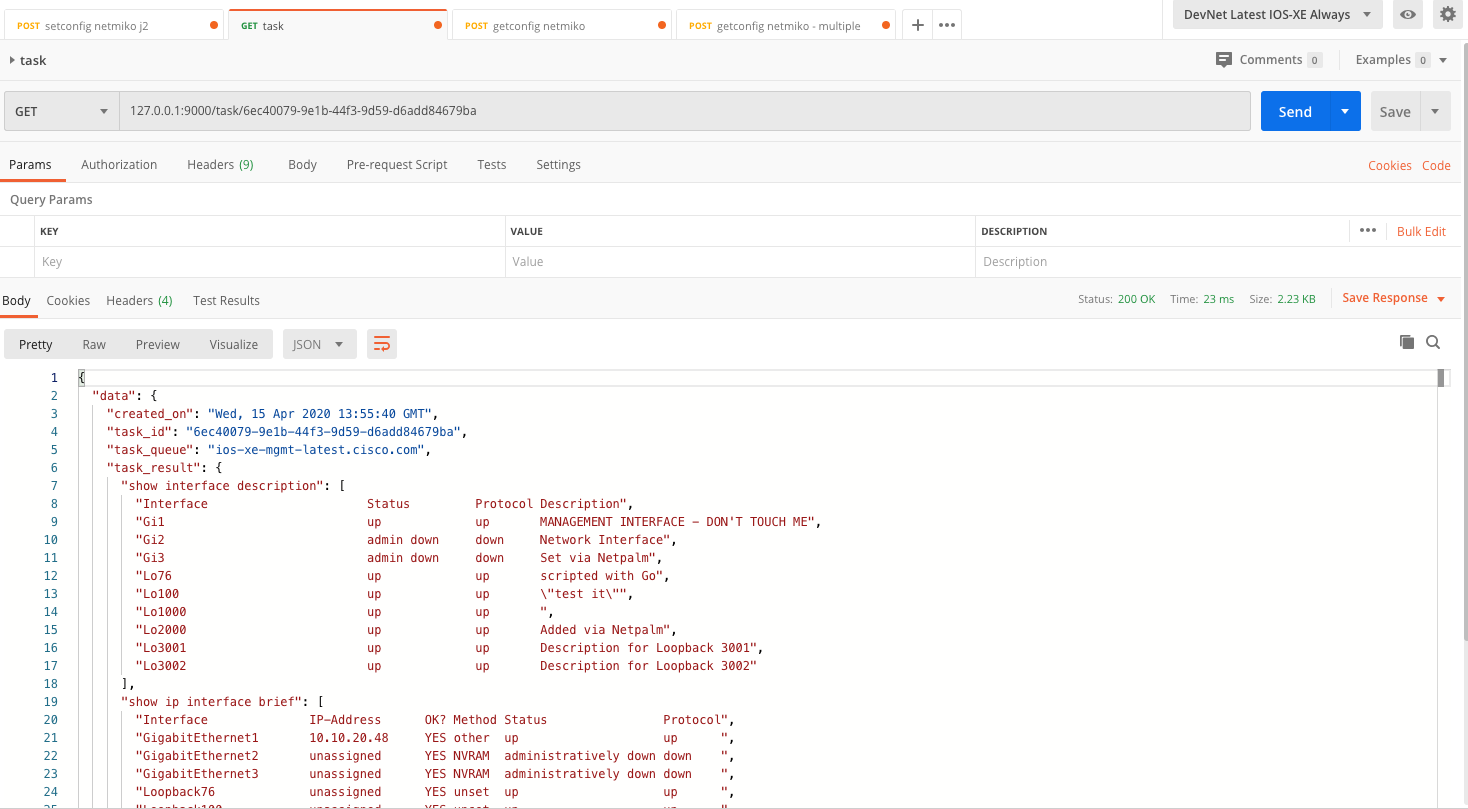
And a view on the task (pay attendtion to the changes attribute):
Next, let’s check if it worked correctly. We will be using the Netmiko getconfig API for this (this one).
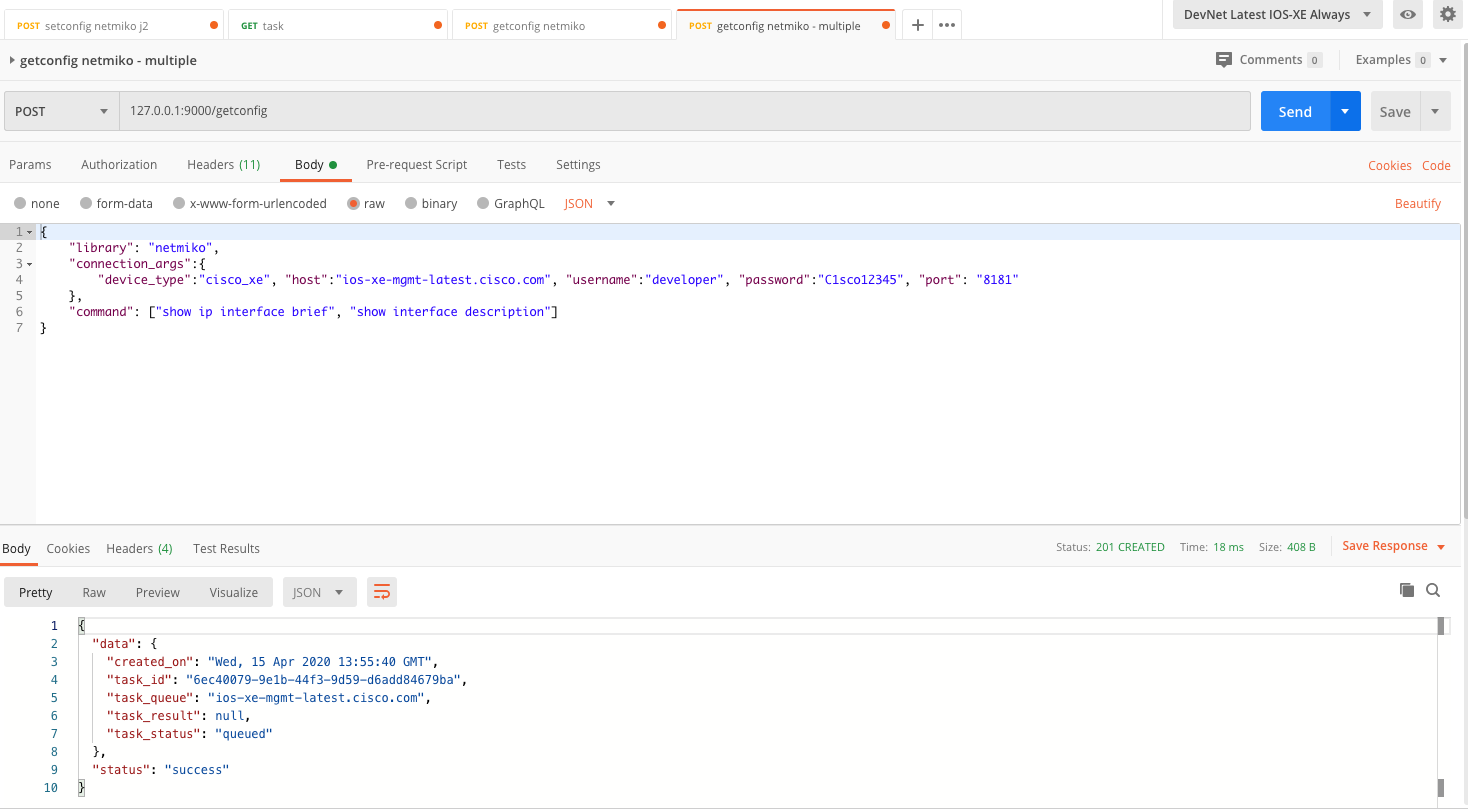
In below screenshot, you can see these two loopback interfaces got added successfully.
Or via SSH into our devices, we see them listed indeed:
csr1000v-1#show ip interface brief
Interface              IP-Address      OK? Method Status                Protocol
GigabitEthernet1       10.10.20.48     YES other  up                    up
GigabitEthernet2       unassigned      YES NVRAM  administratively down down
GigabitEthernet3       unassigned      YES NVRAM  administratively down down
Loopback76             unassigned      YES unset  up                    up
Loopback100            unassigned      YES unset  up                    up
Loopback1000           unassigned      YES unset  up                    up
Loopback2000           10.0.0.40       YES other  up                    up
Loopback3001           200.200.200.230 YES manual up                    up
Loopback3002           200.200.200.231 YES manual up                    up
Service templates
NetPalm supports a feature called Service Templates. The value from service templates comes from the fact they allow you to create things at a service level rather then the individual device level. Sounds pretty abstract right?
Imagine you have dozens of devices onto which you want to add additional interfaces (or add interfactes to certain VLANs, or create trunk ports or…). In the first and second post, we have seen how this could be achieved through calling NetPalm’s getconfig/setconfig API and pass the commands for each device. These could be daunting and error-prone tasks if you need to repeat this for multiple dozens of devices, possibly devices having different operating systems or coming from multiple vendors.
Service templates will allow you to define a single service template that can be used across multiple devices. The service template supports all of the Jinja logic. In other words, it allows you to run IF/ELSE statements inside an individual operation (retrieve, create, delete). The benefit here is that we only need to define such service template once and it will work against all the underlying devices. If we were to do the same withouth service templates, it would require us to call NetPalm’s getconfig/setconfig API but each time specifying different JSON payloads (per vendor, per device and per operation system).
Service templates: code overview
In order to work with service templates, we need to create a service template which needs to be stored in the netpalm > backend > plugins > service_templates folder. NetPalm ships out of the box with some boilerplate templates for you to get started. For this post, I’m using my own service template (we’ll call it loopback.j2), though very much inspired by the existing examples.
A service file defines several CRUD operations, hence you will find a section to get configuration from your device (RETRIEVE), to add some configuration (CREATE) and to delete some configuration from your device (DELETE).
A) Retrieve section
Let’s have a look first at the easiest one, which is the retrieve. As you can see, this is (part of) a Jinja template to which we need to pass some variables like the host, username and password. Also note that to retrieve the interfaces, we will be using netmiko under the hood.
{
"operation": "retrieve",
"payload": {
"library": "netmiko",
"connection_args": {
"device_type": "cisco_xe",
"host": "{{host}}",
"username": "{{username}}",
"password": "{{password}}",
"port": "8181"
},
"command": "show ip interface brief"
}
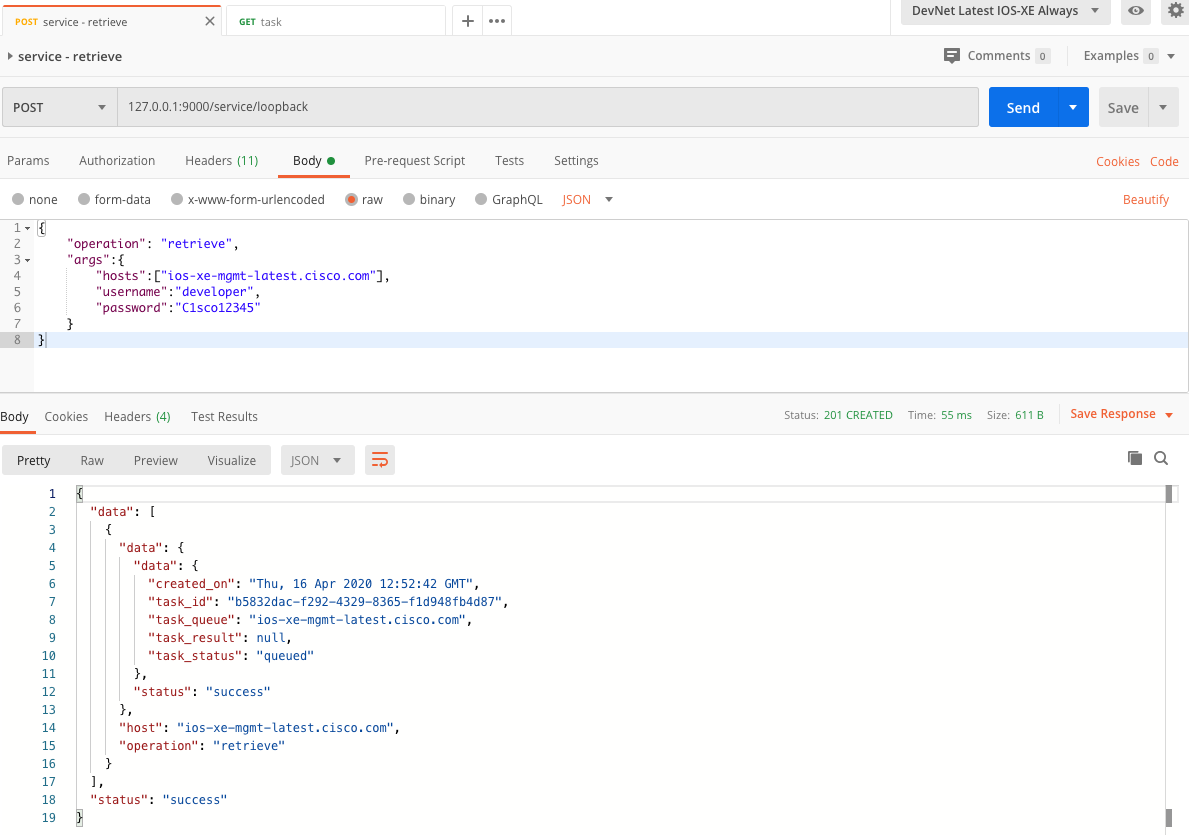
}We will pass in these variables through the json body as part of the REST call. Below you see an example of such body.
{
	"operation": "retrieve",
	"args":{
		"hosts":["ios-xe-mgmt-latest.cisco.com"],
		"username":"developer",
		"password":"C1sco12345"

	}
}
With this piece of information, NetPalm knows you want to use the retrieve part of the service template and will execute the command you specified in that section of the service template.
Let’s try things out now. Go to POSTMAN and issue a GET request to the address http://localhost:9000/service/loopback. The word loopback here refers to the name of the service template (but without the j2 extension)
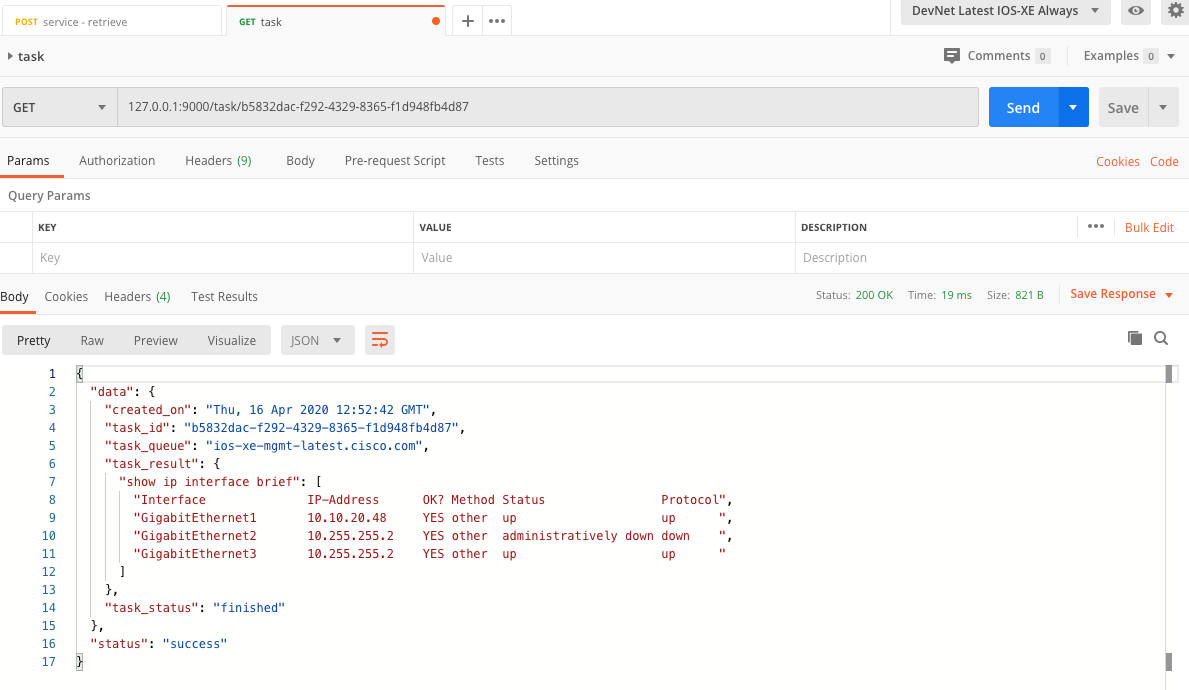
You will get back a task ID which we can then use to query the http://localhost:9000/task API. Doing so, will show you the list of interfaces on our device.
B) Create section
If you understood the above, it will be quite easy to understand also the create and delete sections of the service template. Let’s quickly walk over things here.
Below is the create part of the service template.
      {
        "operation": "create",
        "payload": {
          "library": "napalm",
          "connection_args": {
            "device_type": "cisco_ios",
            "host": "{{host}}",
            "username": "{{username}}",
            "password": "{{password}}",
            "optional_args": {"port": 8181}
        },
        "j2config": {
    	    "template":"loopback_create",
    	    "args":{
              "interfaces": [
                {
                  "name": "Loopback250",
                  "description": "Description for Loopback 250",
                  "ipv4_addr": "200.200.200.20",
                  "ipv4_mask": "255.255.255.255"
                },
                {
                  "name": "Loopback251",
                  "description": "Description for Loopback 251",
                  "ipv4_addr": "200.200.200.21",
                  "ipv4_mask": "255.255.255.255"
                }
              ]
          }
    	  }
It looks pretty similar to the retrieve example from above. Yet, here we are passing a Jinja template as well. How does this work? Well, NetPalm needs to know what you want to create on your device. In our little example, we will be adding two loopback interfaces. While in the retrieve section we wanted to use netmiko, here I deciced to use napalm.
Next, you’ll need to create file in the netpalm > backend > plugins > jinja2_templates folder. We’ll call this file loopback_create.j2 and it looks as follows:
{% for interface in interfaces %}
   interface {{interface.name}}
   description {{interface.description}}
   ip address {{interface.ipv4_addr}} {{interface.ipv4_mask}}
{% endfor %}
This is a simple Jinja2 template, in fact the same one as we used in the first section of this blog post. We’ll need to pass in the data to the template of course and this is exactly what the j2config portion of the create section does for us. As you can see from the service template snippet above, we are providing a list of two interfaces.
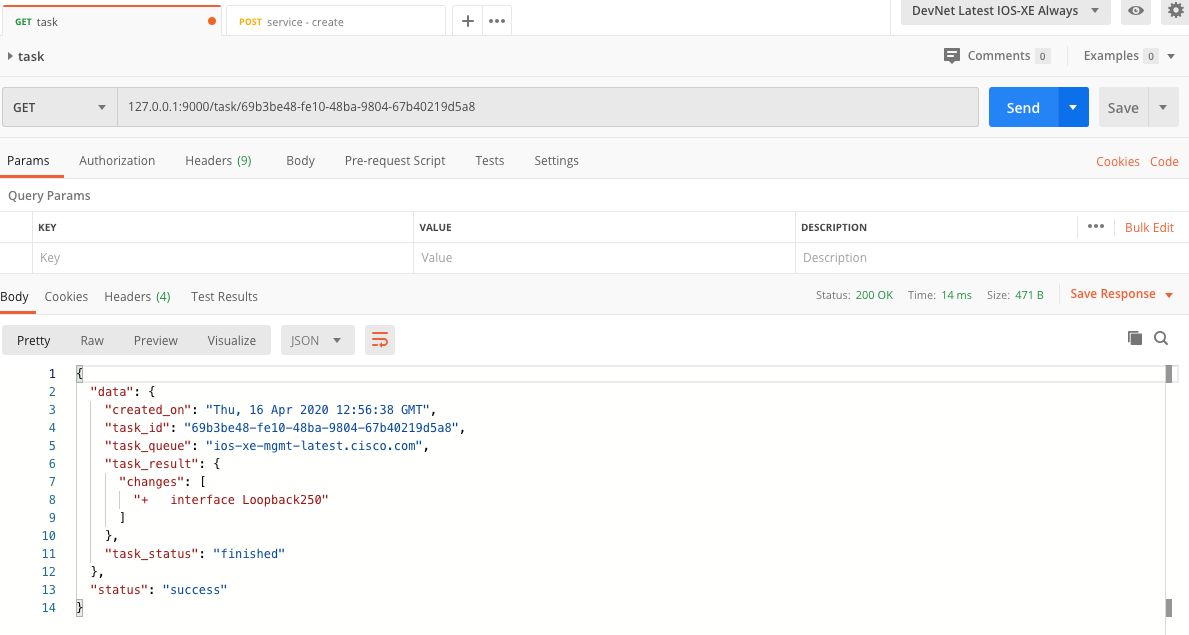
Let’s try things out again. The POSTMAN REST call does not change apart from the fact that we specify the create operation for obvious reasons.

Below you will see that we added the loopback interfaces.
Let’s verify by logging into the device through SSH and you indeed see the loopback interfaces were added successfully.
csr1000v-1#show ip interface brief
Interface              IP-Address      OK? Method Status                Protocol
GigabitEthernet1       10.10.20.48     YES other  up                    up
GigabitEthernet2       10.255.255.2    YES other  administratively down down
GigabitEthernet3       10.255.255.2    YES other  up                    up
Loopback250            200.200.200.20  YES TFTP   up                    up
Loopback251            200.200.200.21  YES TFTP   up                    up
C) Delete section
The delete section is very similar to the create section in terms of the logic. Also here we need to create a Jinja2 template for deleting the loopback interfaces and then refer to this template in the delete section of the service template. So let’s do this:
First, create a file called loopback_remove.j2 in the netpalm > backend > plugins > jinja2_templates folder which contains the following content.
{% for interface in interfaces %}
   no interface {{interface.name}}
{% endfor %}
In the snippet above, pay attention to the word ‘no’ which indicates we want to remove the interface from our device. Also note we only need to know the name of the interface (the description and IP configuration will obviously automatically be deleted by the device).
Next, let’s have a look at the delete operation in the service template.
     "operation": "delete",
        "payload": {
          "library": "napalm",
          "connection_args": {
            "device_type": "cisco_ios",
            "host": "{{host}}",
            "username": "{{username}}",
            "password": "{{password}}",
            "optional_args": {"port": 8181}
          },
        "j2config": {
    	    "template":"loopback_remove",
    	    "args":{
    		    "interfaces": [
                {
                  "name": "Loopback250"
                },
                {
                  "name": "Loopback251"
                }
              ]
    	    }
        }
      }
Very similar to the create section, but here we are referring to the loopback_remove template and we provide just the name of the interface we want to remove.
Let’s once again try things out. As we’re dealing with the delete function, we need to specify the delete operation in the JSON body.
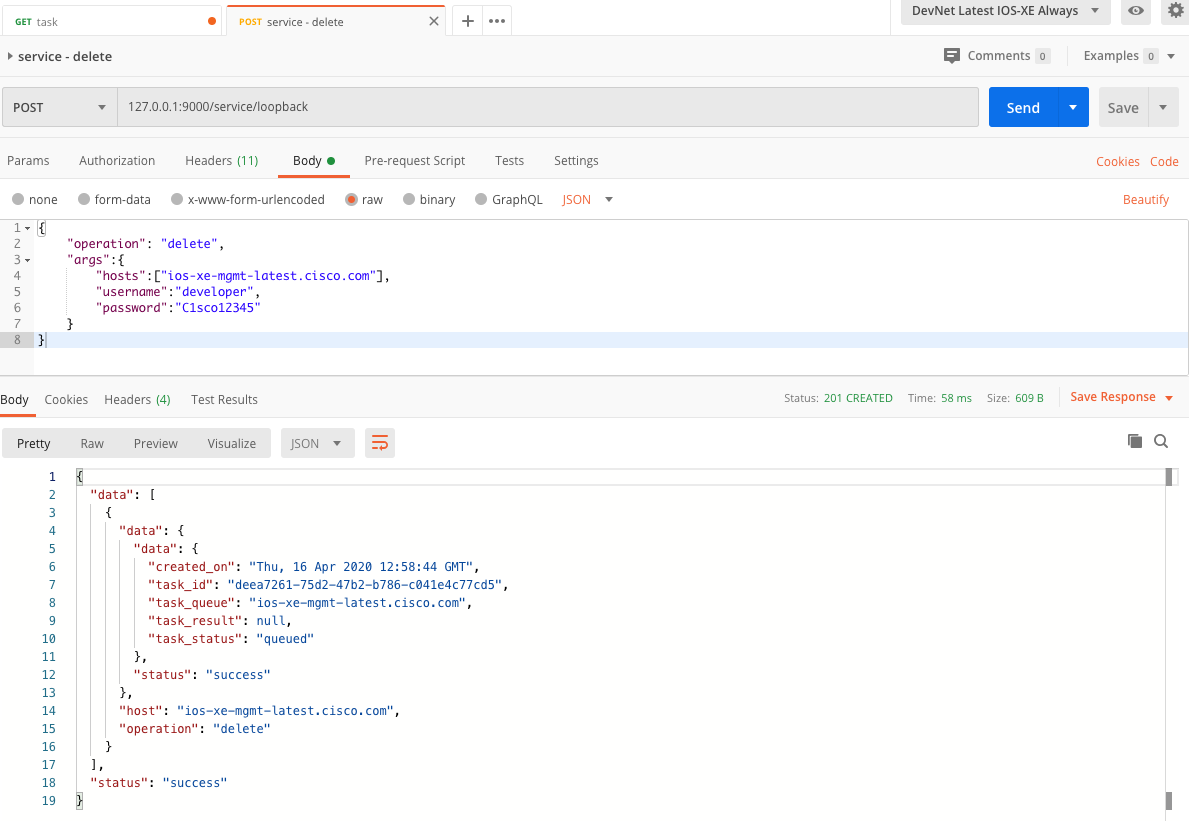
You’ll see we get back an indication that the interfaces were deleted. See below screenshot.
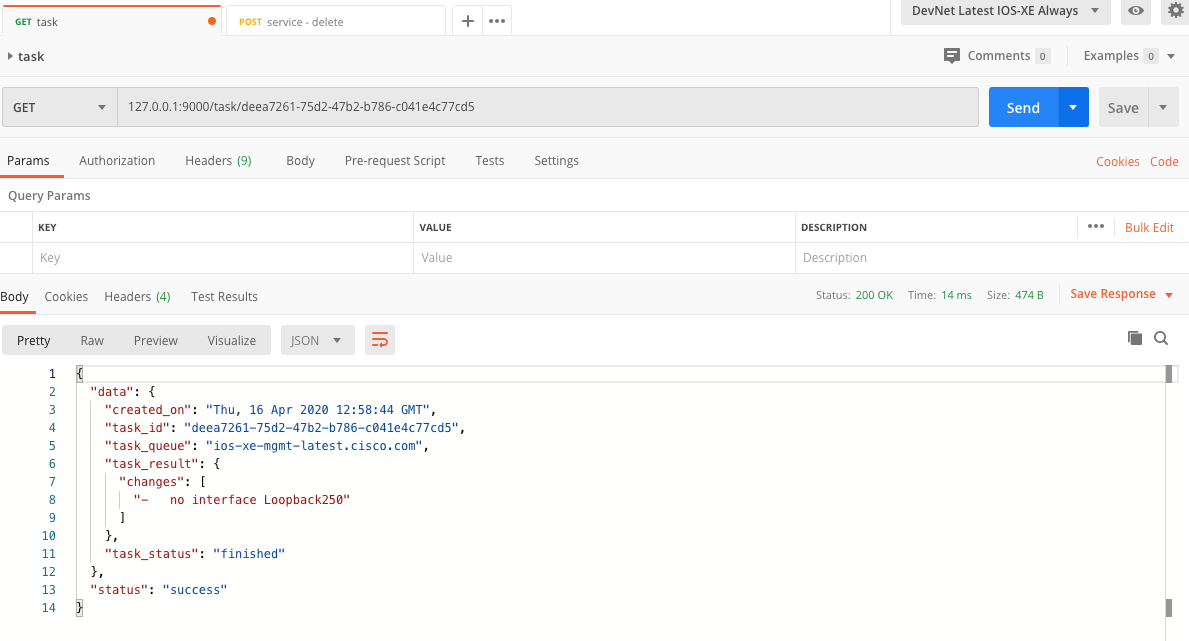
And as usual, let’s verify things again through SSH and you’ll see the loopback interfaces were removed properly.
csr1000v-1#show ip interface brief
Interface              IP-Address      OK? Method Status                Protocol
GigabitEthernet1       10.10.20.48     YES other  up                    up
GigabitEthernet2       10.255.255.2    YES other  administratively down down
GigabitEthernet3       10.255.255.2    YES other  up                    up
The entire service template can be found here.
That’it for now folks. Hope you started to see the benefits of NetPalm Service Templates.