NETCONF/YANG and Python - part 1
What is NETCONF
From the Tail-F website:
NETCONF is a protocol defined by the IETF to “install, manipulate, and delete the configuration of network devices”. NETCONF operations are realized on top of a Remote Procedure Call (RPC) layer using an XML encoding and provides a basic set of operations to edit and query configuration on a network device.
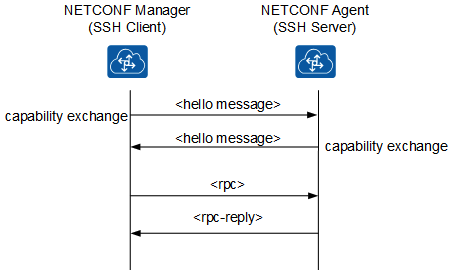
In terms of communication, as mentioned above, NETCONF uses an RPC layer. In below graphic, you can see that a NETCONF manager (usually our SSH client) communicates with a NETCONF Agent (usually the device at hand). They exchange capabilities to understand what features are supported. Using RPC calls, the SSH client can then retrieve information from the SSH server.
Netconf uses YANG. So what is YANG actually?
What is YANG
YANG (Yet Another Next Generation) is a data modelling language, providing a standardized way to model the operational and configuration data of a network device. YANG, being a language is being protocol independent, can then be converted into any encoding format, e.g. XML or JSON.
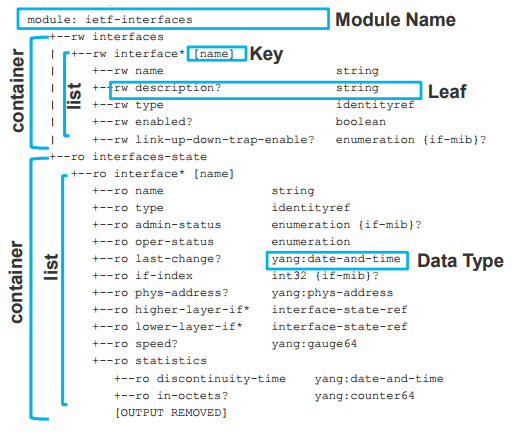
An example of a YANG model (source: Cisco Live DEVNET-1721).
Difference between NETCONF and YANG
Both protocols combined (NETCONF/YANG) provide a standardized way to programmatically update and modify the configuration of a network device.
- YANG is the modelling language that describes the configuration changes.
- NETCONF is the protocol that applies the changes to the relevant datastore (i.e running, saved etc) upon the device.
NETCONF/YANG are certainly not the easiest protocols to understand. In fact, it can be pretty overwhelming at first. Actually, I found the following description to be a pretty nice analogy.
Note: A very good intro to NETCONF and YANG can be found here. I really encourage you to watch the video before continuing. Another one to watch is this one.
Install Netconf Python library
In order to work with NETCONF, we have a library called ncclient. It’s a Python library that facilitates client-side scripting and application development around the NETCONF protocol. Refer to Github for more information on the library. The docs can be found here.
Installing the library is straigthforward. In addition, we also install some additional libraries to work with NETCONF more easily.
WAUTERW-M-65P7:Netconf_Python wauterw$ python3 -m venv venv
WAUTERW-M-65P7:Netconf_Python wauterw$ source venv/bin/activate
(venv) WAUTERW-M-65P7:Netconf_Python wauterw$ pip3 install ncclient pyang xmltodict
***Truncated***
Successfully installed bcrypt-3.1.7 cffi-1.14.0 cryptography-2.8 lxml-4.5.0 ncclient-0.6.7 paramiko-2.7.1 pyang-2.2.1 pycparser-2.20 pynacl-1.3.0 six-1.14.0 xmltodict-0.12.0
Note about devices
For all the examples, we will use a Cisco sandbox environment delivered by Cisco Devnet. Go check out Devnet.. To get a list of all sandboxes, check out this link. For this tutorial, I’m using the IOS XE sandbox (see here).
Netconf and Python: first steps
Let’s check if everything works. We will use the ncclient library to connect to my device in the DevNet sandbox. In the sandbox documentation, you’ll notice the NETCONF port is set to 10000 (standard NETCONF port is 830)
Below script speaks for itself. If all works well you will see that you successfully created a connection between your SSH client (ncclient) and the IOS XE NETCONF agent.
Disclaimer: this is not production-grade code obviously. One should never store the username and password in the clear, not in the source code itself. The examples in the post are merely conceptual and for informational purposes.
from ncclient import manager

m = manager.connect(host='ios-xe-mgmt-latest.cisco.com', port='10000', username='***',
                    password='***', device_params={'name':'iosxe'}, hostkey_verify=False)

print(m.connected)
This will print True:
(venv) WAUTERW-M-65P7:Netconf_Python wauterw$ python3 connect.py
True
Get Capabilities
Basic NETCONF functionality can be extended by the definition of NETCONF capabilities. The set of additional protocol features that an implementation supports is communicated between the server and the client during the capability exchange portion of session setup. Let’s see this in action by executing the below script.
from ncclient import manager

m = manager.connect(host='ios-xe-mgmt-latest.cisco.com', port='10000', username='***',
                    password='***', device_params={'name':'iosxe'}, hostkey_verify=False)

for capability in m.server_capabilities:
   print('*'* 50)
   print(capability)
You will see a HUGE list of capabilities returned from our device.
(venv) WAUTERW-M-65P7:Netconf_Python wauterw$ python3 capabilities.py
***Truncated***
urn:ietf:params:xml:ns:yang:smiv2:UDP-MIB?module=UDP-MIB&revision=2005-05-20
**************************************************
urn:ietf:params:xml:ns:yang:smiv2:VPN-TC-STD-MIB?module=VPN-TC-STD-MIB&revision=2005-11-15
**************************************************
urn:ietf:params:xml:ns:netconf:base:1.0?module=ietf-netconf&revision=2011-06-01
**************************************************
urn:ietf:params:xml:ns:yang:ietf-netconf-with-defaults?module=ietf-netconf-with-defaults&revision=2011-06-01
Get Running Config
Using NETCONF, we can also retrieve the ‘running-config’ from our device. Below is the Python script for that. We again make a connection to our device and then we issue the get_config method. Refer to the documentation for more context.
from ncclient import manager
from pprint import pprint
import xmltodict
import xml.dom.minidom

router = {
   'host': 'ios-xe-mgmt-latest.cisco.com',
   'port': '10000',
   'username': '***',
   'password': '***'
}

m = manager.connect(host=router['host'], port=router['port'], username=router['username'],
                    password=router['password'], device_params={'name':'iosxe'}, hostkey_verify=False)

running_config = m.get_config('running').xml
print(xml.dom.minidom.parseString(running_config).toprettyxml())

m.close_session()
Note, instead of
m = manager.connect(host=router['host'], port=router['port'], username=router['username'],
                    password=router['password'], device_params={'name':'iosxe'}, hostkey_verify=False)
we could have also written something shorter:
m = manager.connect(**router, device_params={'name':'iosxe'}, hostkey_verify=False)For printing the response, we are performing some XML manipulation. The issue is that the get_config returns a GetReply object. If we print out the content, it would be something like:
<rpc-reply xmlns="urn:ietf:params:xml:ns:netconf:base:1.0" message-id="urn:uuid:0b1df155-ae50-432f-8293-d38dc1f66baf" xmlns:nc="urn:ietf:params:xml:ns:netconf:base:1.0"><data><app-hosting-cfg-data xmlns="http://cisco.com/ns/yang/Cisco-IOS-XE-app-hosting-cfg"><apps><app><application-name>guestshell</application-name><application-network-resource><vnic-gateway-0>0</vnic-gateway-0><virtualportgroup-guest-interface-name-1>0</virtualportgroup-guest-interface-name-1><virtualportgroup-guest-ip-address-1>192.168.35.2</virtualportgroup-guest-i
This huge string is difficult to read of course, but if you look inside it contains XML tags. Hence we are using xml.dom.minidom library to print it out more nicely.
(venv) WAUTERW-M-65P7:Netconf_Python wauterw$ python3 running_config.py
<rpc-reply xmlns="urn:ietf:params:xml:ns:netconf:base:1.0" message-id="urn:uuid:0b1df155-ae50-432f-8293-d38dc1f66baf" xmlns:nc="urn:ietf:params:xml:ns:netconf:base:1.0">
  <data>
     ***Truncated***
  </data>
</rpc-reply>
I truncated the reponse here, but you can clearly see that we received an RPC reply and inside the data you will find the running config.
Get Running Config and print to file
In below snippet, we do essentually the same as in the previous script, instead we will print out the reply to a text file instead of showing it inside our terminal.
from ncclient import manager

router = {
   'ip': 'ios-xe-mgmt-latest.cisco.com',
   'port': '10000',
   'username': '***',
   'password': '***'
}

m = manager.connect(host=router['ip'], port=router['port'], username=router['username'],
                    password=router['password'], device_params={'name':'iosxe'}, hostkey_verify=False)

c = m.get_config(source='running').data_xml

with open("%s.xml" % router['ip'], 'w') as f:
   f.write(c)
If you execute this script, you will find an XML file in your current directory with the contents of the running-config.
Use filter
Sometimes we are only interested in a very particular part of the config. NETCONF accomodates this with the ability to specify a filter. In below script, we will specify a filter that only shows the information for interface GigabitEthernet3. The get_config also accepts a filter parameter (documentation). So in below script, we will simply pass that filter to the get_config method and see what happens.
from ncclient import manager
from pprint import pprint
import xmltodict
import xml.dom.minidom

router = {
   'ip': 'ios-xe-mgmt-latest.cisco.com',
   'port': '10000',
   'username': '***',
   'password': '***'
}

m = manager.connect(host=router['ip'], port=router['port'], username=router['username'],
                    password=router['password'], device_params={'name':'iosxe'}, hostkey_verify=False)

netconf_filter = """
<filter>
   <interfaces xmlns="urn:ietf:params:xml:ns:yang:ietf-interfaces">
      <interface>
         <name>GigabitEthernet1</name>
      </interface>
   </interfaces>
</filter>
"""

running_config = m.get_config("running", netconf_filter)

running_config_xml = xmltodict.parse(running_config.xml)["rpc-reply"]["data"]
print(xml.dom.minidom.parseString(str(running_config)).toprettyxml())
Instead of:
running_config = m.get_config("running", netconf_filter)We could have also written:
running_config = m.get(netconf_filter)Below is the output from running the above script. You can clearly see the RPC reply here. And as expected, the script returns the information related to the requested interface.
(venv) WAUTERW-M-65P7:Netconf_Python wauterw$ python3 netconf_filter_part1.py
<?xml version="1.0" ?>
<rpc-reply xmlns="urn:ietf:params:xml:ns:netconf:base:1.0" xmlns:nc="urn:ietf:params:xml:ns:netconf:base:1.0" message-id="urn:uuid:ada291fe-01d6-476b-ad48-1b209c41381f">
  <data>
    <interfaces xmlns="urn:ietf:params:xml:ns:yang:ietf-interfaces">
      <interface>
        <name xmlns:nc="urn:ietf:params:xml:ns:netconf:base:1.0">GigabitEthernet1</name>
        <description>MANAGEMENT INTERFACE - DONOT TOUCH ME</description>
        <type xmlns:ianaift="urn:ietf:params:xml:ns:yang:iana-if-type">ianaift:ethernetCsmacd</type>
        <enabled>true</enabled>
        <ipv4 xmlns="urn:ietf:params:xml:ns:yang:ietf-ip">
          <address>
            <ip>10.10.20.48</ip>
            <netmask>255.255.255.0</netmask>
          </address>
        </ipv4>
        <ipv6 xmlns="urn:ietf:params:xml:ns:yang:ietf-ip"/>
      </interface>
    </interfaces>
  </data>
</rpc-reply>
If you want to extract some of this information you can do so using the following code. The full script can be found here.
print(f'Interface name: { interface["name"]["#text"] }')
print(f'Interface description: { interface["description"] }')
print(f'Interface IP address: {  interface["ipv4"]["address"]["ip"] }')
print(f'Interface IP netmask: {  interface["ipv4"]["address"]["netmask"] }')
This will print out the following:
(venv) WAUTERW-M-65P7:Netconf_Python wauterw$ python3 netconf_filter_part2.py
Interface name: GigabitEthernet1
Interface description: MANAGEMENT INTERFACE - DON'T TOUCH ME
Interface IP address: 10.10.20.48
Interface IP netmask: 255.255.255.0
The above scripts will help you to understand how to work with ncclient and allows you to read information from your device using NETCONF. In a follow-up blog post, I will address how we can make configuration changes via NETCONF.
The code for this blogpost can be found at Github.
Split per section:
- Netconf and Python: first steps: source code
- Get Capabilities: source code
- Get Running Config: source code
- Get Running Config and print to file: source code
- Use filter - part 1: source code
- Use filter - part 2: source code