DigitalOcean - Create K8S cluster with Terraform
Introduction
In this post, we are going to create a Kubernetes cluster on DigitalOcean using Terraform. Something I wanted to do already for quite some time but never got to it really. In the past we have used already some different methods to install a Kubernetes cluster. He’s an overview:
- On Digitalocean droplets using Ansible
- On AWS using Ansible
- On vSphere using Ansible
- On Raspberry Pi 4 ESXi host
Terraform script
Luckily Terraform provides a beautiful module for DigitalOcean. You can find more info here. The Kubernetes specific part can be found here.
provider "digitalocean"{
  token = var.do_token
}

resource "digitalocean_kubernetes_cluster" "kubernetes_cluster" {
  name    = var.k8s_clustername
  region  = var.region
  version = var.k8s_version

  tags = ["k8s"]

  # This default node pool is mandatory
  node_pool {
    name       = var.k8s_poolname
    size       = "s-2vcpu-2gb"
    auto_scale = false
    node_count = var.k8s_count
    tags       = ["node-pool-tag"]
  }

}

output "cluster-id" {
  value = digitalocean_kubernetes_cluster.kubernetes_cluster.id
}
We will use the following variables:
The variables file:
variable "do_token" {
  default = "2c***5"
}

variable "region" {
  default = "ams3"
}

variable "k8s_clustername" {
  default = "clusterwim"
}

variable "k8s_version" {
  default = "1.19.3-do.3"
}

variable "k8s_poolname" {
  default = "worker-pool"
}

variable "k8s_count" {
  default = "3"
}
The tricky part here might be to find out what are the values that can be used for e.g. the k8s_version variable, or the compute size. We can use a Digitalocean CLI tool for that called DOCTL. Installation instructions can be found here.
For the compute size:
~/DigitalOcean_K8S ❯ doctl compute size list
Slug                  Memory    VCPUs    Disk    Price Monthly    Price Hourly
s-1vcpu-1gb           1024      1        25      5.00             0.007440
512mb                 512       1        20      5.00             0.007440
s-1vcpu-2gb           2048      1        50      10.00            0.014880
1gb                   1024      1        30      10.00            0.014880
s-3vcpu-1gb           1024      3        60      15.00            0.022320
s-2vcpu-2gb           2048      2        60      15.00            0.022320
For the regions:
~/DigitalOcean_K8S ❯ doctl compute region list
Slug    Name               Available
nyc1    New York 1         true
sfo1    San Francisco 1    false
nyc2    New York 2         false
ams2    Amsterdam 2        false
sgp1    Singapore 1        true
lon1    London 1           true
nyc3    New York 3         true
ams3    Amsterdam 3        true
fra1    Frankfurt 1        true
tor1    Toronto 1          true
sfo2    San Francisco 2    true
blr1    Bangalore 1        true
sfo3    San Francisco 3    true
Perform Terraform deployment
Next, let’s get started with the Terraform part. First, run terraform init to download the required providers
~/DigitalOcean_K8S ❯ terraform init

Initializing the backend...

Initializing provider plugins...
- Finding latest version of digitalocean/digitalocean...
- Installing digitalocean/digitalocean v2.4.0...
- Installed digitalocean/digitalocean v2.4.0 (signed by a HashiCorp partner, key ID F82037E524B9C0E8)

Partner and community providers are signed by their developers.
If you'd like to know more about provider signing, you can read about it here:
https://www.terraform.io/docs/plugins/signing.html

The following providers do not have any version constraints in configuration,
so the latest version was installed.

To prevent automatic upgrades to new major versions that may contain breaking
changes, we recommend adding version constraints in a required_providers block
in your configuration, with the constraint strings suggested below.

* digitalocean/digitalocean: version = "~> 2.4.0"

Terraform has been successfully initialized!

You may now begin working with Terraform. Try running "terraform plan" to see
any changes that are required for your infrastructure. All Terraform commands
should now work.

If you ever set or change modules or backend configuration for Terraform,
rerun this command to reinitialize your working directory. If you forget, other
commands will detect it and remind you to do so if necessary.
Next, run terraform plan to verify what resources are planned to be created:
~/DigitalOcean-K8S ❯ terraform plan
Refreshing Terraform state in-memory prior to plan...
The refreshed state will be used to calculate this plan, but will not be
persisted to local or remote state storage.


------------------------------------------------------------------------

An execution plan has been generated and is shown below.
Resource actions are indicated with the following symbols:
  + create

Terraform will perform the following actions:

  # digitalocean_kubernetes_cluster.kubernetes_cluster will be created
  + resource "digitalocean_kubernetes_cluster" "kubernetes_cluster" {
      + cluster_subnet = (known after apply)
      + created_at     = (known after apply)
      + endpoint       = (known after apply)
      + id             = (known after apply)
      + ipv4_address   = (known after apply)
      + kube_config    = (sensitive value)
      + name           = "k8scluster_wim"
      + region         = "ams3"
      + service_subnet = (known after apply)
      + status         = (known after apply)
      + tags           = [
          + "k8s",
        ]
      + updated_at     = (known after apply)
      + version        = "1.19.3-do.3"
      + vpc_uuid       = (known after apply)

      + node_pool {
          + actual_node_count = (known after apply)
          + auto_scale        = false
          + id                = (known after apply)
          + name              = "worker-pool"
          + node_count        = 3
          + nodes             = (known after apply)
          + size              = "s-2vcpu-2gb"
          + tags              = [
              + "node-pool-tag",
            ]
        }
    }

Plan: 1 to add, 0 to change, 0 to destroy.

------------------------------------------------------------------------

Note: You didn't specify an "-out" parameter to save this plan, so Terraform
can't guarantee that exactly these actions will be performed if
"terraform apply" is subsequently run.
And finally, let’s apply the configuration through terraform apply
~/DigitalOcean_K8S ❯ terraform apply --auto-approve
digitalocean_kubernetes_cluster.kubernetes_cluster: Creating...
digitalocean_kubernetes_cluster.kubernetes_cluster: Still creating... [10s elapsed]
digitalocean_kubernetes_cluster.kubernetes_cluster: Still creating... [20s elapsed]
digitalocean_kubernetes_cluster.kubernetes_cluster: Still creating... [30s elapsed]
digitalocean_kubernetes_cluster.kubernetes_cluster: Still creating... [40s elapsed]
digitalocean_kubernetes_cluster.kubernetes_cluster: Still creating... [50s elapsed]
digitalocean_kubernetes_cluster.kubernetes_cluster: Still creating... [1m0s elapsed]
<TRUNCATED>
digitalocean_kubernetes_cluster.kubernetes_cluster: Still creating... [5m10s elapsed]
digitalocean_kubernetes_cluster.kubernetes_cluster: Still creating... [5m20s elapsed]
digitalocean_kubernetes_cluster.kubernetes_cluster: Still creating... [5m30s elapsed]
digitalocean_kubernetes_cluster.kubernetes_cluster: Creation complete after 5m35s [id=02b7c276-b262-4a32-8178-26d812a1623b]

Apply complete! Resources: 1 added, 0 changed, 0 destroyed.

Outputs:

cluster-id = 02b7c276-b262-4a32-8178-26d812a1623b
During cluster provisioning you will see the progress bar moving to the right.
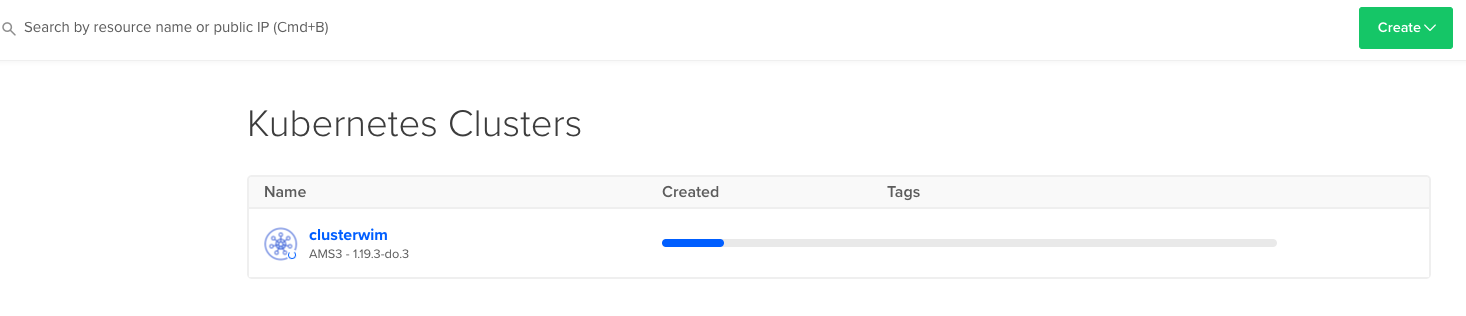
Once finished, you will see the K8S cluster available:
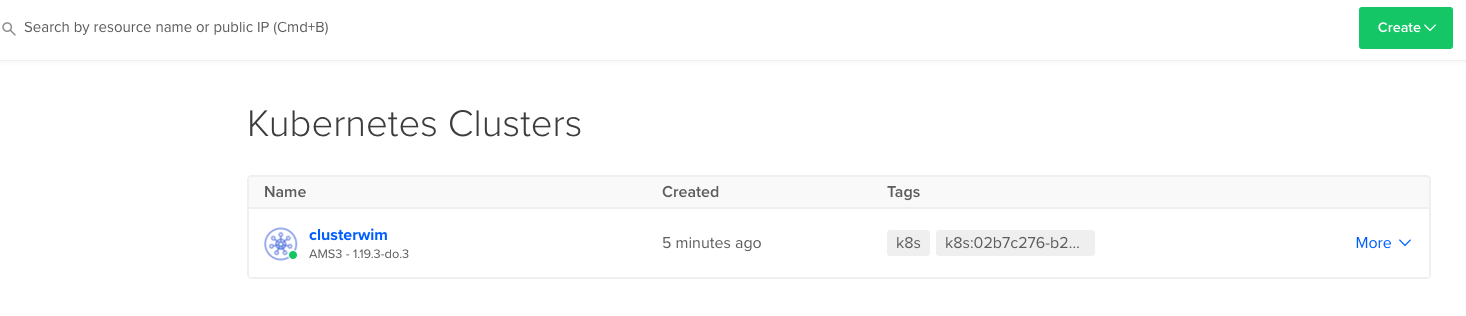
And it will tell you to download the config file:
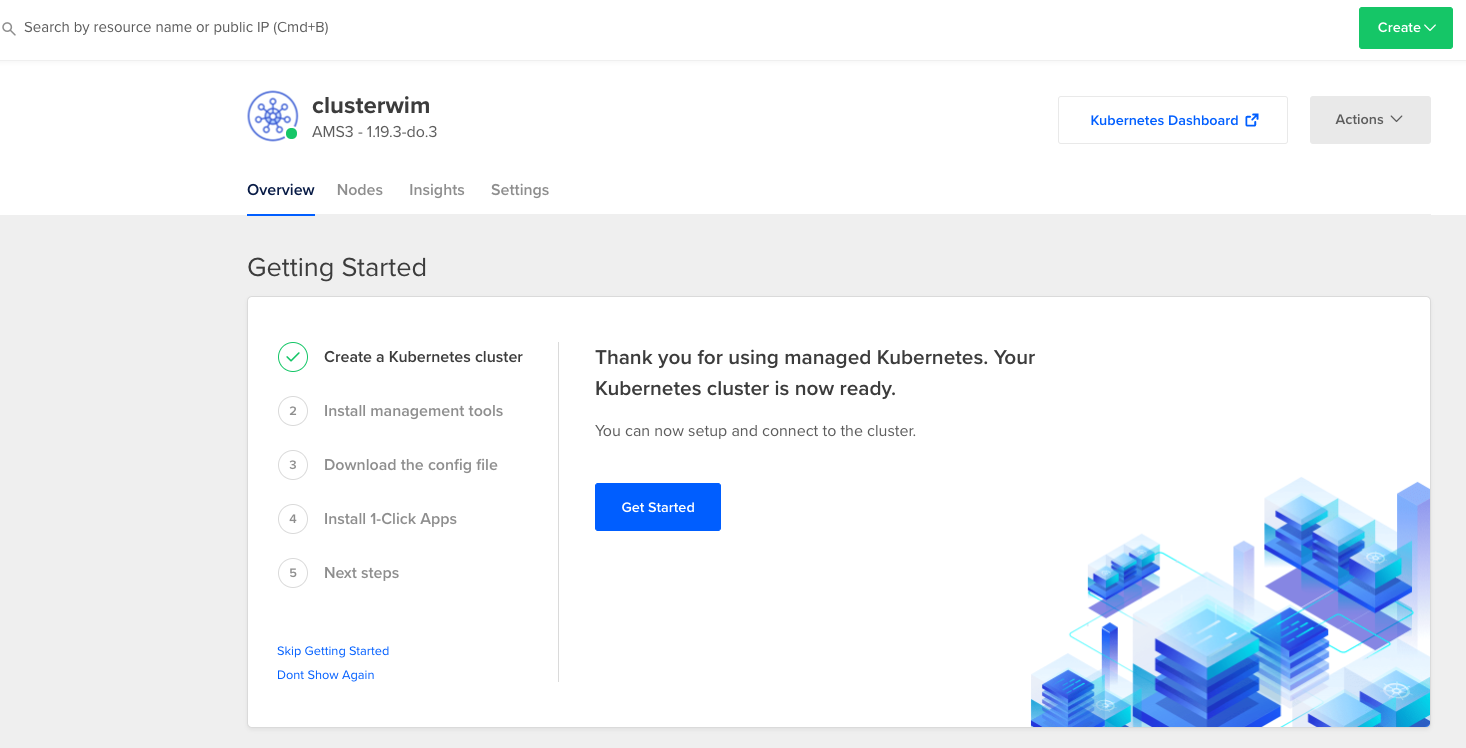
Connect to the Kubernetes cluster
Next we will connect to our Kubernetes cluster. To achieve that, we need to download the kubeconfig file. We can use CURL to do this. First, let’s create an environment variable with our cluster ID.
~/DigitalOcean_K8S ❯ export CLUSTER_ID=02b7c276-b262-4a32-8178-26d812a1623bNext, let’s go ahead and download the kubectl config file. We will do it through CURL but we could also manually download it from the DigitalOcean console:
~/DigitalOcean_K8S ❯ curl -X GET \
-H "Content-Type: application/json" \
-H "Authorization: Bearer 2c5****95e8f6b9b75714dd5" \
"https://api.digitalocean.com/v2/kubernetes/clusters/$CLUSTER_ID/kubeconfig" \
> config
  % Total    % Received % Xferd  Average Speed   Time    Time     Time  Current
                                 Dload  Upload   Total   Spent    Left  Speed
100  2020    0  2020    0     0    952      0 --:--:--  0:00:02 --:--:--   952
This will download a config file in your current repository. Now we need to set the KUBECONFIG environment variable to point to the downloaded config file in our folder. We can do this as follows:
~/DigitalOcean_K8S ❯ export KUBECONFIG=$(pwd)/configLet’s now see if everything works as expected:
~/DigitalOcean_K8S ❯ kubectl cluster-info
Kubernetes master is running at https://02b7c276-b262-4a32-8178-26d812a1623b.k8s.ondigitalocean.com
CoreDNS is running at https://02b7c276-b262-4a32-8178-26d812a1623b.k8s.ondigitalocean.com/api/v1/namespaces/kube-system/services/kube-dns:dns/proxy

To further debug and diagnose cluster problems, use 'kubectl cluster-info dump'.
This gives back indeed information related to our DigitalOcean Kubernetes cluster. Let’s see our nodes:
~/DigitalOcean_K8S ❯ kubectl get nodes
NAME                STATUS   ROLES    AGE     VERSION
worker-pool-39dfa   Ready    <none>   6m53s   v1.19.3
worker-pool-39dfe   Ready    <none>   6m50s   v1.19.3
worker-pool-39dfg   Ready    <none>   7m3s    v1.19.3
And indeed, also here we get the workers from our Kubernetes cluster. All works, have fun deploying some applications onto the K8S cluster. Code can be found here.