DigitalOcean - Create droplets instances with Terraform
Introduction
In this post, we are going to create a server (aka droplets) on DigitalOcean. They will be running Ubuntu. There’s plenty of ways doing it but for this post I decided to give Terraform a try.
Pre-requisites
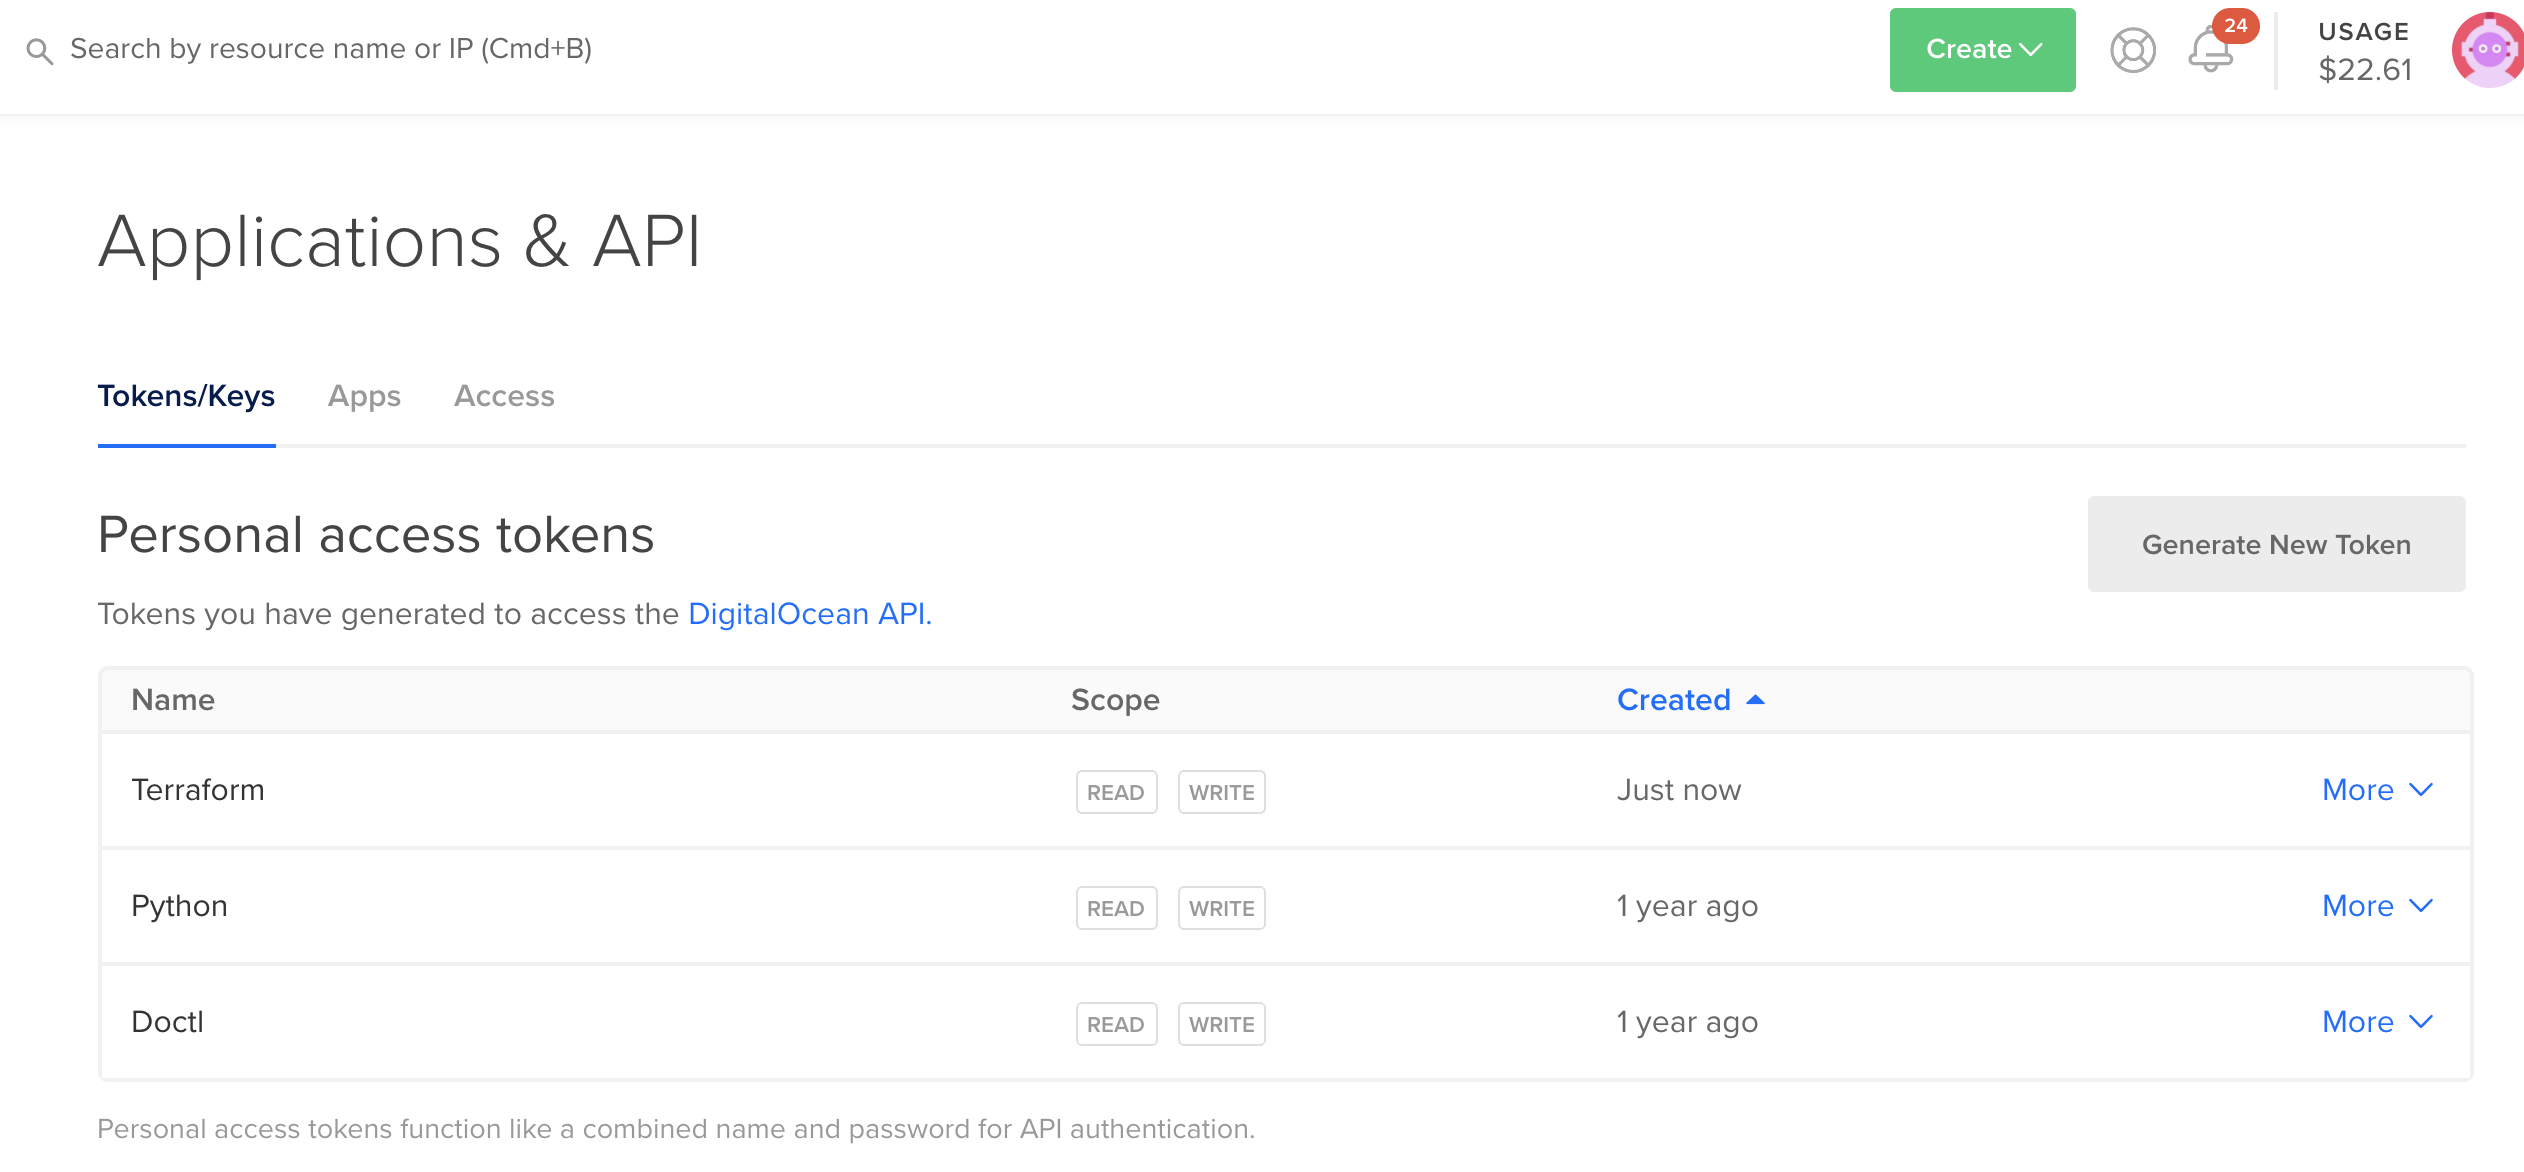
I’m assuming you have already a DigitalOcean account and have access to its webinterface. In order to create droplets via Terraform, you will need to get API access. On DigitalOcean’s webinterface, go to API and click “Generate Token”.

After generating the token, you will see an entry like the one below (we called our token ‘Terraform’)
Next, you will also need the fingerprint of the SSH key you want to use to access the provisioned server. Therefore go to your Account page and then to Security. There is a section called “SSH keys”. You’ll want to copy/paste somewhere the fingerprint of the key you wish to use. We will need it in the variable file for Terraform a bit later in this tutorial.
Creating the Terraform scripts
The below script will create a droplet called server 1 on DigitalOcean and will apply also a tag ‘webserver’ to the droplet.
Create a file and copy/past the below information. Note that the name of the file does not really matter as long as the extension is ‘tf’.
provider "digitalocean"{
  token = var.do_token
}

resource "digitalocean_droplet" "myserver" {
   count = var.number_servers
   name = "server-${count.index}"
   image = "ubuntu-18-04-x64"
   size = "1gb"
   region = var.region
   ssh_keys = [
        var.ssh_fingerprint
   ]
   tags   = ["${digitalocean_tag.webserver.id}"]
}

resource "digitalocean_tag" "webserver" {
    name = "webserver"
}
And the corresponding variables file.
variable "do_token" {
  default = "8***d"
}

variable "region" {
  default = "AMS3"
}

variable "ssh_fingerprint" {
  default =  "5a:25:***:c9:8d:03"
}

variable "number_servers" {
  default = "2"
}
Then execute the command ‘terraform init’. This will essentially download the DigitalOcean plugin and initialise it.
WAUTERW-M-65P7:DigitalOcean_Terraform wauterw$ terraform init

Initializing the backend...

* provider.digitalocean: version = "~> 0.8"

Terraform has been successfully initialized!
***Truncated***
Next, perform a terraform plan as follows.
WAUTERW-M-65P7:DigitalOcean_Terraform wauterw$ terraform plan
Refreshing Terraform state in-memory prior to plan...

***Truncated***

Plan: 3 to add, 0 to change, 0 to destroy.
So we can see that the plan is to add three resources, essentially these are the two droplets themselves and then also the tag.
WAUTERW-M-65P7:DigitalOcean_Terraform wauterw$ terraform apply
***Truncated***
digitalocean_tag.webserver: Creating...
digitalocean_tag.webserver: Creation complete after 2s [id=webserver]
digitalocean_droplet.myserver[0]: Creating...
digitalocean_droplet.myserver[1]: Creating...
digitalocean_droplet.myserver[1]: Still creating... [10s elapsed]
digitalocean_droplet.myserver[0]: Still creating... [10s elapsed]
digitalocean_droplet.myserver[0]: Still creating... [20s elapsed]
digitalocean_droplet.myserver[1]: Still creating... [20s elapsed]
digitalocean_droplet.myserver[1]: Still creating... [30s elapsed]
digitalocean_droplet.myserver[0]: Still creating... [30s elapsed]
digitalocean_droplet.myserver[1]: Creation complete after 34s [id=186893061]
digitalocean_droplet.myserver[0]: Creation complete after 34s [id=186893059]
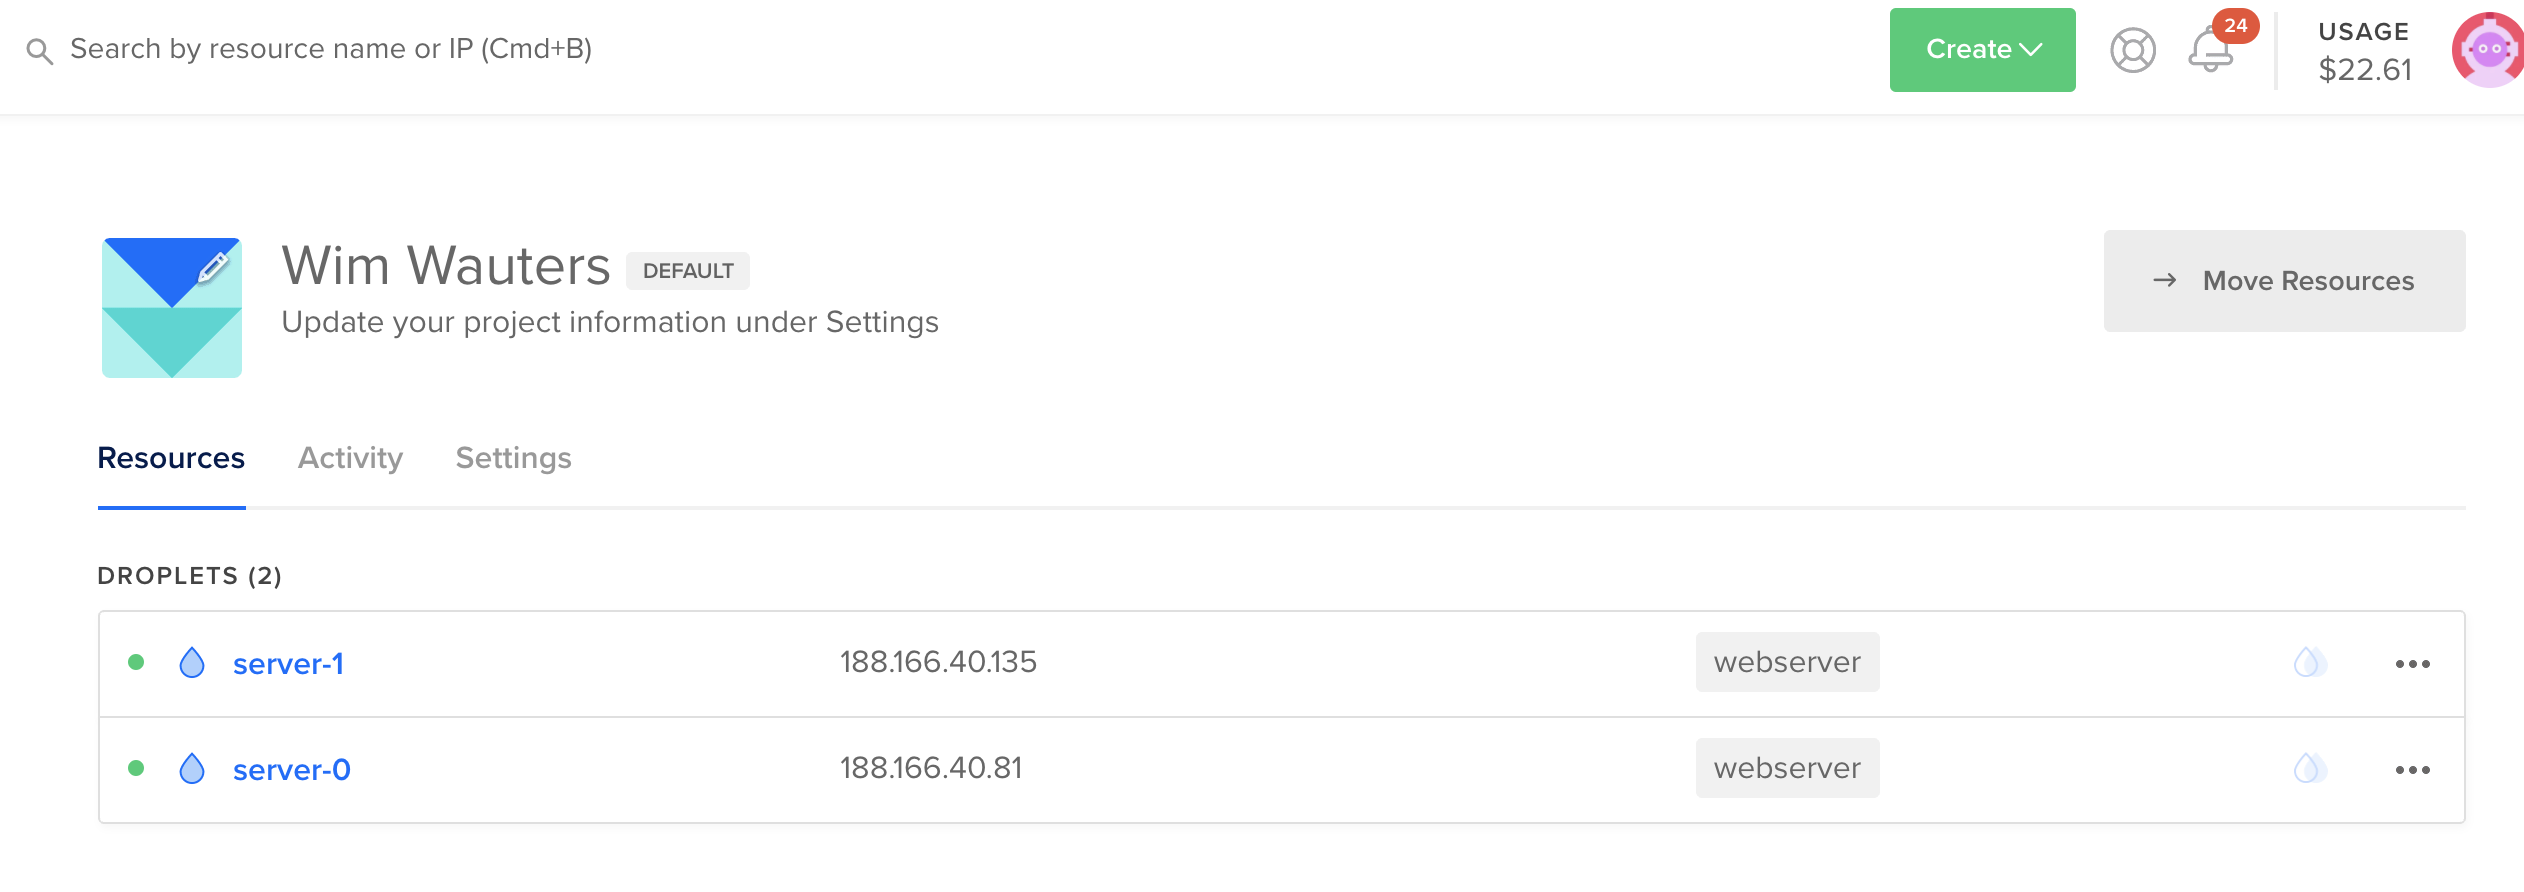
Apply complete! Resources: 3 added, 0 changed, 0 destroyed.As indicated in the output, the servers were created successfully and also the tag was applied properly (hence 3 resources: 2 servers and 1 tag resource)
*.tfstate file
The tfstate file contains the state of the infrastructure on the DigitalOcean platform. Terraform keeps this statefile to make it easy to modify or delete resources at a later moment.
{
  "version": 4,
  "terraform_version": "0.12.24",
  "serial": 4,
  "lineage": "89eab7df-d695-6da3-f8b5-a660bfd2311d",
  "outputs": {},
  "resources": [
    {
      "mode": "managed",
      "type": "digitalocean_droplet",
      "name": "myserver",
      "each": "list",
      "provider": "provider.digitalocean",
      "instances": [
        {
          "index_key": 0,
          "schema_version": 1,
         ***Truncated***

        {
          "index_key": 1,
          "schema_version": 1,
          "attributes": {
            "backups": false,
            "created_at": "2020-03-31T19:18:38Z",

         ***Truncated***

            "volume_ids": []
          },
          "private": "eyJzY2hlbWFfdmVyc2lvbiI6IjEifQ==",
          "dependencies": [
            "digitalocean_tag.webserver"
          ]
        }
      ]
    },

    ***Truncated***
}
SSH into the server
Let’s now try to ssh into the server by using our keypair. Go to the local folder on your PC/MAC and locate the public key that corresponds to the SSH key you uploaded to the DO webinterface.
WAUTERW-M-65P7:Keys wauterw$ ssh -i keypair_digitalocean_146185179184 root@188.166.40.81
The authenticity of host '188.166.40.81 (188.166.40.81)' can't be established.
ECDSA key fingerprint is SHA256:XcR+DRg9Dz5eYeLDdh6c0K7Mx2K6lmnVKELrYwT1wQk.
Are you sure you want to continue connecting (yes/no/[fingerprint])? yes
Warning: Permanently added '188.166.40.81' (ECDSA) to the list of known hosts.
Welcome to Ubuntu 18.04.3 LTS (GNU/Linux 4.15.0-66-generic x86_64)

 * Documentation:  https://help.ubuntu.com
 * Management:     https://landscape.canonical.com
 * Support:        https://ubuntu.com/advantage

  System information as of Tue Mar 31 19:23:31 UTC 2020

  System load:  0.0               Processes:           84
  Usage of /:   3.3% of 28.90GB   Users logged in:     0
  Memory usage: 11%               IP address for eth0: 188.166.40.81
  Swap usage:   0%

0 packages can be updated.
0 updates are security updates.

The programs included with the Ubuntu system are free software;
the exact distribution terms for each program are described in the
individual files in /usr/share/doc/*/copyright.

Ubuntu comes with ABSOLUTELY NO WARRANTY, to the extent permitted by
applicable law.

root@server-0:~#
Deleting the server
Deleting the server is very easy with Terraform. Just use the terraform destroy command will do the trick.
WAUTERW-M-65P7:DigitalOcean_Terraform wauterw$ terraform destroy
digitalocean_tag.webserver: Refreshing state... [id=webserver]
digitalocean_droplet.myserver[1]: Refreshing state... [id=186893061]
digitalocean_droplet.myserver[0]: Refreshing state... [id=186893059]

An execution plan has been generated and is shown below.
Resource actions are indicated with the following symbols:
  - destroy

***Truncated***

Plan: 0 to add, 0 to change, 3 to destroy.

digitalocean_droplet.myserver[1]: Destroying... [id=186893061]
digitalocean_droplet.myserver[0]: Destroying... [id=186893059]
digitalocean_droplet.myserver[0]: Still destroying... [id=186893059, 10s elapsed]
digitalocean_droplet.myserver[1]: Still destroying... [id=186893061, 10s elapsed]
digitalocean_droplet.myserver[0]: Still destroying... [id=186893059, 20s elapsed]
digitalocean_droplet.myserver[1]: Still destroying... [id=186893061, 20s elapsed]
digitalocean_droplet.myserver[0]: Destruction complete after 23s
digitalocean_droplet.myserver[1]: Destruction complete after 24s
digitalocean_tag.webserver: Destroying... [id=webserver]
digitalocean_tag.webserver: Destruction complete after 0s

Destroy complete! Resources: 3 destroyed.
As you can imagine the droplets have been destroyed successfully.
You can check the files in this repo.