Create AWS instances with Terraform
Intoduction
In this blogpost, we will create an AWS instance onto EC2 entirely using Terraform. Nothing too complex as such, but better to start with something fairly easy and continue to expand on it. Which is what we will do in next blog posts.
Code
We will start off with creating a file called provider.tf. As the filename suggests we will configure the Terraform AWS provider in that file.
provider "aws" {
  version    = "~> 2.0"
  region     = var.ec2_region
}
The meat of configuring EC2 instances is in the below file. I have the tendency to call this file the main.tf but as you likely know, the filename is entirely up to your imagination.
As we want to create an EC2 instance, we will add a resource ‘aws_instance’ and provide it the arguments it requires. I think these speak for itself. In case you are interested what other arguments can be specified, please refer to the Terraform documentation.
As we want to know which IP addresses AWS assigned to our EC2 instance, we are also outputting some these. Again, if you are interested in all the arguments that can be output, please see here.
resource "aws_instance" "Server" {
  ami           = var.ec2_image
  instance_type = var.ec2_instance_type
  key_name      = var.ec2_keypair
  count         = var.ec2_count
  tags = {
    Name = var.ec2_tags
  }
}

output "instance_ip_addr" {
  value       = aws_instance.Server.*.private_ip
  description = "The private IP address of the main server instance."
}

output "instance_ips" {
  value = aws_instance.Server.*.public_ip
}
You will notice that we are referencing some variables in that file so we also need to declare them. This is something we will do in the variables.tf file.
variable "ec2_region" {
  default = "eu-west-1"
}

variable "ec2_image" {
  default = "ami-00035f41c82244dab"
}

variable "ec2_instance_type" {
  default = "t2.micro"
}

variable "ec2_keypair" {
  default = "AWS-Cisco"
}

variable "ec2_tags" {
  default = "Cisco-Demo-Terraform"
}

variable "ec2_count" {
  default = "2"
}
Deployment
The beauty of Terraform is its simplicity. Start off with running terraform init. This will essentially download the required plugins.
WAUTERW-M-65P7:AWS_Terraform wauterw$ terraform init

Initializing the backend...

Initializing provider plugins...
- Checking for available provider plugins...
- Downloading plugin for provider "aws" (hashicorp/aws) 2.54.0...

Terraform has been successfully initialized!

You may now begin working with Terraform. Try running "terraform plan" to see
any changes that are required for your infrastructure. All Terraform commands
should now work.

If you ever set or change modules or backend configuration for Terraform,
rerun this command to reinitialize your working directory. If you forget, other
commands will detect it and remind you to do so if necessary.
Terraform plan will show you a blueprint of things that are about the created/updated. No surprise here we will see that the plan is to create 1 instance (see bottom of the output).
WAUTERW-M-65P7:AWS_Terraform wauterw$ terraform plan
Refreshing Terraform state in-memory prior to plan...
The refreshed state will be used to calculate this plan, but will not be
persisted to local or remote state storage.


------------------------------------------------------------------------

An execution plan has been generated and is shown below.
Resource actions are indicated with the following symbols:
  + create

Terraform will perform the following actions:

  # aws_instance.OneServer[0] will be created
  + resource "aws_instance" "OneServer" {
      + ami                          = "ami-00035f41c82244dab"
      + arn                          = (known after apply)
      + associate_public_ip_address  = (known after apply)

***Truncated***

Plan: 2 to add, 0 to change, 0 to destroy.

------------------------------------------------------------------------

Note: You didn't specify an "-out" parameter to save this plan, so Terraform
can't guarantee that exactly these actions will be performed if
"terraform apply" is subsequently run.
And finally, we will run terraform apply. This will take the execution plan and effectively apply that plan to AWS.
WAUTERW-M-65P7:AWS_Terraform wauterw$ terraform apply
An execution plan has been generated and is shown below.
Resource actions are indicated with the following symbols:
+ create
Terraform will perform the following actions:
*** Truncated ***
Plan: 2 to add, 0 to change, 0 to destroy.
Do you want to perform these actions?
Terraform will perform the actions described above.
Only 'yes' will be accepted to approve.
Enter a value: yes
aws_instance.OneServer[1]: Creating...
aws_instance.OneServer[0]: Creating...
aws_instance.OneServer[0]: Still creating... [10s elapsed]
aws_instance.OneServer[1]: Still creating... [10s elapsed]
aws_instance.OneServer[1]: Still creating... [20s elapsed]
aws_instance.OneServer[0]: Still creating... [20s elapsed]
aws_instance.OneServer[1]: Creation complete after 24s [id=i-092891da9d7cbc982]
aws_instance.OneServer[0]: Still creating... [30s elapsed]
aws_instance.OneServer[0]: Creation complete after 34s [id=i-084a3e4264f37c775]
Apply complete! Resources: 2 added, 0 changed, 0 destroyed.
Outputs:
instance_ip_addr = [
"172.31.33.28",
"172.31.32.8",
]
instance_ips = [
"52.211.117.11",
"63.32.47.62",
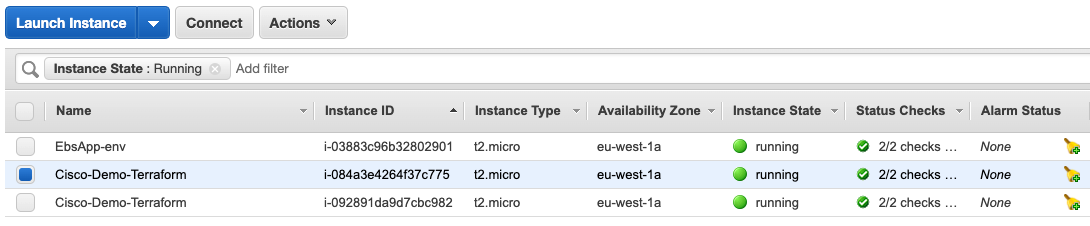
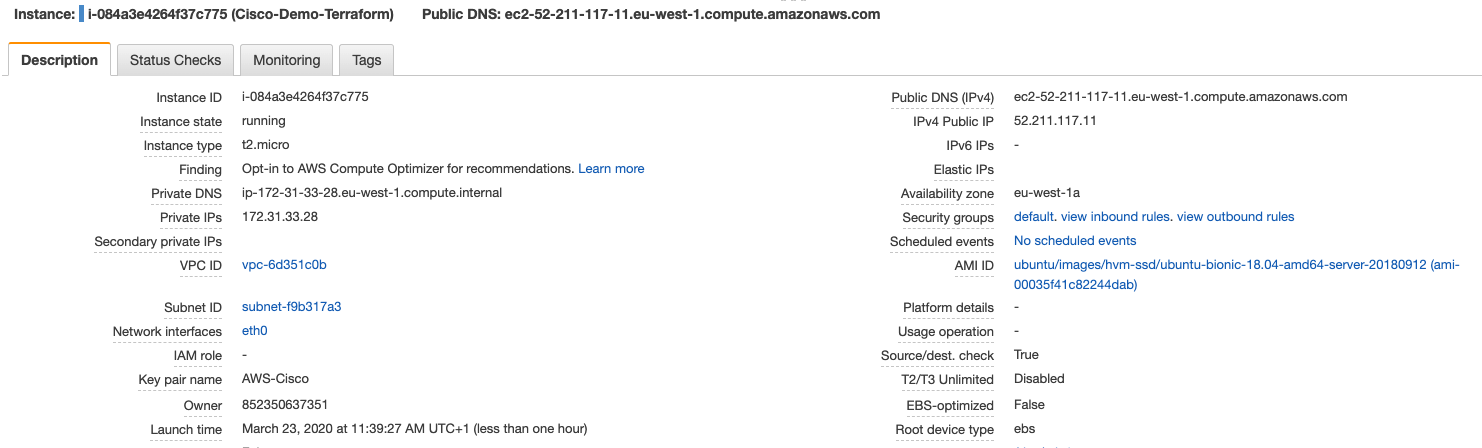
]If you are following along with this blogpost, log in to your AWS account and you will see your instance up and running.
Something noteworthy is the tfstate that Terraform maintains. The tfstate is found in your local directory (from where you run the Terraform commands) and should never be touched. It contains all the information related to the state of your configuration. I added a full output below for you to verify.
{
  "version": 4,
  "terraform_version": "0.12.10",
  "serial": 3,
  "lineage": "929031da-ed19-abb5-a98e-f1ab9415f0b4",
  "outputs": {
    "instance_ip_addr": {
      "value": [
        "172.31.33.28",
        "172.31.32.8"
      ],
      "type": [
        "tuple",
        [
          "string",
          "string"
        ]
      ]
    },
    "instance_ips": {
      "value": [
        "52.211.117.11",
        "63.32.47.62"
      ],
      "type": [
        "tuple",
        [
          "string",
          "string"
        ]
      ]
    }
  },
  "resources": [
    {
      "mode": "managed",
      "type": "aws_instance",
      "name": "OneServer",
      "each": "list",
      "provider": "provider.aws",
      "instances": [
        {
          "index_key": 0,
          "schema_version": 1,
          "attributes": {
            "ami": "ami-00035f41c82244dab",

       ***Truncated ***

            "vpc_security_group_ids": [
              "sg-c3b88cbd"
            ]
          },
          "private": "eyJlMmJmYjczMC1lY2FhLTExZTYtOGY4OC0zNDM2M2JjN2M0YzAiOnsiY3JlYXRlIjo2MDAwMDAwMDAwMDAsImRlbGV0ZSI6MTIwMDAwMDAwMDAwMCwidXBkYXRlIjo2MDAwMDAwMDAwMDB9LCJzY2hlbWFfdmVyc2lvbiI6IjEifQ=="
        }
      ]
    }
  ]
}
Destroying the instances
Also deleting the instance is very simple using Terraform. Just issue a terraform destroy command, hit enter, accept the change and off you go. No more instances on AWS. While easy and nice, I’m sure you will also understand the danger of this.
WAUTERW-M-65P7:AWS_Terraform wauterw$ terraform destroy
aws_instance.OneServer[1]: Refreshing state... [id=i-092891da9d7cbc982]
aws_instance.OneServer[0]: Refreshing state... [id=i-084a3e4264f37c775]

An execution plan has been generated and is shown below.
Resource actions are indicated with the following symbols:
  - destroy

Terraform will perform the following actions:

  # aws_instance.OneServer[0] will be destroyed
  - resource "aws_instance" "OneServer" {
      - ami                          = "ami-00035f41c82244dab" -> null

***Truncated***

Plan: 0 to add, 0 to change, 2 to destroy.

Do you really want to destroy all resources?
  Terraform will destroy all your managed infrastructure, as shown above.
  There is no undo. Only 'yes' will be accepted to confirm.

  Enter a value: yes

aws_instance.OneServer[1]: Destroying... [id=i-092891da9d7cbc982]
aws_instance.OneServer[0]: Destroying... [id=i-084a3e4264f37c775]
aws_instance.OneServer[1]: Still destroying... [id=i-092891da9d7cbc982, 10s elapsed]
aws_instance.OneServer[0]: Still destroying... [id=i-084a3e4264f37c775, 10s elapsed]
aws_instance.OneServer[0]: Still destroying... [id=i-084a3e4264f37c775, 20s elapsed]
aws_instance.OneServer[1]: Still destroying... [id=i-092891da9d7cbc982, 20s elapsed]
aws_instance.OneServer[0]: Still destroying... [id=i-084a3e4264f37c775, 30s elapsed]
aws_instance.OneServer[1]: Destruction complete after 31s
aws_instance.OneServer[0]: Destruction complete after 31s

Destroy complete! Resources: 2 destroyed.
In your AWS console, you will see the instance we created earlier in the blog post is in a terminated state.

Code can be found here. Thanks for reading guys, hope to see you back in a next blog post some time.