Create Cisco ACI network with Terraform
Introduction
In this post, we created some EC2 instances on AWS. In the current post, we will apply the same principle but instead of creating some servers on AWS, we will create a network on Cisco’s ACI solution using Terraform’s ACI provider. If you want to learn more on ACI, read this and this.
Note: I will use my own APIC in my lab. If you don’t have one available, have a look here from Cisco Devnet. This is an always-on sandbox environment which you can use if you want to follow along with this blog post.
Terraform code
We will create a provider.tf file which contains nothing more than the ACI details. The URL is the URL for your APIC. I will take the fast route and put insecure to true, but you can also use certificate. It’s all in the documentation.
provider "aci" {
  username = "admin"
  password = "---"
  url      = "https://10.48.X.Y"
  insecure = true
}
Next, we will create a main.tf file which contains the information we want to configure on ACI.
resource "aci_tenant" "Tenant_TF_Demo" {
  name        = var.aci_tenant
  description = "Tenant created by TF"
}

resource "aci_vrf" "VRF_TF_Demo" {
  tenant_dn = aci_tenant.Tenant_TF_Demo.id
  name      = var.aci_vrf
}

resource "aci_bridge_domain" "BD_TF_Demo" {
  tenant_dn          = aci_tenant.Tenant_TF_Demo.id
  name               = var.aci_bd
  description        = "BD created by TF"
  relation_fv_rs_ctx = aci_vrf.VRF_TF_Demo.name
}
As you can extract from the above Terraform file, we will create a new tenant, a VRF under that tenant and a BD under that VRF. For this blogpost I will limit myself to these three network constructs just to give you an idea of how things work. In a later blog post (when I have more time), I will create a more elaborate infrastructure.
You will notice, we refer to some variables in the Terraform file. In order for this to work, we need to have also such a variiables.tf file. The content can be found below:
variable "aci_tenant" {
  default = "Tenant_Terraform_Demo"
}

variable "aci_vrf" {
  default = "VRF_Terraform_Demo"
}

variable "aci_bd" {
  default = "BD_Terraform_Demo"
}
Next, we need a location to store our state file. While it’s perfectly possible to store the state file on your laptop, it is not recommended. The idea of the state file is to store it on a location where other people can access it. Doing so, you can collaborate on your infrastructure. In this example, I will store the state file in an AWS bucket. You can easily do this by creating a provider.tf file with following content:
terraform {
  backend "s3" {
    bucket = "be.wymedia.terraform"
    key    = "terraform/state"
    region = "eu-west-1"
  }
}
Deploy infrastructure
As we did with AWS resources (see this post), we will follow exactly the same pattern. First we will perform ‘terraform init’. This will essentially download the ACI provider from Terraform repo.
WAUTERW-M-65P7:ACI_Terraform wauterw$ terraform init

Initializing the backend...

Successfully configured the backend "s3"! Terraform will automatically
use this backend unless the backend configuration changes.

Initializing provider plugins...
- Checking for available provider plugins...
- Downloading plugin for provider "aci" (terraform-providers/aci) 0.1.7...

The following providers do not have any version constraints in configuration,
so the latest version was installed.

To prevent automatic upgrades to new major versions that may contain breaking
changes, it is recommended to add version = "..." constraints to the
corresponding provider blocks in configuration, with the constraint strings
suggested below.

* provider.aci: version = "~> 0.1"

Terraform has been successfully initialized!

You may now begin working with Terraform. Try running "terraform plan" to see
any changes that are required for your infrastructure. All Terraform commands
should now work.

If you ever set or change modules or backend configuration for Terraform,
rerun this command to reinitialize your working directory. If you forget, other
commands will detect it and remind you to do so if necessary.
You see in above snippet, it’s configuring the S3 backend to store the state file and it also downloads the ACI provider. Next, we’ll perform a ‘terraform plan’ to see what will be created.
WAUTERW-M-65P7:ACI_Terraform wauterw$ terraform plan
Refreshing Terraform state in-memory prior to plan...
The refreshed state will be used to calculate this plan, but will not be
persisted to local or remote state storage.


------------------------------------------------------------------------

An execution plan has been generated and is shown below.
Resource actions are indicated with the following symbols:
  + create

Terraform will perform the following actions:

  # aci_bridge_domain.BD_TF_Demo will be created
  + resource "aci_bridge_domain" "BD_TF_Demo" {
      + annotation                  = (known after apply)
      + arp_flood                   = (known after apply)

***Truncated***
Plan: 3 to add, 0 to change, 0 to destroy.

------------------------------------------------------------------------

Note: You didn't specify an "-out" parameter to save this plan, so Terraform
can't guarantee that exactly these actions will be performed if
"terraform apply" is subsequently run.
Next, let’s apply the configuration. You should know the drill by now as we did it many times in previous blog posts already.
WAUTERW-M-65P7:ACI_Terraform wauterw$ terraform apply
An execution plan has been generated and is shown below.
Resource actions are indicated with the following symbols:
+ create
Terraform will perform the following actions:
# aci_bridge_domain.BD_TF_Demo will be created
+ resource "aci_bridge_domain" "BD_TF_Demo" {
***Truncated***
Plan: 3 to add, 0 to change, 0 to destroy.
Do you want to perform these actions?
Terraform will perform the actions described above.
Only 'yes' will be accepted to approve.
Enter a value: yes
aci_tenant.Tenant_TF_Demo: Creating...
aci_tenant.Tenant_TF_Demo: Creation complete after 1s [id=uni/tn-Tenant_Terraform_Demo]
aci_vrf.VRF_TF_Demo: Creating...
aci_vrf.VRF_TF_Demo: Creation complete after 2s [id=uni/tn-Tenant_Terraform_Demo/ctx-VRF_Terraform_Demo]
aci_bridge_domain.BD_TF_Demo: Creating...
aci_bridge_domain.BD_TF_Demo: Creation complete after 1s [id=uni/tn-Tenant_Terraform_Demo/BD-BD_Terraform_Demo]
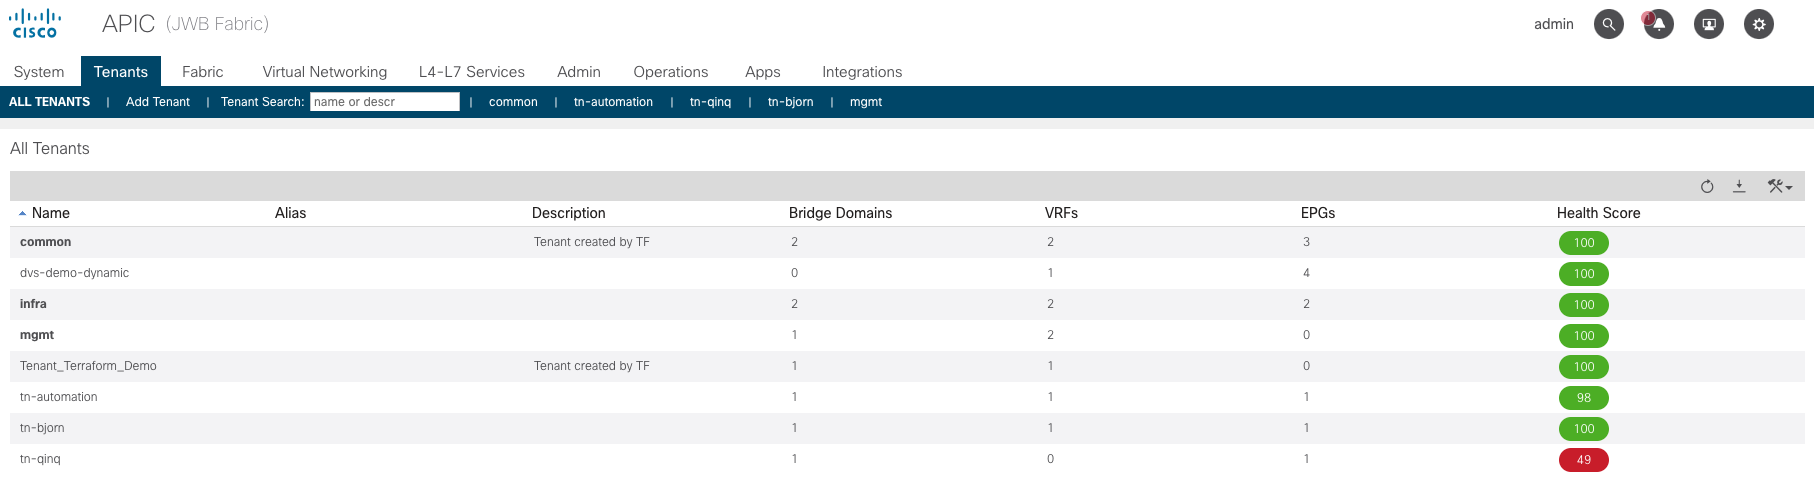
Apply complete! Resources: 3 added, 0 changed, 0 destroyed.Log into ACI and see that the tenant is created there:
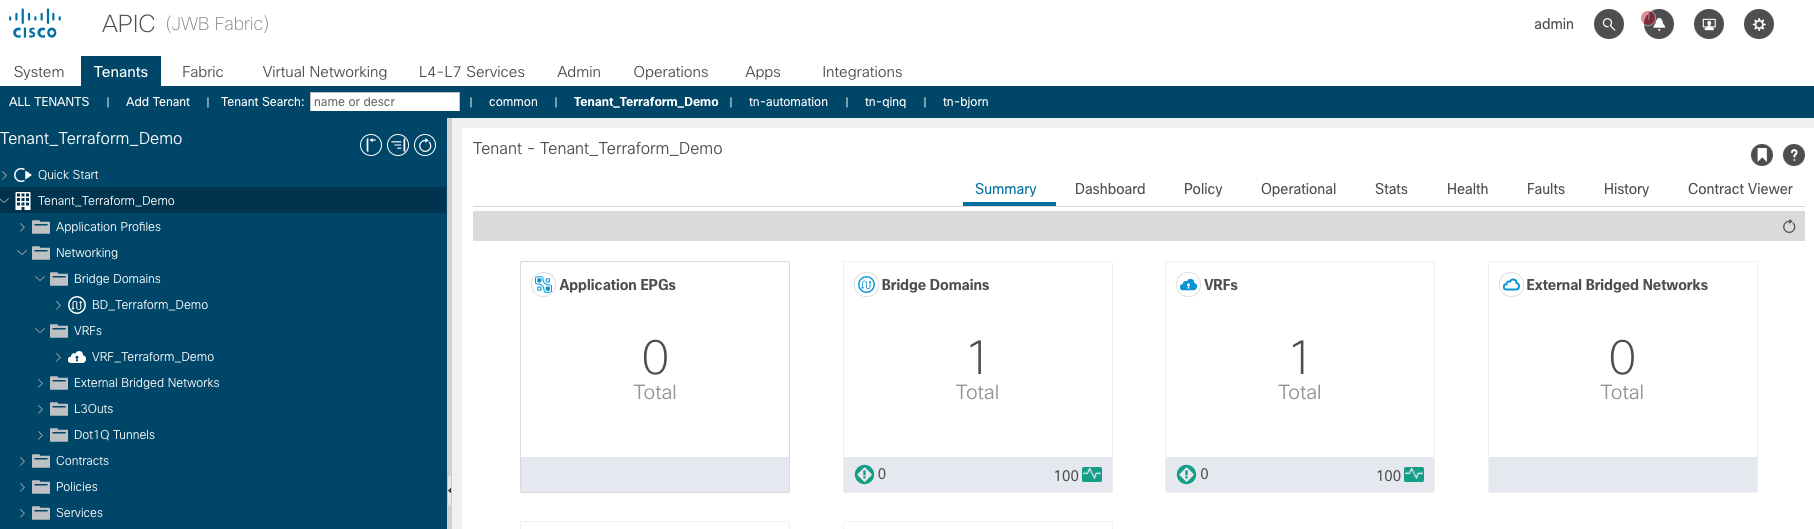
Also the VRF and the BD got created as you can see in below screenshot (see the left colum):
Pretty neat stuff.
Destroying the infrastructure
Let’s continue to delete what we created. With Terraform this is extremely easy. It’s simply issuing the ‘terraform destroy’ command. Again, Terraform keeps the state file, in our case in an AWS S3 bucket and hence it knows what it created and so it can easily be destroyed.
WAUTERW-M-65P7:ACI_Terraform wauterw$ terraform destroy
aci_tenant.Tenant_TF_Demo: Refreshing state... [id=uni/tn-Tenant_Terraform_Demo]
aci_vrf.VRF_TF_Demo: Refreshing state... [id=uni/tn-Tenant_Terraform_Demo/ctx-VRF_Terraform_Demo]
aci_bridge_domain.BD_TF_Demo: Refreshing state... [id=uni/tn-Tenant_Terraform_Demo/BD-BD_Terraform_Demo]

An execution plan has been generated and is shown below.
Resource actions are indicated with the following symbols:
  - destroy

Terraform will perform the following actions:

***Truncated***

Plan: 0 to add, 0 to change, 3 to destroy.

Do you really want to destroy all resources?
  Terraform will destroy all your managed infrastructure, as shown above.
  There is no undo. Only 'yes' will be accepted to confirm.

  Enter a value: yes

aci_bridge_domain.BD_TF_Demo: Destroying... [id=uni/tn-Tenant_Terraform_Demo/BD-BD_Terraform_Demo]
aci_bridge_domain.BD_TF_Demo: Destruction complete after 0s
aci_vrf.VRF_TF_Demo: Destroying... [id=uni/tn-Tenant_Terraform_Demo/ctx-VRF_Terraform_Demo]
aci_vrf.VRF_TF_Demo: Destruction complete after 0s
aci_tenant.Tenant_TF_Demo: Destroying... [id=uni/tn-Tenant_Terraform_Demo]
aci_tenant.Tenant_TF_Demo: Destruction complete after 0s

Destroy complete! Resources: 3 destroyed.
Check back your ACI Controller and you will notice that the Tenant and the underlying objects (in this case VRF and BD) are destroyed.
Hope you had some fun with Terraform and ACI. You can check out the files in my Github repo. A more complete example, where we create EPGs with contracts and filters between them, can be found here.
In our next blog post, we will be integrating all this in a CI/CD pipeline with Gitlab.
Hope to see you back!