ESXi on Raspberry Pi 4
Introduction
On October 7th, VMware released a fling (*) that allows us to run ESXi on a Raspberry Pi. This immediately caught my attention as I had been waiting for this for quite a while. See, I have multiple smaller applications today in use (e.g Ubiquiti Controller, PiHole, PiVPN, …) that each run on seperate Raspberry Pi’s. I have been thinking also of building a small Kubernetes cluster on Raspberry Pi but did not want to spend money on each time bying seperate Raspberry Pi’s. All this can easily be solved now with this new Fling. I will run each of the above mentioned applications into a seperate virtual machine on top of ESXi.
- A Fling is an unsupported virtualization or cloud computing software tool created by a VMware engineer that often addresses a specific problem that is not typically found in a VMware product.
Note: if you prefer a video tutorial on how to achioeve this, I highly recommend you to check out this and this video. And once you are there, check out there other video’s as well. They do cool stuff all the time :-).
Bill of Material
- Raspberry Pi 4 with 4GB or 8GB of RAM. Go for the 8GB version to have it run smooth.
- SD card: can be very small as it contains only the UEFI firmware. I’m using an SD card of 4GB.
- USB stick: will contain the ESXi installer
- SSD drive: will be used for the ESXi system as well as the VMWare datastore files (e.g. the VMDK’s). I purchased this one.
Note: I’m using a MacBook Pro so in case you have other OS, please also refer to [this]() official guide.
1) Install Raspberry Pi
We’ll start off with installing Raspbian onto our Raspberry Pi. This is very straightforward as there are some neat tools available to do so. I recommend Etcher or the Raspberry Pi imager tool. For this guide, I will be using the Raspberry Pi tool.
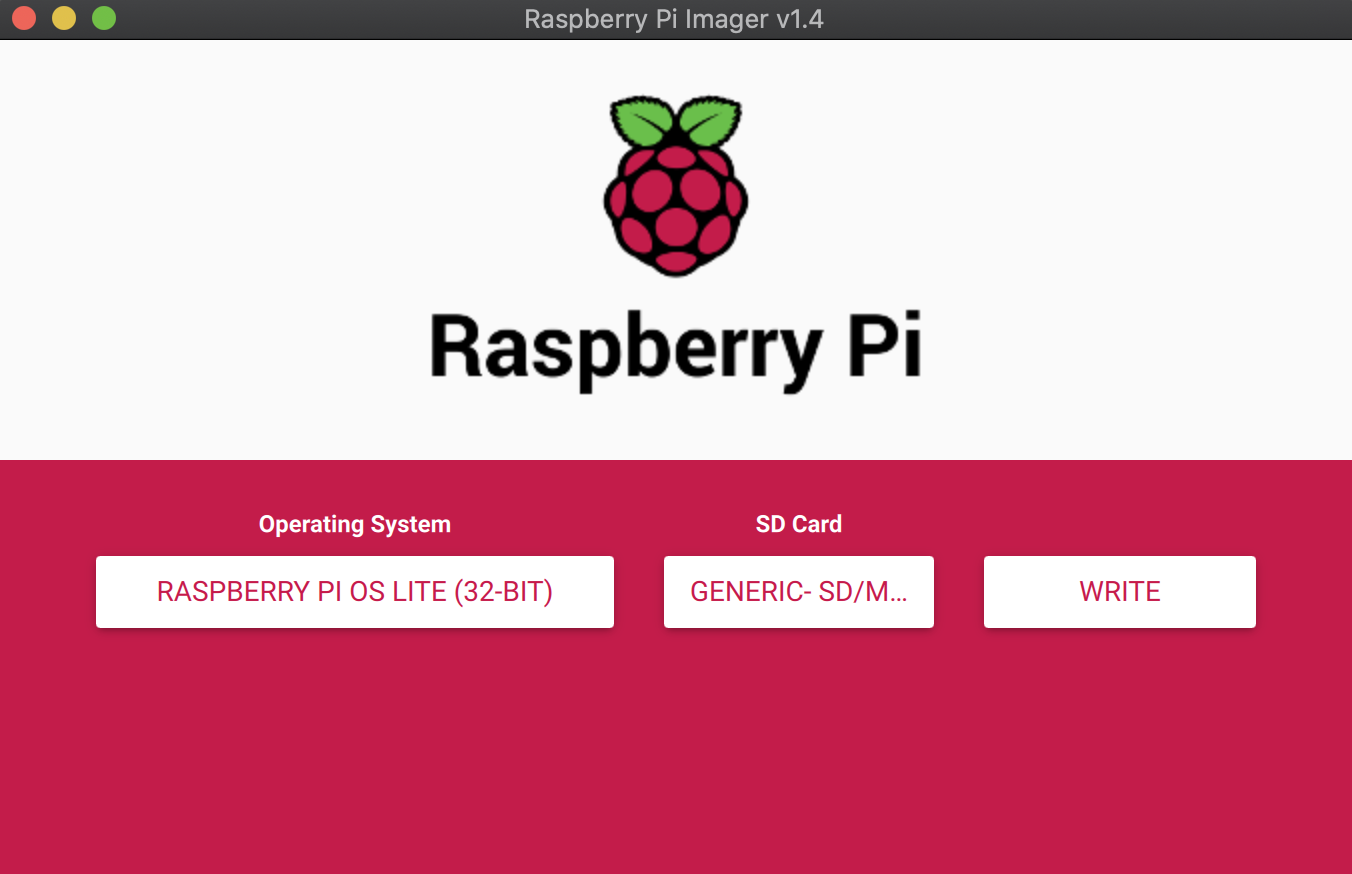
You have various options for the OS to install. I personally went with the Raspbian Lite option. In any case, once it has been written to the
Take out the SD card from your computer and insert it into the Raspberry Pi. Boot the Pi into the Raspbian OS image. The standard username and password is pi/raspberry.
Once you are in the terminal app, perform an update as follows:
pi@raspberrypi: sudo apt update
pi@raspberrypi: sudo apt upgrade
Next, reboot the Raspberry Pi.
pi@raspberrypi: sudo reboot
2) EEPROM update
Once the reboot is completed, log back into the Raspberry Pi and run the following commands to verify if you have the latest EEPROM:
pi@raspberrypi: sudo rpi-eeprom-update
In case that there would be updates available, you can apply them as follows:
pi@raspberrypi: sudo rpi-eeprom-update -a
Next, shutdown the Raspberry Pi.
pi@raspberrypi: sudo shutdown now
3) Copy UEFI firmware onto SD card
Download the following files onto a folder on your desktop:
Extract the contents on your Desktop. You should have a folder called firmware-master and RPi4_UEFI_Firmware_v1.20.
Insert now the SD-card into the appropriate slot on your PC, open a terminal and execute the following commands. Note that these are specific for MAC, but the official fling documentation also provides material on how to do this on Windows.
~ ❯ diskutil list                                                                                                                                                                            13:31:24
/dev/disk0 (internal, physical):
   #:                       TYPE NAME                    SIZE       IDENTIFIER
   0:      GUID_partition_scheme                        *500.3 GB   disk0
   1:                        EFI EFI                     314.6 MB   disk0s1
   2:                 Apple_APFS Container disk1         500.0 GB   disk0s2

/dev/disk1 (synthesized):
   #:                       TYPE NAME                    SIZE       IDENTIFIER
   0:      APFS Container Scheme -                      +500.0 GB   disk1
                                 Physical Store disk0s2
   1:                APFS Volume MacWim                  11.2 GB    disk1s1
   2:                APFS Volume Preboot                 78.7 MB    disk1s2
   3:                APFS Volume Recovery                529.0 MB   disk1s3
   4:                APFS Volume VM                      4.3 GB     disk1s4
   5:                APFS Volume MacWim - Data           266.6 GB   disk1s5

/dev/disk2 (external, physical):
   #:                       TYPE NAME                    SIZE       IDENTIFIER
   0:     FDisk_partition_scheme                        *4.0 GB     disk2
   1:             Windows_FAT_32 boot                    268.4 MB   disk2s1
   2:                      Linux                         3.7 GB     disk2s2
You will see that (in my case) the SD card is recognized as /dev/disk2. This might be different in your case so adapt the commands below accordingly. We will start with creating a FAT32 partition on the SD card:
~ ❯ diskutil partitionDisk /dev/disk2 1 MBRFormat "MS-DOS" UEFI R
Next, we need to delete all the kernel*.img files within firmware-master/boot folder and then copy the boot folder to the SD Card.
~ ❯ rm ~/Desktop/firmware-master/boot/kernel*.img
~ ❯ cp -rf ~/Desktop/firmware-master/boot/* /Volumes/UEFI
Copy all files within the RPi4_UEFI_Firmware_v1.20 directory into the same boot directory on SD card:
cp -rf ~/Desktop/RPi4_UEFI_Firmware_v1.20/* /Volumes/UEFI
In case you have a Raspberry Pi 4 with 4GB of RAM, we also need to edit the config.txt file on the card:
echo "gpu_mem=16" >> /Volumes/UEFI/config.txt
Eject the SD card:
~ ❯ diskutil eject /dev/disk2
Disk /dev/disk2 ejected
Next, put the SD card back in the Raspberry Pi.
4) Configure UEFI firmware
Boot the Raspberry Pi with the SD card containing the UEFI firmware. Next, we will configure it. Ensure you press the ESC key once the splash screen is shown:
- Go to
Device Manager->Raspberry Pi Configuration->Advanced Configuration - Set
Limit RAM to 3GBto disabled - Press F10 to save the changes
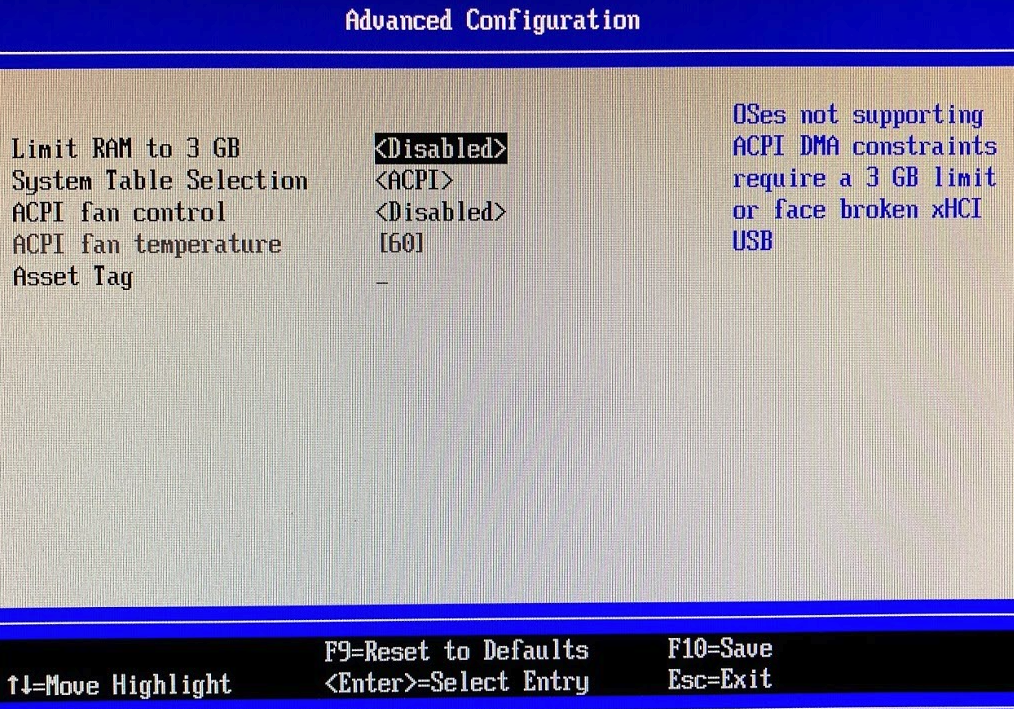
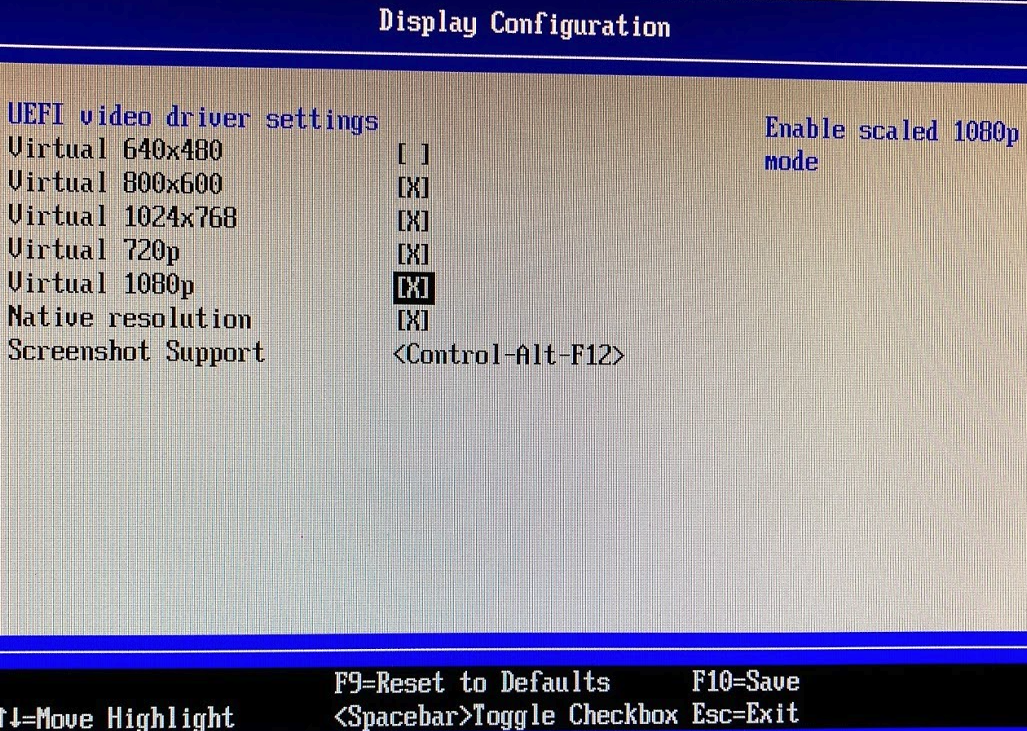
- Go to
Device Manager->Raspberry Pi Configuration->Display Configuration - Select the display options that are relevant to you
- Press F10 to save the changes
- Press
ESCcouple of times until you see theContinueorResetoptions - Press
Continue - Press
ENTERto reboot the Pi
5) Install ESXi
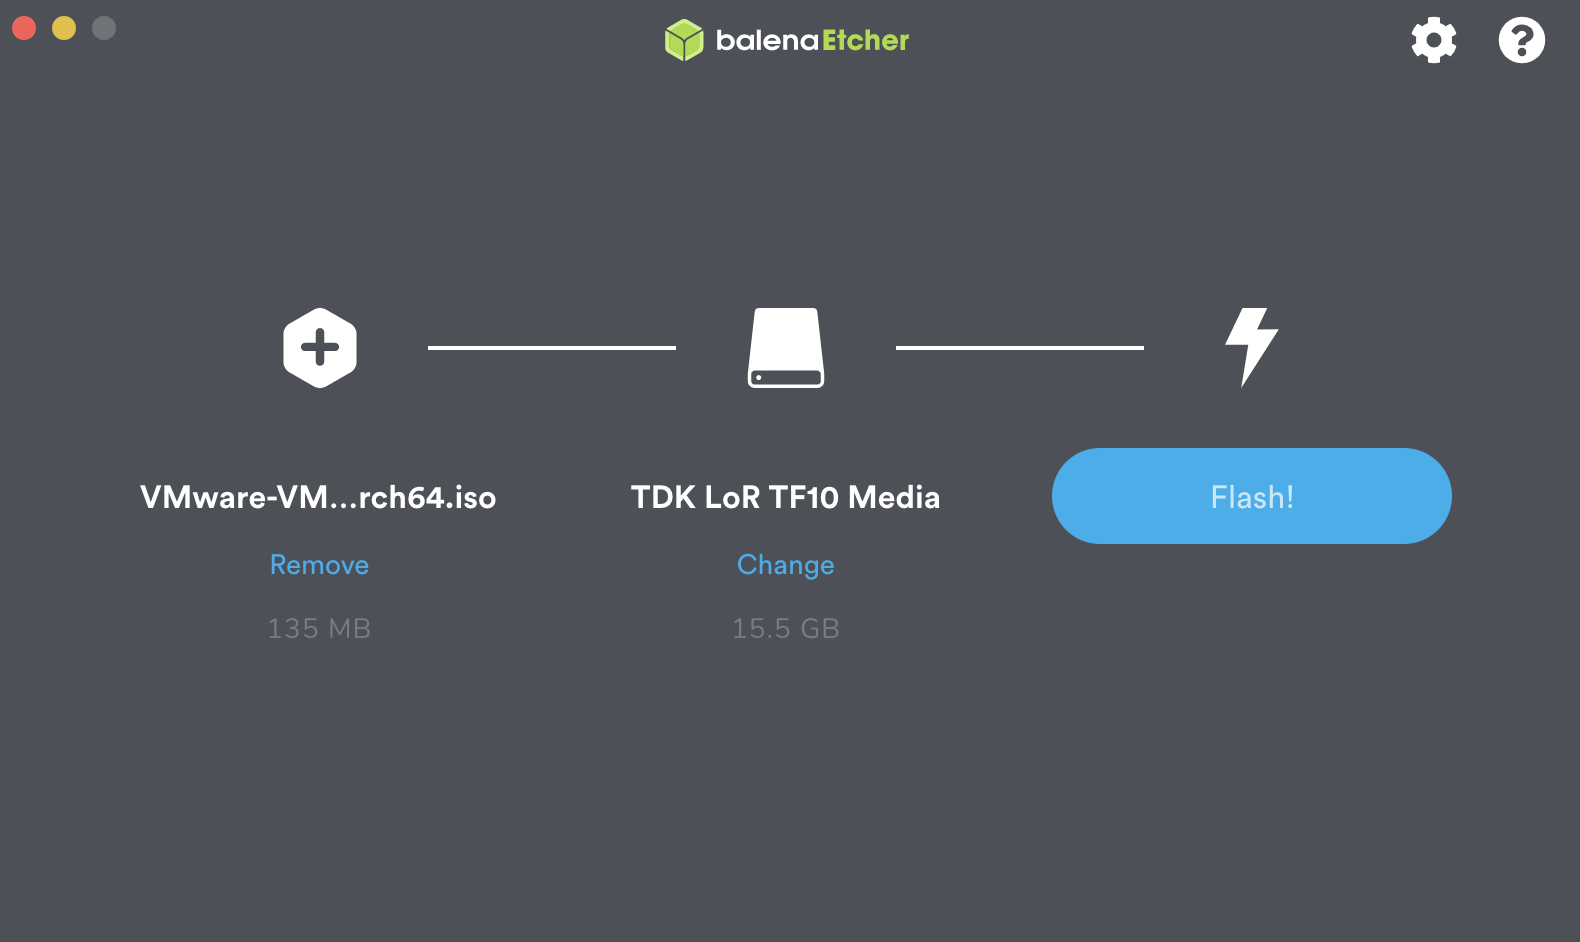
Download the ESXi ISO file from here. Note that this is free but limited to 180 days. Once downloaded use a tool to write the image to a USB disk. Again, Etcher might be a good tool to use here.
Once the image is written to the USB disk, insert it into the Raspberry Pi in order to install ESXi. To do so, press the ESC button after you see the startup screen and go to the Boot Manager option. Select your USB disk to start the ESXi installation. Right after you hit the enter button to load the ESXi installer, hit the SHIFT-O combination. You’ll see:
runweasel cdromBoot
Update this line to:
runweasel cdromBoot autoPartitionOSDataSize=8192
and hit ENTER. You will see that the ESXi installer is loading. This command is not mandatory but essentially this command is used to ensure that the ESXi is not using more than 8GB of your disk, so the rest will be available for your datastore files.
Once the installer is fully loaded (it might take a while), ensure you have inserted your target USB disk (in my case I’m using an SSD drive but might as well be a USB stick) that will eventually contain the ESXi as well as the datastore files. You will notices that the installer scans for the disks you have attached. If your device is not recognized, you can press the F5 button to re-scan for devices. Note that you could also use the same USB disk as the one containing the installer.
Let ESXi now install on the target disk. It will ask you to reboot the device.
6) Configure bootorder
So as a next step, we will change the boot order so that it always boots from the USB disk (or SSD drive in my case). To do so, perform the following steps:
- go to
Boot Maintenance Manager->Boot Options->Change Boot Order - Locate your target disk and use the + sign to move it to the top of the list
- Press
enterandF10to save - Press ESC a couple of times and finally hit the
continuebutton
The Raspberry Pi will now boot the ESXi OS and will display you the IP address it can be reached on.
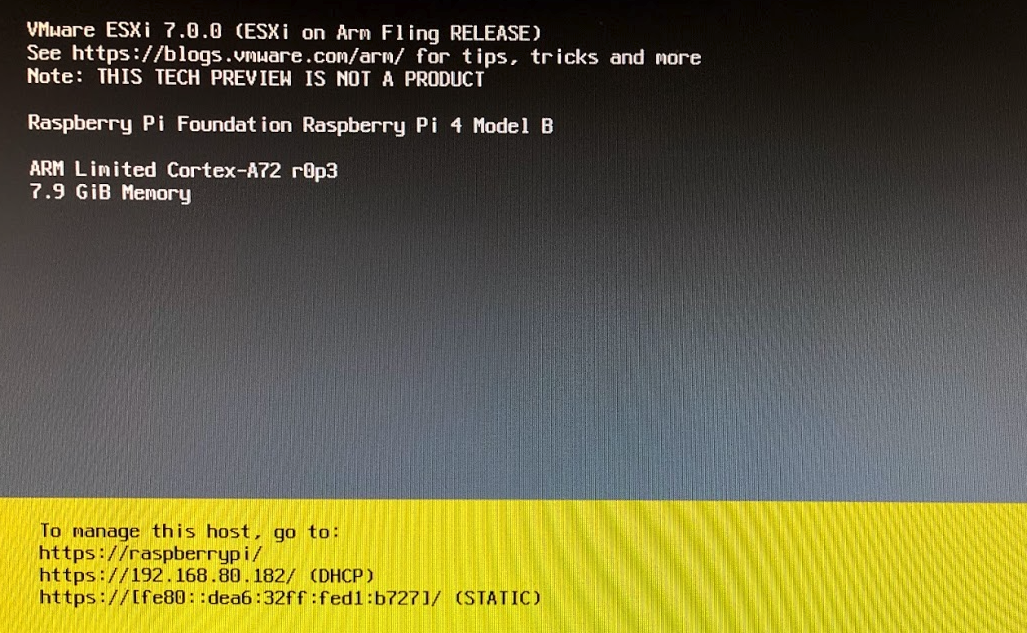
That’s it folks. If all went well, you know have ESXi running on a Raspberry Pi ready to deploy your virtual machines. Have fun!!