Create Cisco ACI network with Ansible
Introduction
In this post we created a simple ACI network using Terraform. In what follows, we will do the same but instead use Ansible. Have a look here for more information on how Ansible and ACI can integrate. Here are all the ACI related Ansible modules.
Note: I will use my own APIC in my lab. If you don’t have one available, have a look here from Cisco Devnet. This is an always-on sandbox environment which you can use if you want to follow along with this blog post.
Ansible code
We will create first a hosts file. We will reference the [apic] host later in our Ansible playbook.
[apic]
10.48.109.10

[apic:vars]
ansible_connection = local
ansible_python_interpreter = /usr/bin/python3
username = admin
password = ---
Next, we will create a variables file which is essentially just a plain YAML file in which we specify the values for the various objects we want to create on our ACI fabric.
---
tenant: "Tenant_Ansible"
vrf: "VRF_Ansible"
bridge_domains:
  - bd: "BD_Ansible"
    gateway: "10.16.100.1"
    mask: "24"
    scope: "shared"
ap: "AP_Ansible"
epgs:
  - epg: "EPG_Ansible"
    bd: "BD_Ansible"
Next, we will create the playbook itself. It’s pretty much self explanatory, but a couple of points nevertheless:
- we reference the variable file we created earlier through the
vars_filesconstruct. Doing this will allow us to the values specified in the variables file directly. - we have defined a block called
aci_login. The idea is that we can reference this block in the rest of the playbook with<<: *aci_login. - sometimes we need to add more objects of the same type. In the variables file we indicate these with a list, indicated with the
-. In the playboo below, you will notice that we can loop over this list with thewith_itemsconstruct.
- name: Limited ACI configuration
  hosts: apic
  connection: local
  gather_facts: False
  vars_files:
    - vars/variables_aci.yml
  vars:
    aci_login: &aci_login
      hostname: '{{ inventory_hostname }}'
      username: '{{ username }}'
      password: '{{ password }}'
      validate_certs: False

  tasks:
    - name: Task 01 - Create Tenant
      aci_tenant:
        <<: *aci_login
        state: "present"
        tenant: "{{ tenant }}"
        descr: "Tenant Created Using Ansible"
      tags: tenant, vrf, bd, filter, contract, app, epg

    - name: Task 02 - Create VRF
      aci_vrf:
        <<: *aci_login
        tenant: "{{ tenant }}"
        vrf: "{{ vrf }}"
        descr: "VRF Created Using Ansible"
      tags: vrf, bd

    - name: Task 03 - Create BD
      aci_bd:
        <<: *aci_login
        state: "present"
        tenant: "{{ tenant }}"
        bd: "{{ item.bd | default('prod_bd') }}"
        vrf: "{{ vrf }}"
      with_items: "{{ bridge_domains }}"
      tags: bd

    - name: Task 04 - Create subnet in BD
      aci_bd_subnet:
        <<: *aci_login
        state: "present"
        tenant: "{{ tenant }}"
        bd: "{{ item.bd }}"
        gateway: "{{ item.gateway }}"
        mask: "{{ item.mask }}"
        scope: ["public", "shared"]
      with_items: "{{ bridge_domains }}"

    - name: Task 05 - Add a new Application Profile
      aci_ap:
        <<: *aci_login
        tenant: '{{ tenant }}'
        ap: '{{ ap }}'
        state: present

    - name: Task 06 - Create EPG's and add to the Application Profile
      aci_epg:
        <<: *aci_login
        tenant: '{{ tenant }}'
        ap: '{{ ap }}'
        epg: '{{ item.epg }}'
        bd: '{{ item.bd }}'
        preferred_group: yes
        state: present
      with_items: "{{ epgs }}"
Deploying the infrastructure
With a host file, a file containing the variables and the playbook, we have everything ready to execute the playbook. Let’s do so:
wauterw@WAUTERW-M-65P7 ACI_Ansible % ansible-playbook -i hosts_aci.yml playbook_aci_create.yml

PLAY [Limited ACI configuration] ****************************************************************************************************************

TASK [Task 01 - Ensure Tenant Exists] ****************************************************************************************************************
changed: [10.48.109.10]

TASK [Task 02 - Ensure VRF Exists] ****************************************************************************************************************
changed: [10.48.109.10]

TASK [Task 03 - Ensure Bridge Domains and Exist] ****************************************************************************************************************
changed: [10.48.109.10] => (item={'bd': 'BD_Ansible', 'gateway': '10.16.100.1', 'mask': '24', 'scope': 'shared'})

TASK [Task 04 - Ensure Bridge Domains Have Subnets] ****************************************************************************************************************
changed: [10.48.109.10] => (item={'bd': 'BD_Ansible', 'gateway': '10.16.100.1', 'mask': '24', 'scope': 'shared'})

TASK [Task 05 - Add a new Application Profile] ****************************************************************************************************************
changed: [10.48.109.10]

TASK [Task 06 - Create EPG's and add to the Application Profile] *****************************************************************************************************************
changed: [10.48.109.10] => (item={'epg': 'EPG_Ansible', 'bd': 'BD_Ansible'})

PLAY RECAP *******************************************************************************************************
10.48.109.10    : ok=6    changed=6    unreachable=0    failed=0    skipped=0    rescued=0    ignored=0
Verify the infrastructure
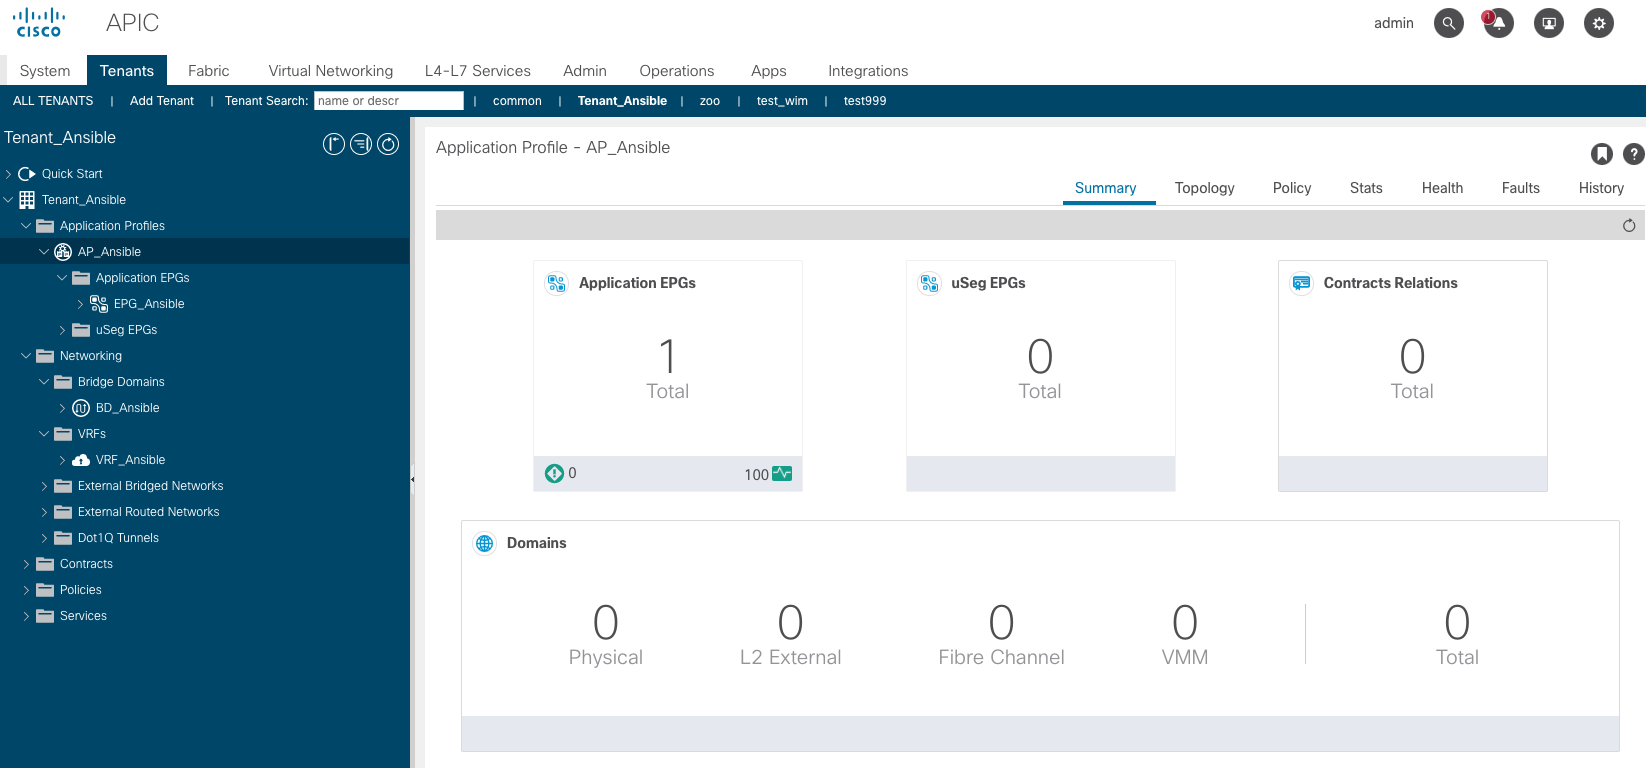
If all works well, you will see that our tenant and the various ACI constructs have been created:
Destroy the infrastructure
In order to delete our tenant and the underlying constructs, we need to create a seperate playbook that takes care of the deletion of the tenant. The playbook to achieve this is much simpler as we only would need to delete the tenant and ACI will take of the deletion of all underlying objects. Deleting the tenant will be done through state: "absent".
- name: Cleanup - Removing Tenants
  hosts: apic
  connection: local
  gather_facts: False
  vars:
    tenants:
      - "Tenant_Ansible"
    aci_login: &aci_login
      hostname: '{{ inventory_hostname }}'
      username: '{{ username }}'
      password: '{{ password }}'
      validate_certs: False

  tasks:
    - name: Delete Tenants
      aci_tenant:
        <<: *aci_login
        state: "absent"
        tenant: "{{ item }}"
      with_items: "{{ tenants }}"
Let’s execute the playbook:
wauterw@WAUTERW-M-65P7 ACI_Ansible % ansible-playbook -i hosts_aci.yml playbook_aci_delete.yml

PLAY [Cleanup - Removing Tenants] **********************************************************************************************************************************************

TASK [Delete Tenants] **********************************************************************************************************************************************************
changed: [10.48.109.10] => (item=Tenant_Ansible)

PLAY RECAP *********************************************************************************************************************************************************************
sandboxapicdc.cisco.com    : ok=1    changed=1    unreachable=0    failed=0    skipped=0    rescued=0    ignored=0
And if all goes well, you will see the tenant and the underlying objects have been deleted from our ACI fabric.
If you want to see the full code, please go to my Github. A more complex example can be found here.
Hope you enjoy playing around with Ansible and ACI! See you need time.