Hashicorp Vault - Getting Started
What is Hashicorp Vault
Taken from the Vault website:
Vault is a tool for securely accessing secrets. A secret is anything that you want to tightly control access to, such as API keys, passwords, or certificates. Vault provides a unified interface to any secret, while providing tight access control and recording a detailed audit log.
Vault’s key features are:
- Securely store secrets
- Generate dynamic secrets
- Encryption of data
- Lease and renew secrets
- Secret revokation
In what follows, we will be experimenting a bit with Vault, just putting our toes in the water.
Install Hashicorp Vault
Let’s first start with installing Vault.
➜  ~ brew install vault
==> Downloading https://homebrew.bintray.com/bottles/vault-1.5.0.catalina.bottle.tar.gz
*** Truncated ***
==> Pouring vault-1.5.0.catalina.bottle.tar.gz
==> Caveats
To have launchd start vault now and restart at login:
  brew services start vault
Or, if you don't want/need a background service you can just run:
  vault server -dev
==> Summary
🍺  /usr/local/Cellar/vault/1.5.0: 7 files, 122.5MB
Run Dev Server
Vault allows us to run a development instance. Needless to say this is for testing purposes only. Installing and configuring Vault in production is a bit harder and requires multiple steps. That’s why the ability to run a development server is coming in very handy.
➜  ~ vault server -dev
==> Vault server configuration:

             Api Address: http://127.0.0.1:8200
                     Cgo: disabled
         Cluster Address: https://127.0.0.1:8201
              Go Version: go1.14.5
              Listener 1: tcp (addr: "127.0.0.1:8200", cluster address: "127.0.0.1:8201", max_request_duration: "1m30s", max_request_size: "33554432", tls: "disabled")
               Log Level: info
                   Mlock: supported: false, enabled: false
           Recovery Mode: false
                 Storage: inmem
                 Version: Vault v1.5.0
             Version Sha: 340cc2fa263f6cbd2861b41518da8a62c153e2e7+CHANGES

WARNING! dev mode is enabled! In this mode, Vault runs entirely in-memory
and starts unsealed with a single unseal key. The root token is already
authenticated to the CLI, so you can immediately begin using Vault.

You may need to set the following environment variable:

    $ export VAULT_ADDR='http://127.0.0.1:8200'

The unseal key and root token are displayed below in case you want to
seal/unseal the Vault or re-authenticate.

Unseal Key: Lo***F8=
Root Token: s.x***xs

Development mode should NOT be used in production installations!

==> Vault server started! Log data will stream in below:
Next, let’s set the environment variable VAULT_ADDR:
➜  blog-hugo-netlify git:(master) ✗ export VAULT_ADDR='http://127.0.0.1:8200'
➜  blog-hugo-netlify git:(master) ✗ export VAULT_TOKEN='s.x***xs'
And finally, let’s verify that the server has started:
➜  ~ vault status
Key             Value
---             -----
Seal Type       shamir
Initialized     true
Sealed          false
Total Shares    1
Threshold       1
Version         1.5.0
Cluster Name    vault-cluster-d7322898
Cluster ID      f4d544e4-b59c-9773-9c39-4364882c6c6b
HA Enabled      false
Note: in case you don’t set the environment variable VAULT_ADDR you will receive the following error Error checking seal status: Get "https://127.0.0.1:8200/v1/sys/seal-status": http: server gave HTTP response to HTTPS client.
Accessing the UI
Once the dev server is up and running, you can access the UI through http://127.0.0.1:8200).
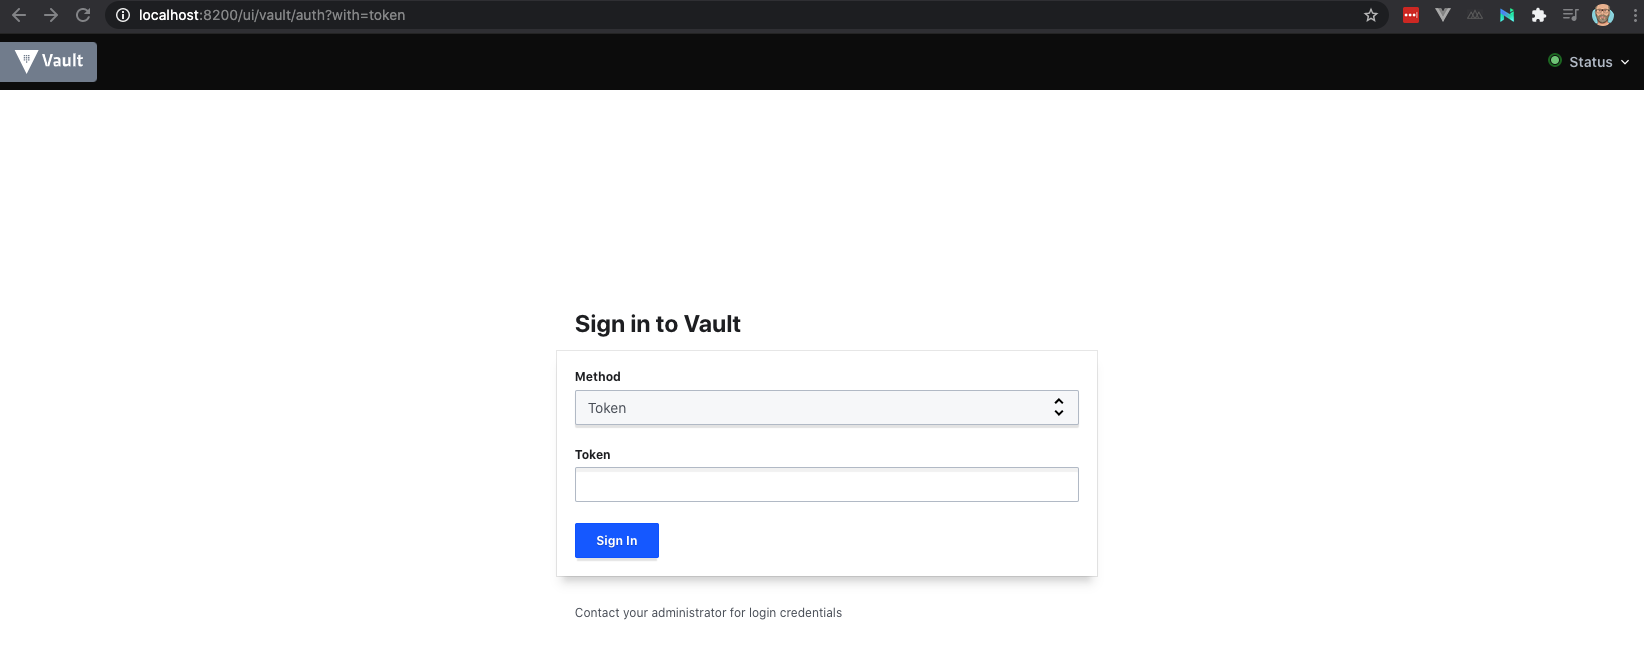
As you see, we are presented with a Token method. In order to login, use the token that was displayed in the output when starting up the dev server.
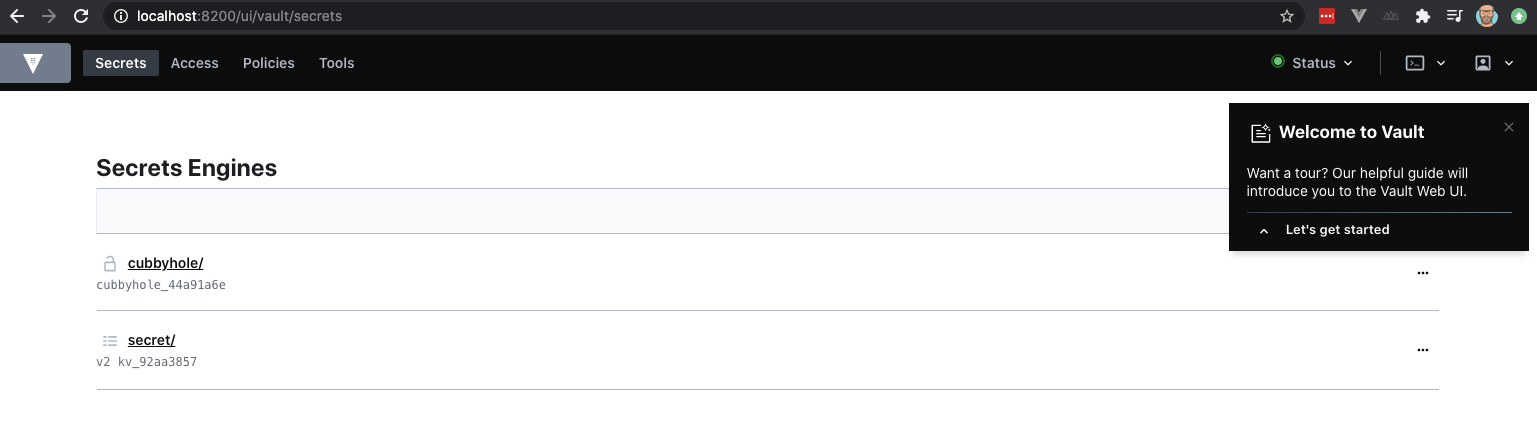
Basic secrets management
Upon logging into the UI, you will see two items cubbyhole and secret. The last one refers to a so-called KV store (key-value store). In the next section, we will interact a bit with this KV store.
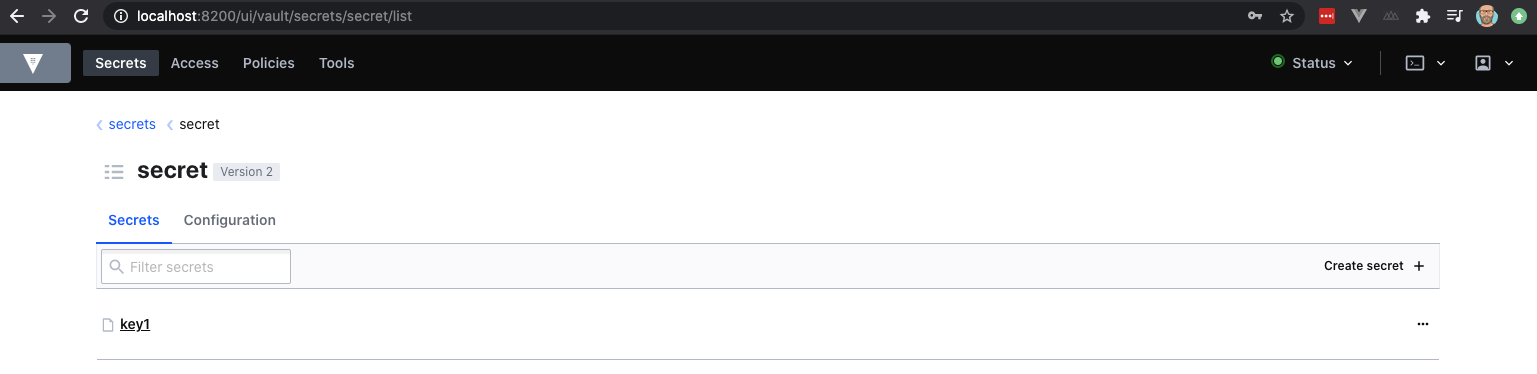
A) Write a secret to a KV store
First, let’s add a secret to a KV store. The below will add a key answer with a value of 10 to a store which is called key1.
➜  ~ vault kv put secret/key1 answer=10
Key              Value
---              -----
created_time     2020-08-24T18:59:42.171723Z
deletion_time    n/a
destroyed        false
version          1
Let’s now create a secret through CURL. In order to do so, create a file called test.json with the following contents:
{
  "data": {
        "answer":"300"
  }
}
Next, apply that file to the Vault server through CURL:
➜  Programming curl -H "X-Vault-Token: $VAULT_TOKEN" -H "Content-Type: application/json" -X POST -d @test.json  $VAULT_ADDR/v1/secret/data/apikey
{"request_id":"ad15e8ea-f3d3-cdec-d392-2f07a4d12911","lease_id":"","renewable":false,"lease_duration":0,"data":{"created_time":"2020-09-15T12:33:34.512333Z","deletion_time":"","destroyed":false,"version":1},"wrap_info":null,"warnings":null,"auth":null}
Verify the result in the UI:

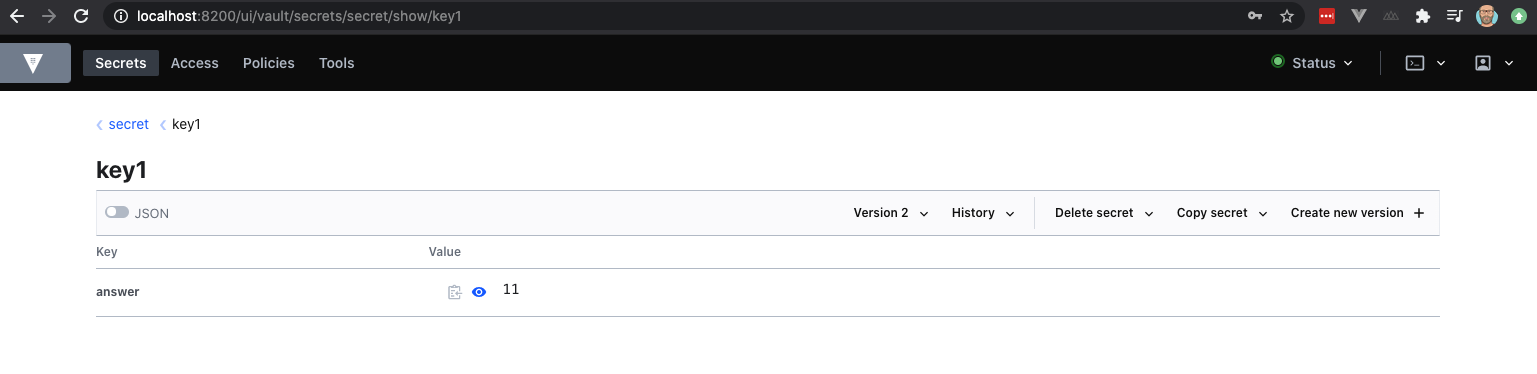
B) Read a secret from a KV store
You could go ahead and check the UI. You will see the following:

Obviously, you could also use the CLI to reveal that information:
➜  ~ vault kv get secret/key1
====== Metadata ======
Key              Value
---              -----
created_time     2020-08-24T18:59:42.171723Z
deletion_time    n/a
destroyed        false
version          1

===== Data =====
Key       Value
---       -----
answer    10
or in case you want to retrieve this date in JSON:
➜  ~ vault kv get -format=json secret/key1
{
  "request_id": "53767fab-3bdf-9ed3-07fd-aa16f2e77fd8",
  "lease_id": "",
  "lease_duration": 0,
  "renewable": false,
  "data": {
    "data": {
      "answer": "10"
    },
    "metadata": {
      "created_time": "2020-08-24T18:59:42.171723Z",
      "deletion_time": "",
      "destroyed": false,
      "version": 1
    }
  },
  "warnings": null
}
The above examples were using the Vault CLI, but we could also use CURL (remember to set the environment variables VAULT_ADDR and VAULT_TOKEN):
➜  ~ curl --header "X-Vault-Token: $VAULT_TOKEN" $VAULT_ADDR/v1/secret/data/key1 | jq
{
  "request_id": "83a8a921-3209-f954-5d8a-c3187a5997f0",
  "lease_id": "",
  "renewable": false,
  "lease_duration": 0,
  "data": {
    "data": {
      "answer": "11"
    },
    "metadata": {
      "created_time": "2020-08-24T19:02:12.08299Z",
      "deletion_time": "",
      "destroyed": false,
      "version": 2
    }
  },
  "wrap_info": null,
  "warnings": null,
  "auth": null
}
Let’s say you want to retrieve only the value of the answer. This requires some JSON parsing, which can be done in quite a number of different ways. If you have jq installed, this comes in handy:
➜  ~ vault kv get -format=json secret/key1 |jq
{
  "request_id": "5c9f6954-5a3b-5b3f-df4f-c3adcb4150f1",
  "lease_id": "",
  "lease_duration": 0,
  "renewable": false,
  "data": {
    "data": {
      "answer": "11"
    },
    "metadata": {
      "created_time": "2020-08-24T19:02:12.08299Z",
      "deletion_time": "",
      "destroyed": false,
      "version": 2
    }
  },
  "warnings": null
}
And to only see the value of answer you could use the following:
➜  ~ vault kv get -format=json secret/key1 |jq -r .data.data.answer
11
Note: it always starts with ..
In case you only want to retrieve a specific version of a secret, use the following syntax:
➜  ~ vault kv get -version=1 secret/key1
====== Metadata ======
Key              Value
---              -----
created_time     2020-08-24T18:59:42.171723Z
deletion_time    n/a
destroyed        false
version          1

===== Data =====
Key       Value
---       -----
answer    10
Or combine the two previous examples as follows:
➜  ~ vault kv get -format=json -version=1 secret/key1 |jq -r .data.data.answer
10
C) Update a secret in a KV store:
Next, let’s update the value of the answer key to 11.
➜  ~ vault kv put secret/key1 answer=11
Key              Value
---              -----
created_time     2020-08-24T19:02:12.08299Z
deletion_time    n/a
destroyed        false
version          2
Let’s use the CLI to retrieve that value. Note here that the version is set to 2.
➜  ~ vault kv get secret/key1
====== Metadata ======
Key              Value
---              -----
created_time     2020-08-24T19:02:12.08299Z
deletion_time    n/a
destroyed        false
version          2

===== Data =====
Key       Value
---       -----
answer    11
Next an example of how to update a secret through CURL. Create a file called test.json (or whatever name) with the following contents.
{
  "data": {
        "answer":"350"
  }
}
Next, use CURL (note the PUT method) to update the value of our secret (previously the value was 300)
➜  Programming curl -H "X-Vault-Token: $VAULT_TOKEN" -H "Content-Type: application/json" -X PUT -d @test.json  $VAULT_ADDR/v1/secret/data/apikey
{"request_id":"6d00ff66-e7b1-b9a8-b2ba-2fcdfc3cffdc","lease_id":"","renewable":false,"lease_duration":0,"data":{"created_time":"2020-09-15T12:34:26.952968Z","deletion_time":"","destroyed":false,"version":2},"wrap_info":null,"warnings":null,"auth":null}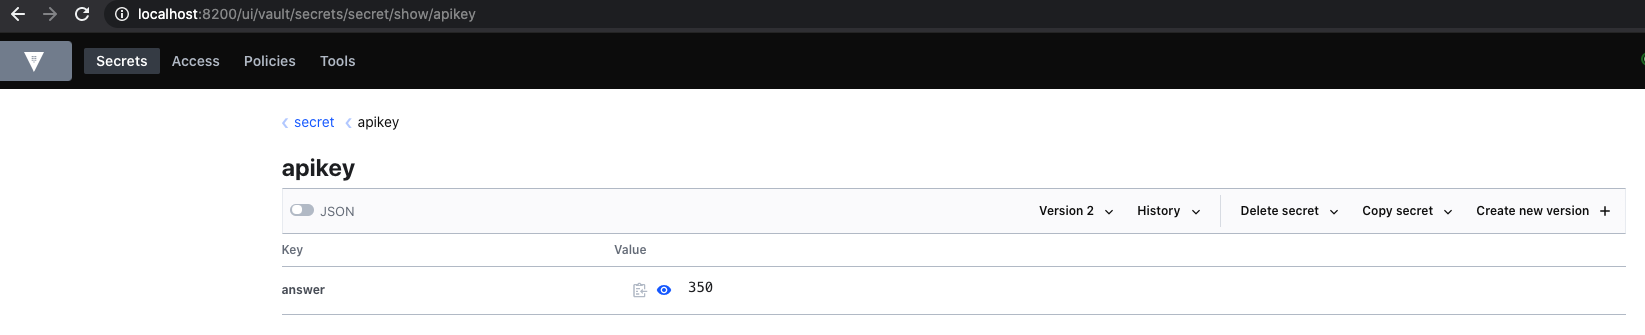
D) Delete a secret in a KV store
Next, let’s delete that value through the CLI.
➜  ~ vault kv delete secret/key1
Success! Data deleted (if it existed) at: secret/key1
Note that this operation will soft delete your last version. When we try to retrieve the key (that was just deleted), only the metadata remains.
➜  ~ vault kv get secret/key1
====== Metadata ======
Key              Value
---              -----
created_time     2020-08-24T19:02:12.08299Z
deletion_time    2020-08-24T19:19:32.682296Z
destroyed        false
version          2
As the delete only soft deletes the last version, it automatically means that the first version would still be available. Let’s check that:
➜  ~ vault kv get -version=1 secret/key1
====== Metadata ======
Key              Value
---              -----
created_time     2020-08-24T18:59:42.171723Z
deletion_time    n/a
destroyed        false
version          1

===== Data =====
Key       Value
---       -----
answer    10
If we wanted to recover the deleted version, we could do so as follows:
➜  ~ vault kv undelete -versions=2 secret/key1
Success! Data written to: secret/undelete/key1
Note that it’s -versions and not -version. Reason is that you could undelete multiple versions at the same time. If you softdeleted version 1 and 2, the command would be vault kv undelete -versions=1,2 secret/key1
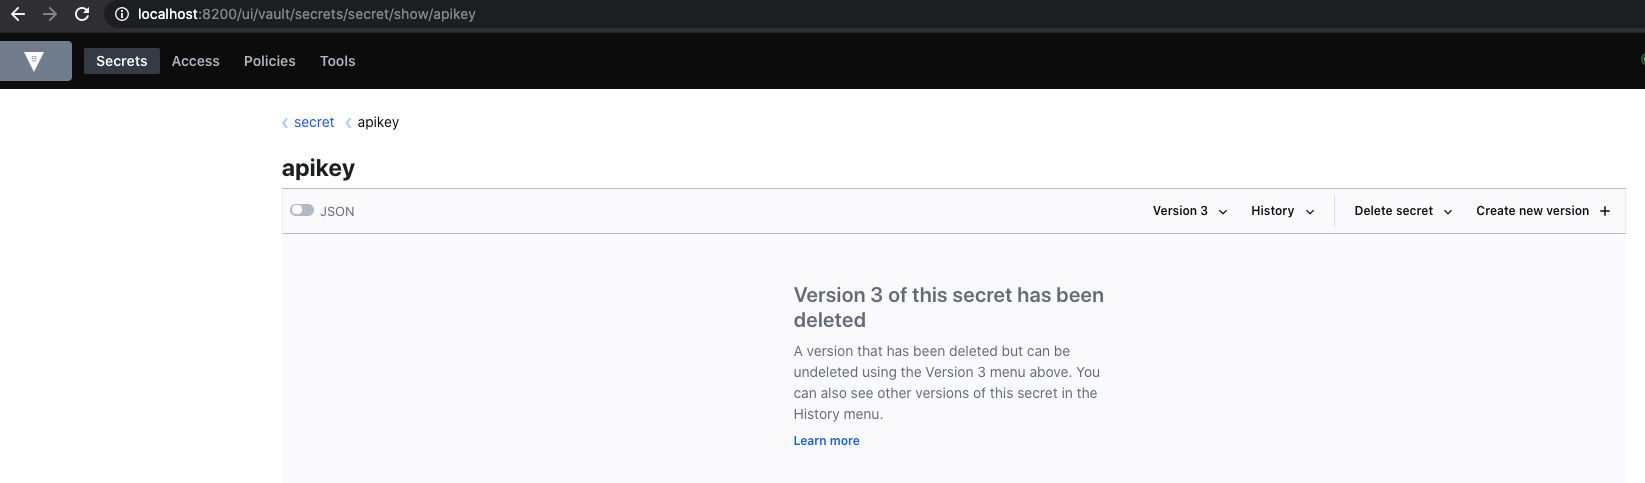
Again, it;s also possible to do it with CURL.
➜ Programming curl -H "X-Vault-Token: $VAULT_TOKEN" -H "Content-Type: application/json" -X DELETE $VAULT_ADDR/v1/secret/data/apikeyAnd let’s check the UI again:
E) Destroy a secret in a KV store
Let’s say we want to permanently remove the specified version of the provided key. We can do this through the destroy command.
➜  ~ vault kv destroy -versions=1,2 secret/key1
Success! Data written to: secret/destroy/key1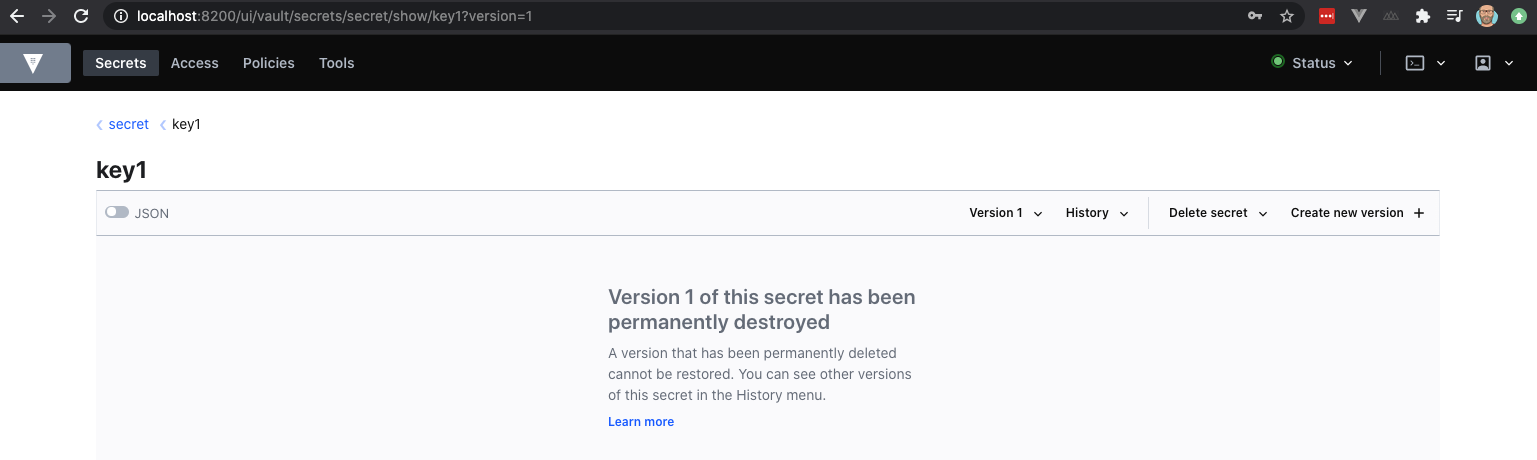
Note again that the metadata about the secret will remain available.
➜  ~ vault kv get -version=1 secret/key1
====== Metadata ======
Key              Value
---              -----
created_time     2020-08-24T18:59:42.171723Z
deletion_time    n/a
destroyed        true
version          1

➜  ~ vault kv get -version=2 secret/key1
====== Metadata ======
Key              Value
---              -----
created_time     2020-08-24T19:02:12.08299Z
deletion_time    n/a
destroyed        true
version          2
F) Delete the metadata
To get rid of the metadata as well, you can use the metadata delete command:
➜  ~ vault kv metadata delete secret/key1
Success! Data deleted (if it existed) at: secret/metadata/key1
You will see now that all (meta)data got deleted:
➜  ~ vault kv get secret/key1
No value found at secret/data/key1
Secret Engines
Next, let’s have a look at secret engines. Secrets engines are components which store, generate, or encrypt data. They are always enabled at a path within Vault.
A) Enable secrets engine
In the following snippet, we will enable a KV secret engine and mount it to the path ‘wim-1’.
➜  ~ vault secrets enable -path=wim-1 kv
Success! Enabled the kv secrets engine at: wim-1/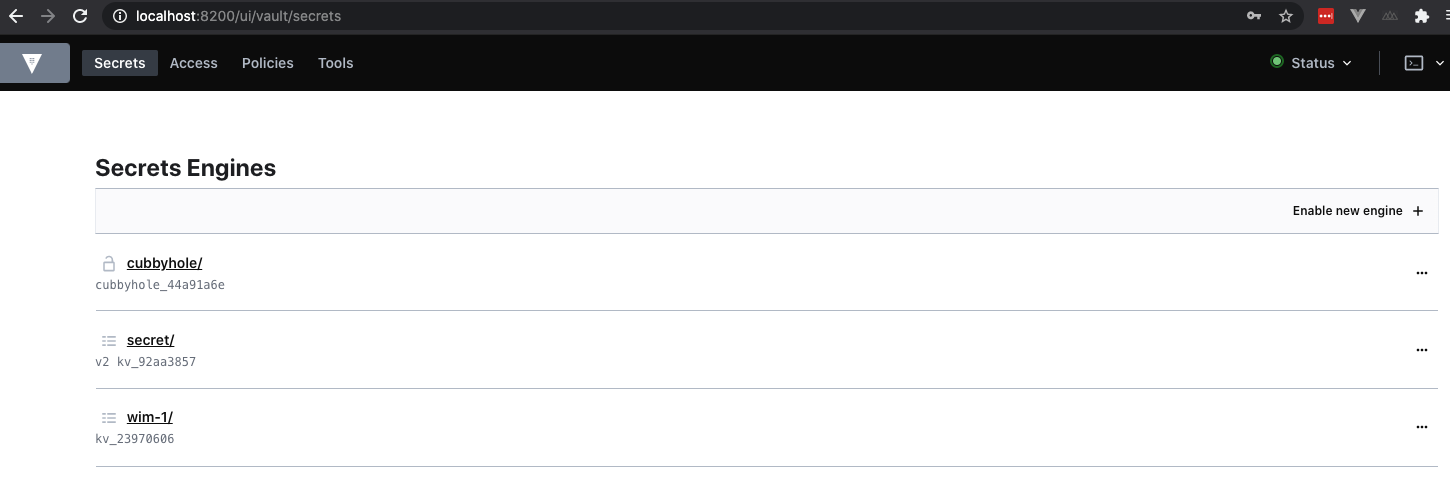
We can also enable a secrets engine through the API
➜ ~ curl --header "X-Vault-Token: $VAULT_TOKEN" --request POST --data @wim-2.json $VAULT_ADDR/v1/sys/mounts/wim-2You see we reference a json file. That could look as follows:
{
	"type": "kv",
	"options": {
		"version": "1"
	}
}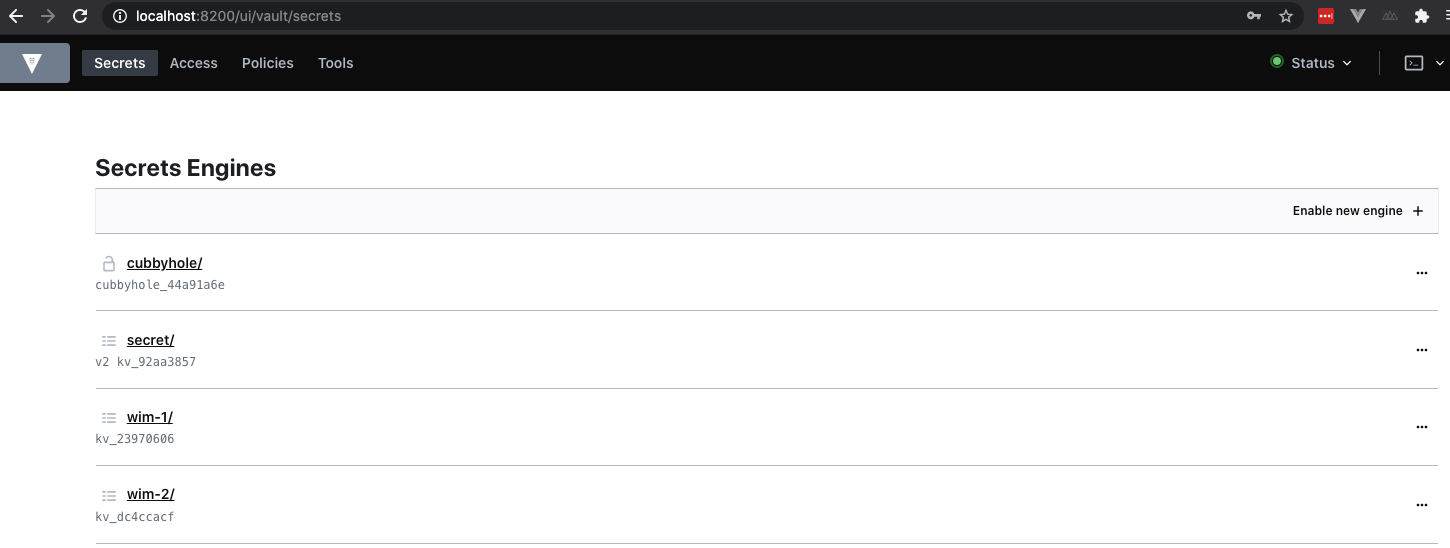
Rather than verifying each time through the UI, we could also use the CLI for that. Below command will provide a list of all secrets engines
➜  ~ vault secrets list
Path          Type         Accessor              Description
----          ----         --------              -----------
cubbyhole/    cubbyhole    cubbyhole_44a91a6e    per-token private secret storage
identity/     identity     identity_5bd975b3     identity store
secret/       kv           kv_92aa3857           key/value secret storage
sys/          system       system_4bf3a06e       system endpoints used for control, policy and debugging
wim-1/        kv           kv_23970606           n/a
wim-2/        kv           kv_dc4ccacf           n/a
➜  ~
Or through the API
➜  ~ curl --header "X-Vault-Token: $VAULT_TOKEN" $VAULT_ADDR/v1/sys/mounts | jq

{
  "sys/": {
    "accessor": "system_4bf3a06e",
    "config": {
      "default_lease_ttl": 0,
      "force_no_cache": false,
      "max_lease_ttl": 0,
      "passthrough_request_headers": [
        "Accept"
      ]
    },
    "description": "system endpoints used for control, policy and debugging",
    "external_entropy_access": false,
    "local": false,
    "options": null,
    "seal_wrap": false,
    "type": "system",
    "uuid": "998e1a66-c8f6-8d20-44fb-146fdd5d12ee"
  },
  "identity/": {
    "accessor": "identity_5bd975b3",
    "config": {
      "default_lease_ttl": 0,
      "force_no_cache": false,
      "max_lease_ttl": 0
    },
    "description": "identity store",
    "external_entropy_access": false,
    "local": false,
    "options": null,
    "seal_wrap": false,
    "type": "identity",
    "uuid": "bef198a5-b3ef-2613-d625-77eeaefb7066"
  },
  "cubbyhole/": {
    "accessor": "cubbyhole_44a91a6e",
And obviously we can write secrets to these new secret engines:
➜  ~ vault kv put wim-1/test1 answer1=10 answer2=20
Success! Data written to: wim-1/test1
And we can read it:
➜  ~ vault kv get wim-1/test1
===== Data =====
Key        Value
---        -----
answer1    10
answer2    20
However there is also an alternative way to read and write data.
In order to write secrets, you could use the vault write CLI command.
➜  ~ vault write wim-1/test1 answer3=30
Success! Data written to: wim-1/test1
However when we now read back the secret as follows:
➜  ~ vault read wim-1/test1
Key                 Value
---                 -----
refresh_interval    768h
answer3             30
We notice that the secrets answer1 and answer2 are gone. Reason is that there are two Key Value Secrets engines, namely version 1 and version 2. In version 1, there is no versioning at all, so the last key you write is the one that is stored. In other words, it overwrites all the secrets, so you ought to be careful here. In our case, the default version is 1 which explains this behaviour.
Therefore, let’s upgrade it to version 2, which will allow us to enter more secrets without overwriting previous secrets.
First, let’s check the current version:
➜  ~ vault secrets list -detailed
wim-1/        kv           kv_23970606           system         system     false             replicated     false        false                      map[]             n/a                                                        9edc1b9a-a38b-f155-3b8b-15ac9b8c80bb
Next, let’s change it to version 2:
➜  ~ vault kv enable-versioning wim-1
Success! Tuned the secrets engine at: wim-1/
And let’s re-check the version again
wim-1/ kv kv_23970606 system system false replicated false false map[version:2] n/a 9edc1b9a-a38b-f155-3b8b-15ac9b8c80bbNote: in version 2 the CLI commands vault read and vault write do not seem to work, they only work in version 1
B) Updating secrets engine
We can also rename a secrets engine through the move command. The below snippet is renaming the wim-1 path to wim-1-updated path.
➜  ~ vault secrets move wim-1 wim-1-updated
Success! Moved secrets engine wim-1/ to: wim-1-updated/

➜  ~ vault secrets list
Path              Type         Accessor              Description
----              ----         --------              -----------
cubbyhole/        cubbyhole    cubbyhole_44a91a6e    per-token private secret storage
identity/         identity     identity_5bd975b3     identity store
secret/           kv           kv_92aa3857           key/value secret storage
sys/              system       system_4bf3a06e       system endpoints used for control, policy and debugging
wim-1-updated/    kv           kv_23970606           n/a
wim-2/            kv           kv_dc4ccacf           n/a
C) Disabling a secrets engine
Next, let’s disable a secret engine through the CLI.
➜  blog-hugo-netlify git:(master) ✗ vault secrets disable wim-1-updated
Success! Disabled the secrets engine (if it existed) at: wim-1-updated/
Note that when a secrets engine is disabled, it will revoke/delete all the keys.
Via CURL
Update
or
➜  Programming curl -H "X-Vault-Token: $VAULT_TOKEN" -H "Content-Type: application/json" -X PUT -d '{"data":{"answer":"400"}}' $VAULT_ADDR/v1/secret/data/apikey
{"request_id":"0176158e-1c1d-22cd-8e52-8412e17218d5","lease_id":"","renewable":false,"lease_duration":0,"data":{"created_time":"2020-09-15T12:35:17.763126Z","deletion_time":"","destroyed":false,"version":3},"wrap_info":null,"warnings":null,"auth":null}